
You are now subscribed
Your newsletter sign-up was successful
Want to add more newsletters?

Five times a week
CreativeBloq
Sign up to Creative Bloq's daily newsletter, which brings you the latest news and inspiration from the worlds of art, design and technology.

Once a week
By Design
Sign up to Creative Bloq's daily newsletter, which brings you the latest news and inspiration from the worlds of art, design and technology.

Once a week
State of the Art
Sign up to Creative Bloq's daily newsletter, which brings you the latest news and inspiration from the worlds of art, design and technology.

Seasonal (around events)
Brand Impact Awards
Sign up to Creative Bloq's daily newsletter, which brings you the latest news and inspiration from the worlds of art, design and technology.
You’ve probably seen the tips floating around online about making your own stylus for an iPad, Android tablet, or other touchscreen device, and it really is quick and simple. The best part? You don’t need any specialist tools or expensive accessories. With a few common household items, you can create a functional DIY stylus that works for sketching, note-taking, or just navigating your tablet.
Just bear in mind that your handmade stylus won't offer anything like the experience provided by an Apple Pencil (or the best Apple Pencil alternatives). It will do the job, though. At least for notetaking. If you have one of the best iPads for drawing, chances are you want an Apple Pencil Pro, but making your own DIY stylus remains fun and eye-opening.
5th January 2026: We have added and improved the general FAQ section and added a new troubleshooting section.
Watch the video below or follow the steps below to make your own stylus.
Make your own stylus using a cotton bud/Q-tip
01. Gather your materials
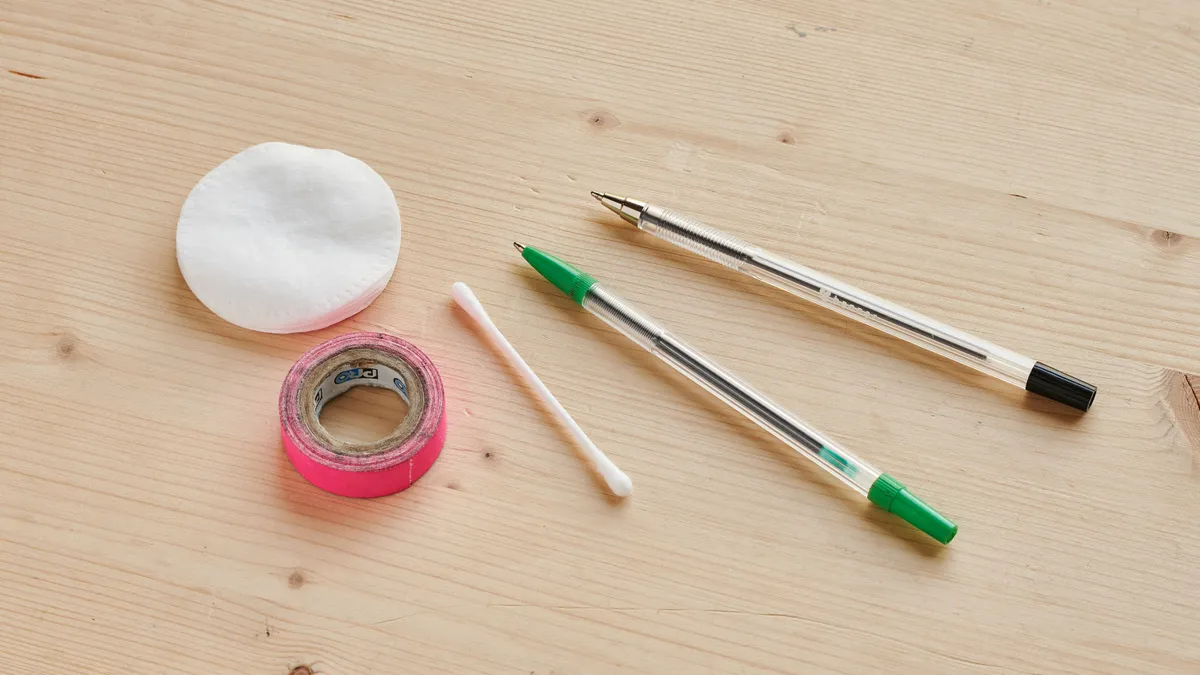
To make your own stylus, all you need is a few household items you might already have, or that you should be able to find at a nearby shop. You'll need a pen (a ballpoint or biro pen will do fine; it just needs to have a removable ink cartridge), a cotton bud, a Q-tip or cotton wool, tin or aluminium foil, and some tape. You'll also need some scissors or a craft knife. And that's it.
02. Prepare your materials

Begin by removing the ink cartridge from your pen, leaving a hole where the pen nib would be. Then take your cotton bud and, with a pair of scissors or a craft knife, cut it diagonally about 100mm from the end of one of the buds. Make sure you do this carefully, as it can be tricky!
03. Insert the cotton bud tip into pen

With the ink cartridge now removed from the pen, push the cotton bud into the tip where the nib normally sits. This can be fiddifly, so you may need to play around with the size of the remaining stem of the bud.
04. Reassemble the pen and wrap in foil

Once secure, screw the pen back together. Wrap the tin or aluminium foil around the pen, making sure the foil touches the cotton bud tip. Using some tape, securely wrap it around the foil for a secure fit.
05. Dampen the tip of your DIY stylus
Now you need to dampen the tip a little to make the pen conductive. Dip the tip in water and squeeze off the excess. You only need the tip to be damp, not soggy, and you don't want to get water on your tablet. That's all there is to it. You now have your very own homemade stylus! If it stops working and is dry to the touch, you can try dampening it again.
Make your own stylus using cotton wool
01. Dismantle your pen and cover the casing in foil

Start by dismantling your pen. If your pen's casing isn’t made of metal, cover it in tin foil and secure it with tape.
Tear off a small piece of cotton wool and feed it through the pen nib hole. With the cotton wool poking through the hole, push the ink cartridge back into the tip of the pen – this will help to secure the cotton wool.
You may need to experiment with the amount of cotton wool you’re using – too much and you won’t be able to push the nib back in, too little and the pen nib won’t be covered and will break through the cotton wool.
02. Reassemble the pen

Reassemble the pen by screwing the top back on, then the bottom. It’s better to have the tip of the pen fully secure and leave a gap at the bottom; the cotton wool will cause a bit of an obstruction. You can always trim the cartridge if it's poking out of the bottom, and the pen won't screw back together.
Shape the cotton wool nib with scissors, dampen the tip with a small amount of water (not too much), and start using your very own stylus. If it stops working at any point and the tip is dry, you can dampen it again to revive it.
Make your own stylus: frequent questions
What are the three types of stylus?
The three types of stylus are captive, echo, and active styluses.
Captive (or passive) styluses are the most basic form of stylus. It replaces your finger by blocking light transmission or altering the electrostatic field of your touchscreen. These are the most common options and are often fairly affordable, but they lack the accuracy of more refined options.
Echo styluses use active electrostatic technology (AES), where the stylus acts as a transmitter to generate an electric field. The precision of echo stylus pens is certainly more intuitive than that of captive stylus pens, making them great for illustration and handwriting.
The final and most advanced stylus option is the active stylus. These styluses have an internal communication system that connects to the device, providing superior connectivity compared to other options. Because of this, active styluses are often limited to specific devices, but with advanced features such as superior accuracy and touch sensitivity, they're a great option for creative professionals.
What random things work as a stylus?
It's important to note that most touch screens use capacitive touchscreens that rely on a person's finger to create conductivity. This means that not every household item will be as effective as a stylus pen.
As a rule of thumb, it's best to use a real stylus or one of our DIY options to keep your tablet in good condition. If you're in a pinch, you can use metal objects like a thumbtack, the head of a screw, or even a key, but be warned, these can cause scratches and damage to your screen.
Will using a homemade stylus damage my tablet?
Possibly. We were able to make a homemade stylus and use it on an iPad with no problems. However, do bear in mind that while an iPad display is pretty darn solid, cotton wool can easily pick up pieces of grit, and it's not impossible that this could cause small scratches. For the ultimate peace of mind, we recommend buying a stylus.
Will a homemade stylus work on any touchscreen?
For basic drawing, note-taking, or navigating your device, a simple conductive DIY stylus can work on most capacitive screens. These detect touch through the electrical conductivity of your finger, so a homemade stylus can work if it uses materials like aluminum foil, cotton buds, or conductive foam.
Make your own stylus: trouble shooting tips
Nothing happens when you touch the screen
Check your materials. Conductive elements like foil, graphite, or damp cotton are essential, and yes, your hand needs to be touching the stylus; capacitive screens rely on your body to complete the circuit.
Cursor or lines jump around
An uneven tip is usually the culprit. Trim or compress the foil, or reshape the cotton so it glides smoothly. Too soft? Try a firmer base.
It works, but not consistently
Dry cotton or foam won’t cut it. A little moisture helps conductivity. Keep your fingers dry enough so the circuit isn’t shorted.
Stylus feels laggy or sluggish
Heavy, bulky tips drag the cursor. Stick to lightweight materials and trim away loose fibres for smoother movement.
Works in some apps, fails in others
Remember, this is a basic stylus. Apps that rely on pressure sensitivity or tilt won’t respond, so stick to simple sketching, note-taking, or navigation.
Did this technique work for you? Share your homemade stylus creations with us via Twitter or Facebook.
If you're looking to upgrade your creative tech, check out our collection of the best beginners' drawing tablets or take a look at the best tablets with a stylus pen for drawing and note-taking. Want to leave the stylus making to the experts? see today's best deals below.

You must confirm your public display name before commenting
Please logout and then login again, you will then be prompted to enter your display name.
