---
title: Overview · Cloudflare R2 docs
description: Cloudflare R2 is a cost-effective, scalable object storage solution
for cloud-native apps, web content, and data lakes without egress fees.
lastUpdated: 2025-08-18T14:27:42.000Z
chatbotDeprioritize: false
source_url:
html: https://developers.cloudflare.com/r2/
md: https://developers.cloudflare.com/r2/index.md
---
Object storage for all your data.
Cloudflare R2 Storage allows developers to store large amounts of unstructured data without the costly egress bandwidth fees associated with typical cloud storage services.
You can use R2 for multiple scenarios, including but not limited to:
* Storage for cloud-native applications
* Cloud storage for web content
* Storage for podcast episodes
* Data lakes (analytics and big data)
* Cloud storage output for large batch processes, such as machine learning model artifacts or datasets
[Get started](https://developers.cloudflare.com/r2/get-started/)
[Browse the examples](https://developers.cloudflare.com/r2/examples/)
***
## Features
### Location Hints
Location Hints are optional parameters you can provide during bucket creation to indicate the primary geographical location you expect data will be accessed from.
[Use Location Hints](https://developers.cloudflare.com/r2/reference/data-location/#location-hints)
### CORS
Configure CORS to interact with objects in your bucket and configure policies on your bucket.
[Use CORS](https://developers.cloudflare.com/r2/buckets/cors/)
### Public buckets
Public buckets expose the contents of your R2 bucket directly to the Internet.
[Use Public buckets](https://developers.cloudflare.com/r2/buckets/public-buckets/)
### Bucket scoped tokens
Create bucket scoped tokens for granular control over who can access your data.
[Use Bucket scoped tokens](https://developers.cloudflare.com/r2/api/tokens/)
***
## Related products
**[Workers](https://developers.cloudflare.com/workers/)**
A [serverless](https://www.cloudflare.com/learning/serverless/what-is-serverless/) execution environment that allows you to create entirely new applications or augment existing ones without configuring or maintaining infrastructure.
**[Stream](https://developers.cloudflare.com/stream/)**
Upload, store, encode, and deliver live and on-demand video with one API, without configuring or maintaining infrastructure.
**[Images](https://developers.cloudflare.com/images/)**
A suite of products tailored to your image-processing needs.
***
## More resources
[Pricing](https://developers.cloudflare.com/r2/pricing)
Understand pricing for free and paid tier rates.
[Discord](https://discord.cloudflare.com)
Ask questions, show off what you are building, and discuss the platform with other developers.
[Twitter](https://x.com/cloudflaredev)
Learn about product announcements, new tutorials, and what is new in Cloudflare Workers.
---
title: 404 - Page Not Found · Cloudflare R2 docs
chatbotDeprioritize: false
source_url:
html: https://developers.cloudflare.com/r2/404/
md: https://developers.cloudflare.com/r2/404/index.md
---
# 404
Check the URL, try using our [search](https://developers.cloudflare.com/search/) or try our LLM-friendly [llms.txt directory](https://developers.cloudflare.com/llms.txt).
---
title: API · Cloudflare R2 docs
lastUpdated: 2024-08-30T16:09:27.000Z
chatbotDeprioritize: true
source_url:
html: https://developers.cloudflare.com/r2/api/
md: https://developers.cloudflare.com/r2/api/index.md
---
* [Authentication](https://developers.cloudflare.com/r2/api/tokens/)
* [Workers API](https://developers.cloudflare.com/r2/api/workers/)
* [S3](https://developers.cloudflare.com/r2/api/s3/)
* [Error codes](https://developers.cloudflare.com/r2/api/error-codes/)
---
title: R2 Data Catalog · Cloudflare R2 docs
description: A managed Apache Iceberg data catalog built directly into R2 buckets.
lastUpdated: 2026-02-02T10:17:46.000Z
chatbotDeprioritize: false
source_url:
html: https://developers.cloudflare.com/r2/data-catalog/
md: https://developers.cloudflare.com/r2/data-catalog/index.md
---
Note
R2 Data Catalog is in **public beta**, and any developer with an [R2 subscription](https://developers.cloudflare.com/r2/pricing/) can start using it. Currently, outside of standard R2 storage and operations, you will not be billed for your use of R2 Data Catalog.
R2 Data Catalog is a managed [Apache Iceberg](https://iceberg.apache.org/) data catalog built directly into your R2 bucket. It exposes a standard Iceberg REST catalog interface, so you can connect the engines you already use, like [Spark](https://developers.cloudflare.com/r2/data-catalog/config-examples/spark-scala/), [Snowflake](https://developers.cloudflare.com/r2/data-catalog/config-examples/snowflake/), and [PyIceberg](https://developers.cloudflare.com/r2/data-catalog/config-examples/pyiceberg/).
R2 Data Catalog makes it easy to turn an R2 bucket into a data warehouse or lakehouse for a variety of analytical workloads including log analytics, business intelligence, and data pipelines. R2's zero-egress fee model means that data users and consumers can access and analyze data from different clouds, data platforms, or regions without incurring transfer costs.
To get started with R2 Data Catalog, refer to the [R2 Data Catalog: Getting started](https://developers.cloudflare.com/r2/data-catalog/get-started/).
## What is Apache Iceberg?
[Apache Iceberg](https://iceberg.apache.org/) is an open table format designed to handle large-scale analytics datasets stored in object storage. Key features include:
* ACID transactions - Ensures reliable, concurrent reads and writes with full data integrity.
* Optimized metadata - Avoids costly full table scans by using indexed metadata for faster queries.
* Full schema evolution - Allows adding, renaming, and deleting columns without rewriting data.
Iceberg is already [widely supported](https://iceberg.apache.org/vendors/) by engines like Apache Spark, Trino, Snowflake, DuckDB, and ClickHouse, with a fast-growing community behind it.
## Why do you need a data catalog?
Although the Iceberg data and metadata files themselves live directly in object storage (like [R2](https://developers.cloudflare.com/r2/)), the list of tables and pointers to the current metadata need to be tracked centrally by a data catalog.
Think of a data catalog as a library's index system. While books (your data) are physically distributed across shelves (object storage), the index provides a single source of truth about what books exist, their locations, and their latest editions. Without this index, readers (query engines) would waste time searching for books, might access outdated versions, or could accidentally shelve new books in ways that make them unfindable.
Similarly, data catalogs ensure consistent, coordinated access, which allows multiple query engines to safely read from and write to the same tables without conflicts or data corruption.
## Learn more
[Get started ](https://developers.cloudflare.com/r2/data-catalog/get-started/)Learn how to enable the R2 Data Catalog on your bucket, load sample data, and run your first query.
[Managing catalogs ](https://developers.cloudflare.com/r2/data-catalog/manage-catalogs/)Enable or disable R2 Data Catalog on your bucket, retrieve configuration details, and authenticate your Iceberg engine.
[Connect to Iceberg engines ](https://developers.cloudflare.com/r2/data-catalog/config-examples/)Find detailed setup instructions for Apache Spark and other common query engines.
---
title: Data migration · Cloudflare R2 docs
description: Quickly and easily migrate data from other cloud providers to R2.
Explore each option further by navigating to their respective documentation
page.
lastUpdated: 2025-05-15T13:16:23.000Z
chatbotDeprioritize: false
source_url:
html: https://developers.cloudflare.com/r2/data-migration/
md: https://developers.cloudflare.com/r2/data-migration/index.md
---
Quickly and easily migrate data from other cloud providers to R2. Explore each option further by navigating to their respective documentation page.
| Name | Description | When to use |
| - | - | - |
| [Super Slurper](https://developers.cloudflare.com/r2/data-migration/super-slurper/) | Quickly migrate large amounts of data from other cloud providers to R2. | * For one-time, comprehensive transfers. |
| [Sippy](https://developers.cloudflare.com/r2/data-migration/sippy/) | Incremental data migration, populating your R2 bucket as objects are requested. | - For gradual migration that avoids upfront egress fees.
- To start serving frequently accessed objects from R2 without a full migration. |
For information on how to leverage these tools effectively, refer to [Migration Strategies](https://developers.cloudflare.com/r2/data-migration/migration-strategies/)
---
title: Buckets · Cloudflare R2 docs
description: With object storage, all of your objects are stored in buckets.
Buckets do not contain folders that group the individual files, but instead,
buckets have a flat structure which simplifies the way you access and retrieve
the objects in your bucket.
lastUpdated: 2024-08-13T19:56:56.000Z
chatbotDeprioritize: false
source_url:
html: https://developers.cloudflare.com/r2/buckets/
md: https://developers.cloudflare.com/r2/buckets/index.md
---
With object storage, all of your objects are stored in buckets. Buckets do not contain folders that group the individual files, but instead, buckets have a flat structure which simplifies the way you access and retrieve the objects in your bucket.
Learn more about bucket level operations from the items below.
* [Bucket locks](https://developers.cloudflare.com/r2/buckets/bucket-locks/)
* [Create new buckets](https://developers.cloudflare.com/r2/buckets/create-buckets/)
* [Configure CORS](https://developers.cloudflare.com/r2/buckets/cors/)
* [Event notifications](https://developers.cloudflare.com/r2/buckets/event-notifications/)
* [Local uploads](https://developers.cloudflare.com/r2/buckets/local-uploads/)
* [Object lifecycles](https://developers.cloudflare.com/r2/buckets/object-lifecycles/)
* [Public buckets](https://developers.cloudflare.com/r2/buckets/public-buckets/)
* [Storage classes](https://developers.cloudflare.com/r2/buckets/storage-classes/)
---
title: Demos and architectures · Cloudflare R2 docs
description: Explore Cloudflare R2 demos and reference architectures for
fullstack applications, storage, and AI, with examples and use cases.
lastUpdated: 2025-10-30T16:19:51.000Z
chatbotDeprioritize: false
source_url:
html: https://developers.cloudflare.com/r2/demos/
md: https://developers.cloudflare.com/r2/demos/index.md
---
Learn how you can use R2 within your existing application and architecture.
## Demos
Explore the following demo applications for R2.
* [Jobs At Conf:](https://github.com/harshil1712/jobs-at-conf-demo) A job lisiting website to add jobs you find at in-person conferences. Built with Cloudflare Pages, R2, D1, Queues, and Workers AI.
* [Upload Image to R2 starter:](https://github.com/harshil1712/nextjs-r2-demo) Upload images to Cloudflare R2 from a Next.js application.
* [DMARC Email Worker:](https://github.com/cloudflare/dmarc-email-worker) A Cloudflare worker script to process incoming DMARC reports, store them, and produce analytics.
## Reference architectures
Explore the following reference architectures that use R2:
[Fullstack applications](https://developers.cloudflare.com/reference-architecture/diagrams/serverless/fullstack-application/)
[A practical example of how these services come together in a real fullstack application architecture.](https://developers.cloudflare.com/reference-architecture/diagrams/serverless/fullstack-application/)
[Storing user generated content](https://developers.cloudflare.com/reference-architecture/diagrams/storage/storing-user-generated-content/)
[Store user-generated content in R2 for fast, secure, and cost-effective architecture.](https://developers.cloudflare.com/reference-architecture/diagrams/storage/storing-user-generated-content/)
[Optimizing and securing connected transportation systems](https://developers.cloudflare.com/reference-architecture/diagrams/iot/optimizing-and-securing-connected-transportation-systems/)
[This diagram showcases Cloudflare components optimizing connected transportation systems. It illustrates how their technologies minimize latency, ensure reliability, and strengthen security for critical data flow.](https://developers.cloudflare.com/reference-architecture/diagrams/iot/optimizing-and-securing-connected-transportation-systems/)
[Ingesting BigQuery Data into Workers AI](https://developers.cloudflare.com/reference-architecture/diagrams/ai/bigquery-workers-ai/)
[You can connect a Cloudflare Worker to get data from Google BigQuery and pass it to Workers AI, to run AI Models, powered by serverless GPUs.](https://developers.cloudflare.com/reference-architecture/diagrams/ai/bigquery-workers-ai/)
[Event notifications for storage](https://developers.cloudflare.com/reference-architecture/diagrams/storage/event-notifications-for-storage/)
[Use Cloudflare Workers or an external service to monitor for notifications about data changes and then handle them appropriately.](https://developers.cloudflare.com/reference-architecture/diagrams/storage/event-notifications-for-storage/)
[On-demand Object Storage Data Migration](https://developers.cloudflare.com/reference-architecture/diagrams/storage/on-demand-object-storage-migration/)
[Use Cloudflare migration tools to migrate data between cloud object storage providers.](https://developers.cloudflare.com/reference-architecture/diagrams/storage/on-demand-object-storage-migration/)
[Optimizing image delivery with Cloudflare image resizing and R2](https://developers.cloudflare.com/reference-architecture/diagrams/content-delivery/optimizing-image-delivery-with-cloudflare-image-resizing-and-r2/)
[Learn how to get a scalable, high-performance solution to optimizing image delivery.](https://developers.cloudflare.com/reference-architecture/diagrams/content-delivery/optimizing-image-delivery-with-cloudflare-image-resizing-and-r2/)
[Composable AI architecture](https://developers.cloudflare.com/reference-architecture/diagrams/ai/ai-composable/)
[The architecture diagram illustrates how AI applications can be built end-to-end on Cloudflare, or single services can be integrated with external infrastructure and services.](https://developers.cloudflare.com/reference-architecture/diagrams/ai/ai-composable/)
[Serverless ETL pipelines](https://developers.cloudflare.com/reference-architecture/diagrams/serverless/serverless-etl/)
[Cloudflare enables fully serverless ETL pipelines, significantly reducing complexity, accelerating time to production, and lowering overall costs.](https://developers.cloudflare.com/reference-architecture/diagrams/serverless/serverless-etl/)
[Egress-free object storage in multi-cloud setups](https://developers.cloudflare.com/reference-architecture/diagrams/storage/egress-free-storage-multi-cloud/)
[Learn how to use R2 to get egress-free object storage in multi-cloud setups.](https://developers.cloudflare.com/reference-architecture/diagrams/storage/egress-free-storage-multi-cloud/)
[Automatic captioning for video uploads](https://developers.cloudflare.com/reference-architecture/diagrams/ai/ai-video-caption/)
[By integrating automatic speech recognition technology into video platforms, content creators, publishers, and distributors can reach a broader audience, including individuals with hearing impairments or those who prefer to consume content in different languages.](https://developers.cloudflare.com/reference-architecture/diagrams/ai/ai-video-caption/)
[Serverless image content management](https://developers.cloudflare.com/reference-architecture/diagrams/serverless/serverless-image-content-management/)
[Leverage various components of Cloudflare's ecosystem to construct a scalable image management solution](https://developers.cloudflare.com/reference-architecture/diagrams/serverless/serverless-image-content-management/)
---
title: Examples · Cloudflare R2 docs
description: Explore the following examples of how to use SDKs and other tools with R2.
lastUpdated: 2025-08-18T14:27:42.000Z
chatbotDeprioritize: false
source_url:
html: https://developers.cloudflare.com/r2/examples/
md: https://developers.cloudflare.com/r2/examples/index.md
---
Explore the following examples of how to use SDKs and other tools with R2.
* [Authenticate against R2 API using auth tokens](https://developers.cloudflare.com/r2/examples/authenticate-r2-auth-tokens/)
* [Use the Cache API](https://developers.cloudflare.com/r2/examples/cache-api/)
* [Multi-cloud setup](https://developers.cloudflare.com/reference-architecture/diagrams/storage/egress-free-storage-multi-cloud/)
* [Rclone](https://developers.cloudflare.com/r2/examples/rclone/)
* [S3 SDKs](https://developers.cloudflare.com/r2/examples/aws/)
* [Terraform](https://developers.cloudflare.com/r2/examples/terraform/)
* [Terraform (AWS)](https://developers.cloudflare.com/r2/examples/terraform-aws/)
* [Use SSE-C](https://developers.cloudflare.com/r2/examples/ssec/)
---
title: Get started · Cloudflare R2 docs
description: Create your first R2 bucket and store objects using the dashboard,
S3-compatible tools, or Workers.
lastUpdated: 2026-01-26T20:24:24.000Z
chatbotDeprioritize: false
source_url:
html: https://developers.cloudflare.com/r2/get-started/
md: https://developers.cloudflare.com/r2/get-started/index.md
---
Cloudflare R2 Storage allows developers to store large amounts of unstructured data without the costly egress bandwidth fees associated with typical cloud storage services.
## Before you begin
You need a Cloudflare account with an R2 subscription. If you do not have one:
1. Go to the [Cloudflare Dashboard](https://dash.cloudflare.com/).
2. Select **Storage & databases > R2 > Overview**
3. Complete the checkout flow to add an R2 subscription to your account.
R2 is free to get started with included free monthly usage. You are billed for your usage on a monthly basis. Refer to [Pricing](https://developers.cloudflare.com/r2/pricing/) for details.
[Go to **Overview**](https://dash.cloudflare.com/?to=/:account/r2/overview)
## Choose how to access R2
R2 supports multiple access methods, so you can choose the one that fits your use case best:
| Method | Use when |
| - | - |
| [Workers API](https://developers.cloudflare.com/r2/get-started/workers-api/) | You are building an application on Cloudflare Workers that needs to read or write from R2 |
| [S3](https://developers.cloudflare.com/r2/get-started/s3/) | You want to use S3-compatible SDKs to interact with R2 in your existing applications |
| [CLI tools](https://developers.cloudflare.com/r2/get-started/cli/) | You want to upload, download, or manage objects from your terminal |
| [Dashboard](https://dash.cloudflare.com/?to=/:account/r2/overview) | You want to quickly view and manage buckets and objects in the browser |
## Next steps
[Workers API ](https://developers.cloudflare.com/r2/get-started/workers-api/)Use R2 from Cloudflare Workers.
[S3 ](https://developers.cloudflare.com/r2/get-started/s3/)Use R2 with S3-compatible SDKs.
[CLI ](https://developers.cloudflare.com/r2/get-started/cli/)Use R2 from the command line.
---
title: How R2 works · Cloudflare R2 docs
description: Find out how R2 works.
lastUpdated: 2026-02-03T04:13:50.000Z
chatbotDeprioritize: false
source_url:
html: https://developers.cloudflare.com/r2/how-r2-works/
md: https://developers.cloudflare.com/r2/how-r2-works/index.md
---
Cloudflare R2 is an S3-compatible object storage service with no egress fees, built on Cloudflare's global network. It is [strongly consistent](https://developers.cloudflare.com/r2/reference/consistency/) and designed for high [data durability](https://developers.cloudflare.com/r2/reference/durability/).
R2 is ideal for storing and serving unstructured data that needs to be accessed frequently over the internet, without incurring egress fees. It's a good fit for workloads like serving web assets, training AI models, and managing user-generated content.
## Architecture
R2's architecture is composed of multiple components:
* **R2 Gateway:** The entry point for all API requests that handles authentication and routing logic. This service is deployed across Cloudflare's global network via [Cloudflare Workers](https://developers.cloudflare.com/workers/).
* **Metadata Service:** A distributed layer built on [Durable Objects](https://developers.cloudflare.com/durable-objects/) used to store and manage object metadata (e.g. object key, checksum) to ensure strong consistency of the object across the storage system. It includes a built-in cache layer to speed up access to metadata.
* **Tiered Read Cache:** A caching layer that sits in front of the Distributed Storage Infrastructure that speeds up object reads by using [Cloudflare Tiered Cache](https://developers.cloudflare.com/cache/how-to/tiered-cache/) to serve data closer to the client.
* **Distributed Storage Infrastructure:** The underlying infrastructure that persistently stores encrypted object data.
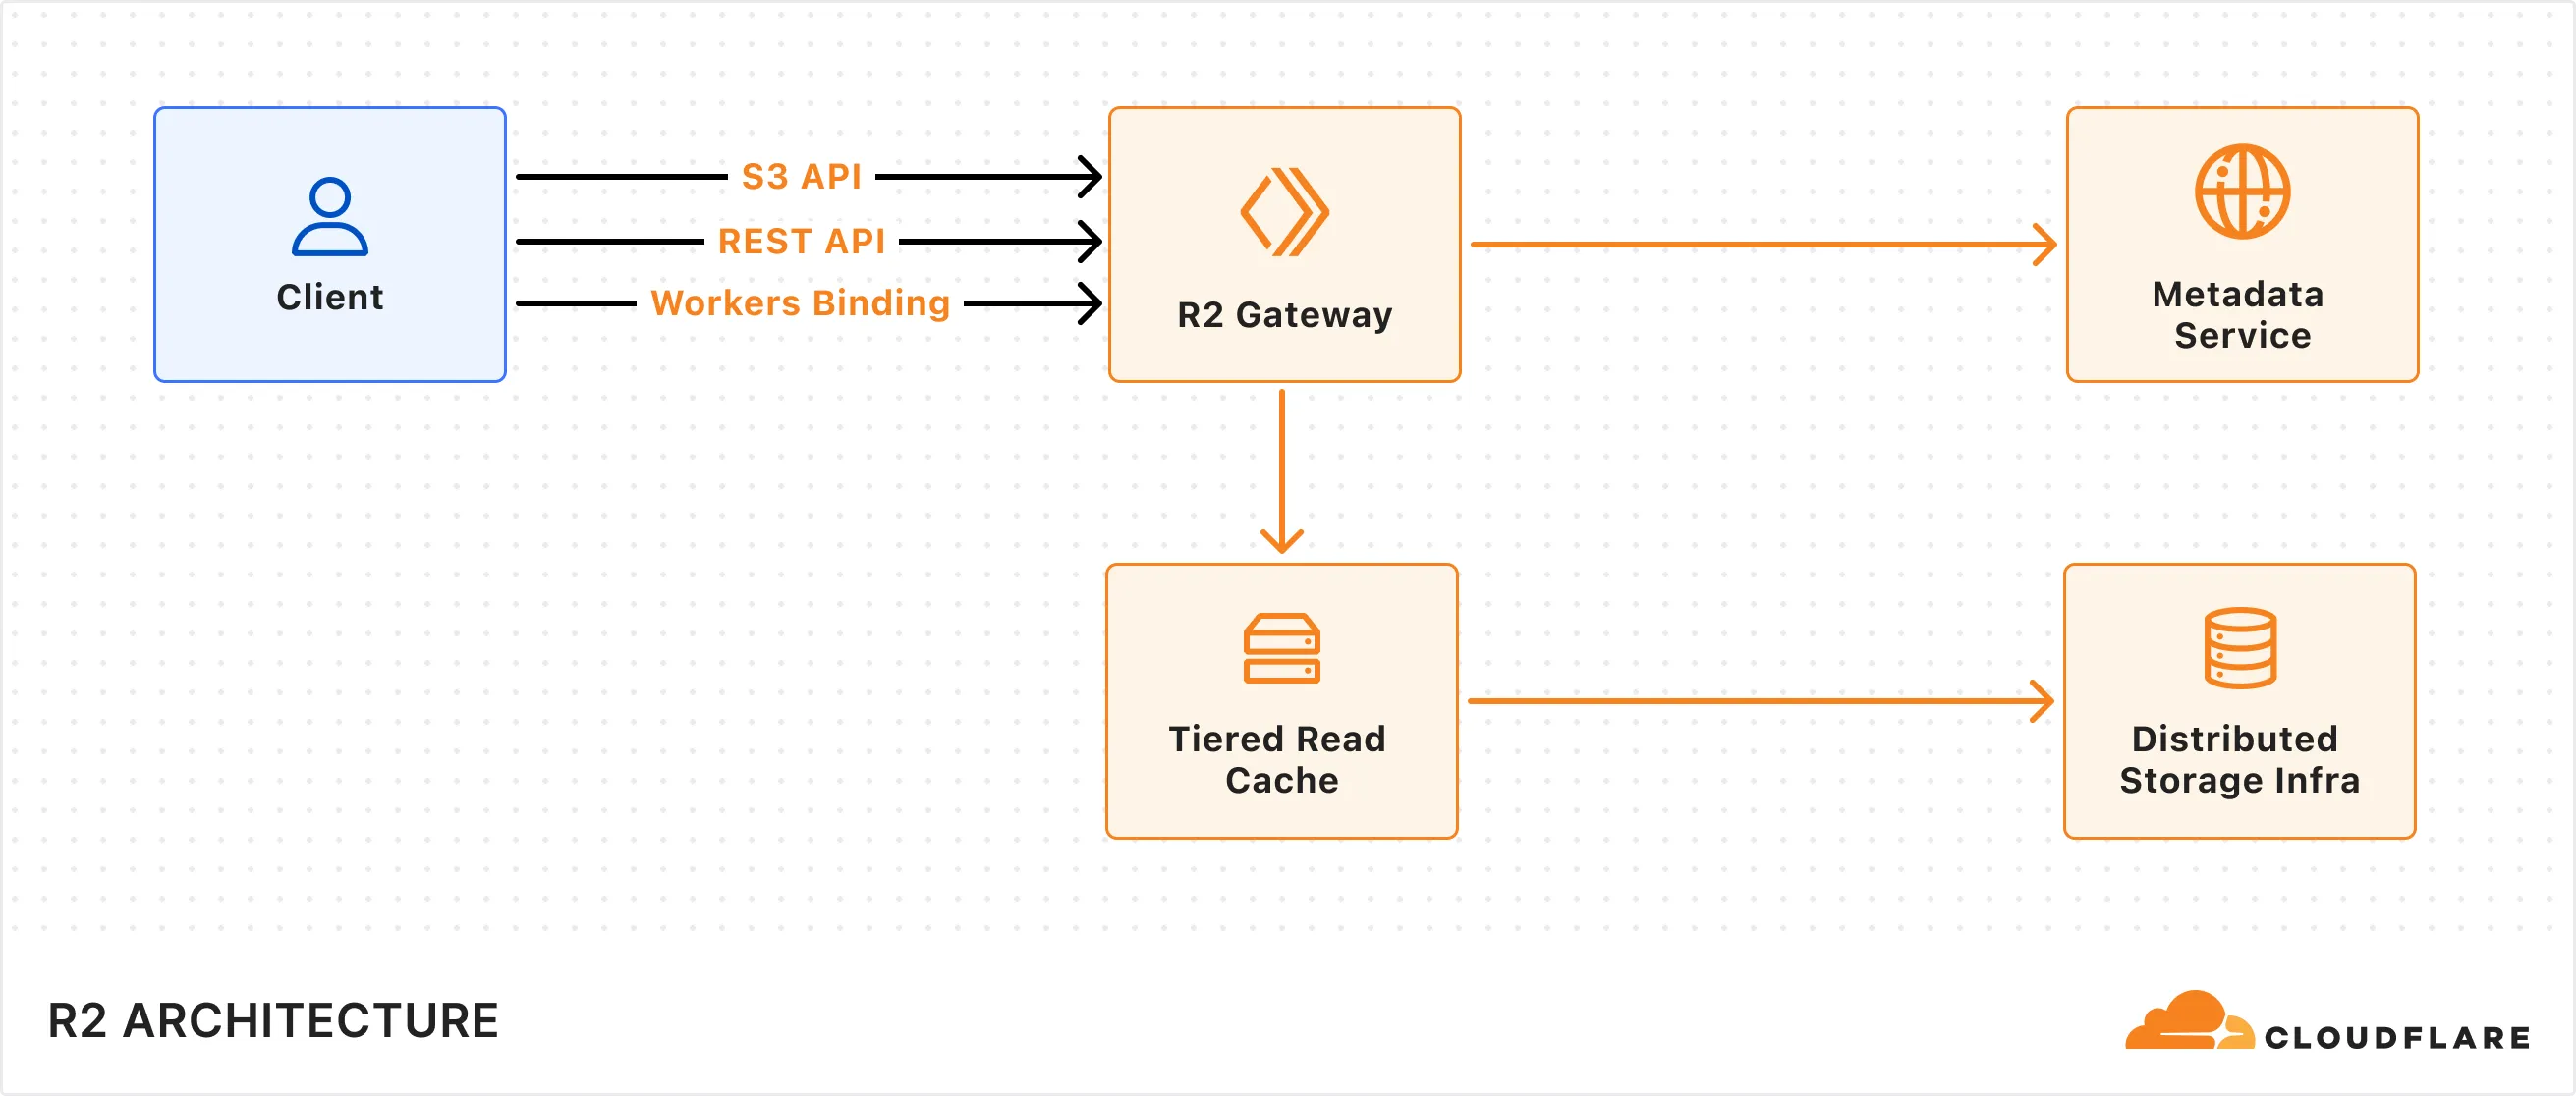
R2 supports multiple client interfaces including [Cloudflare Workers Binding](https://developers.cloudflare.com/r2/api/workers/workers-api-usage/), [S3-compatible API](https://developers.cloudflare.com/r2/api/s3/api/), and a [REST API](https://developers.cloudflare.com/api/resources/r2/) that powers the Cloudflare Dashboard and Wrangler CLI. All requests are routed through the R2 Gateway, which coordinates with the Metadata Service and Distributed Storage Infrastructure to retrieve the object data.
## Write data to R2
When a write request (e.g. uploading an object) is made to R2, the following sequence occurs:
1. **Request handling:** The request is received by the R2 Gateway at the edge, close to the user, where it is authenticated.
2. **Encryption and routing:** The Gateway reaches out to the Metadata Service to retrieve the [encryption key](https://developers.cloudflare.com/r2/reference/data-security/) and determines which storage cluster to write the encrypted data to within the [location](https://developers.cloudflare.com/r2/reference/data-location/) set for the bucket.
3. **Writing to storage:** The encrypted data is written and stored in the distributed storage infrastructure, and replicated within the region (e.g. ENAM) for [durability](https://developers.cloudflare.com/r2/reference/durability/).
4. **Metadata commit:** Finally, the Metadata Service commits the object's metadata, making it visible in subsequent reads. Only after this commit is an `HTTP 200` success response sent to the client, preventing unacknowledged writes.

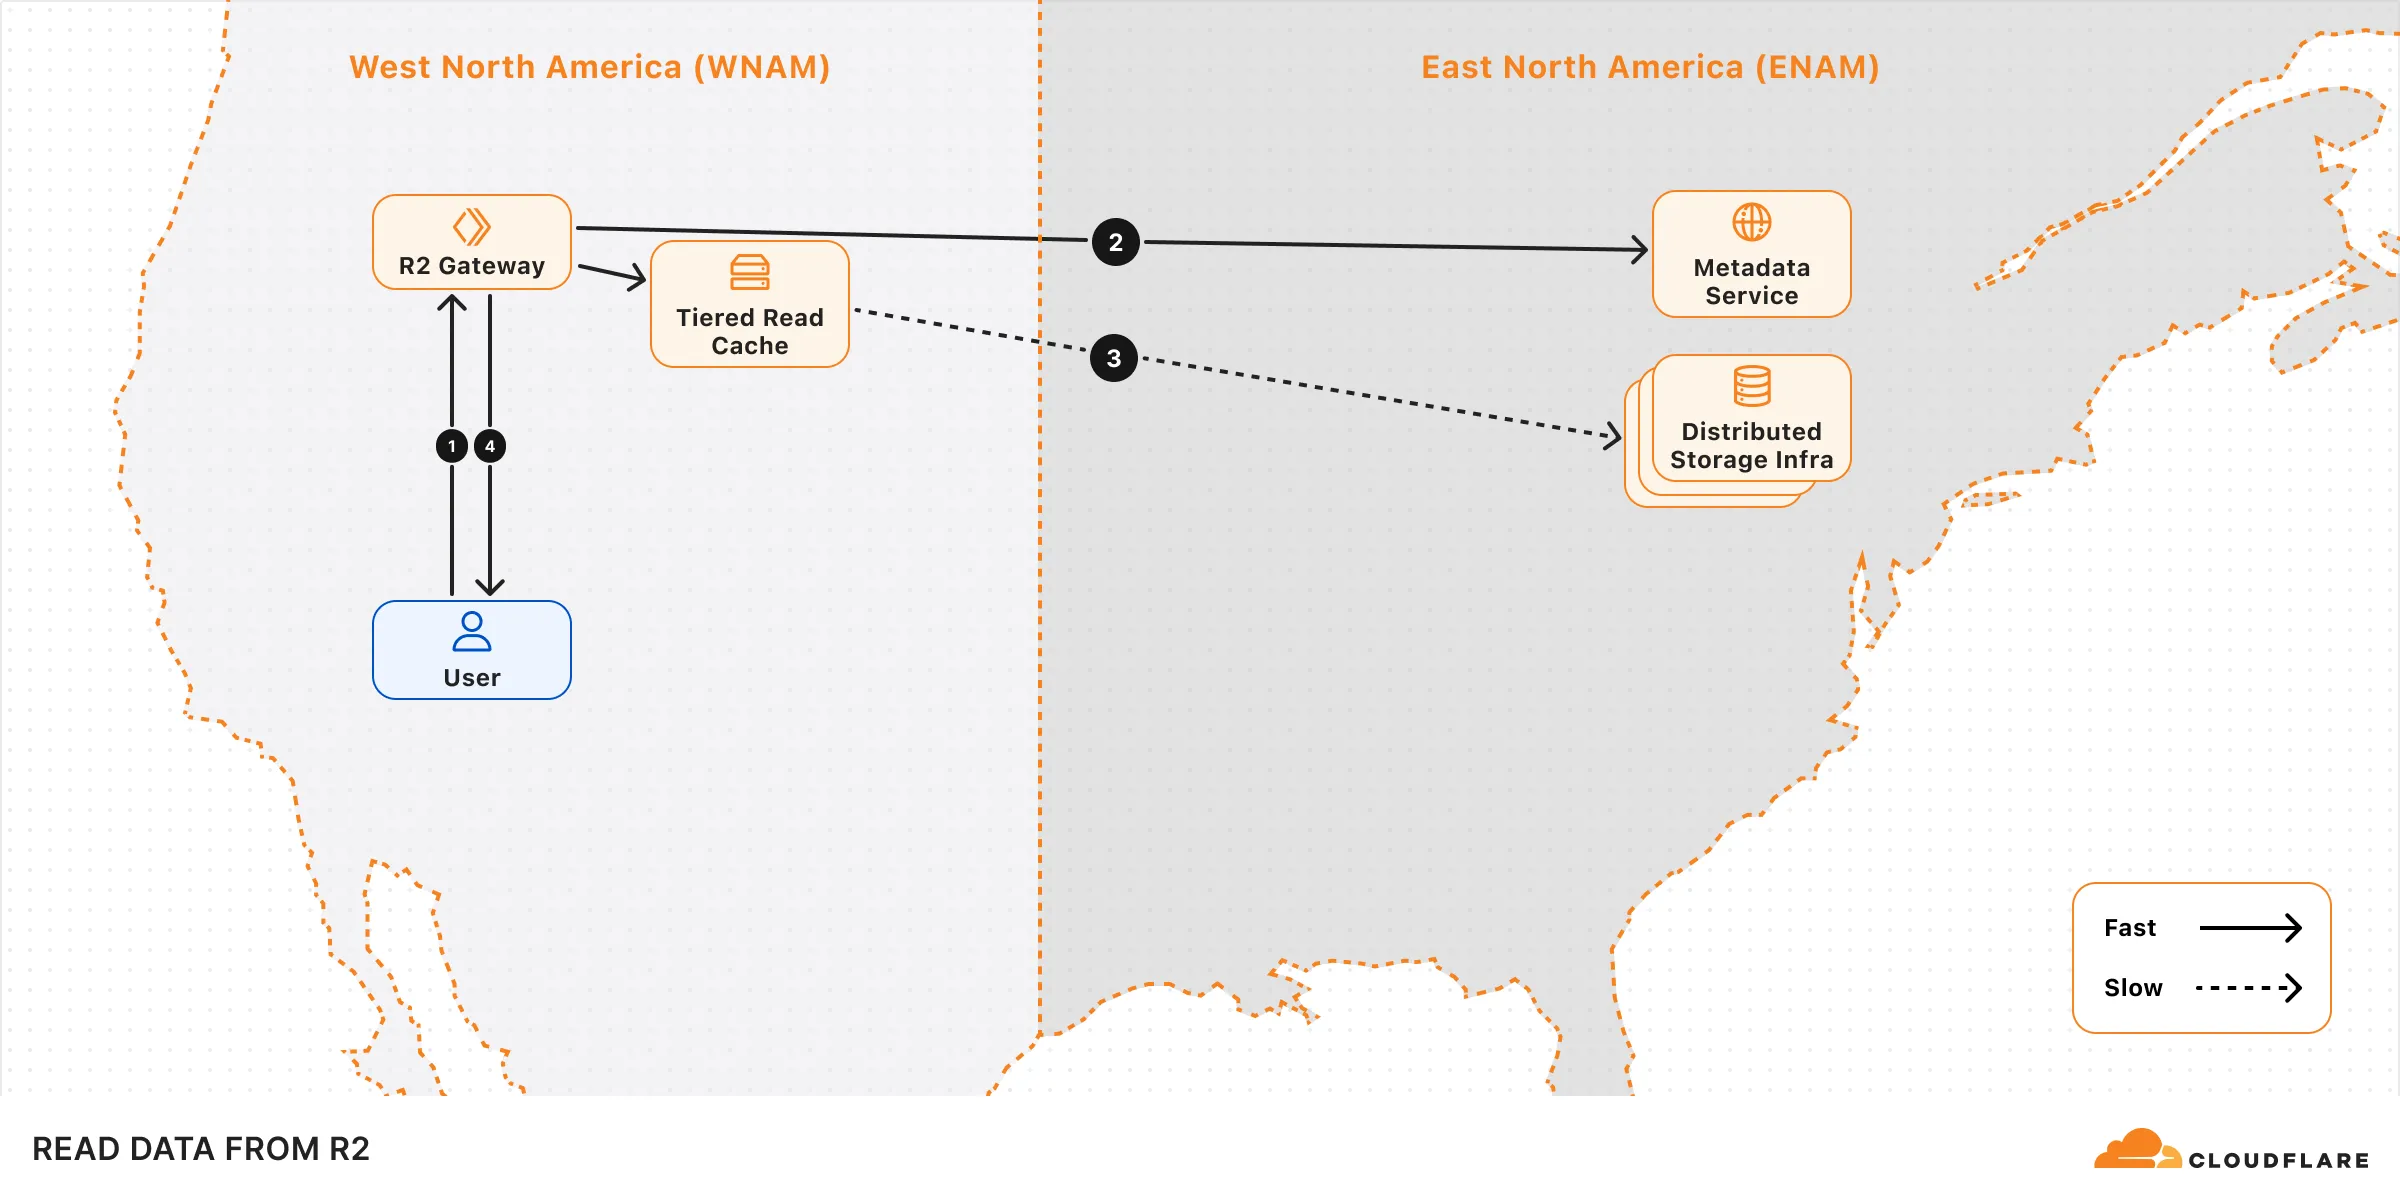
## Read data from R2
When a read request (e.g. fetching an object) is made to R2, the following sequence occurs:
1. **Request handling:** The request is received by the R2 Gateway at the edge, close to the user, where it is authenticated.
2. **Metadata lookup:** The Gateway asks the Metadata Service for the object metadata.
3. **Reading the object:** The Gateway attempts to retrieve the [encrypted](https://developers.cloudflare.com/r2/reference/data-security/) object from the tiered read cache. If it's not available, it retrieves the object from one of the distributed storage data centers within the region that holds the object data.
4. **Serving to client:** The object is decrypted and served to the user.
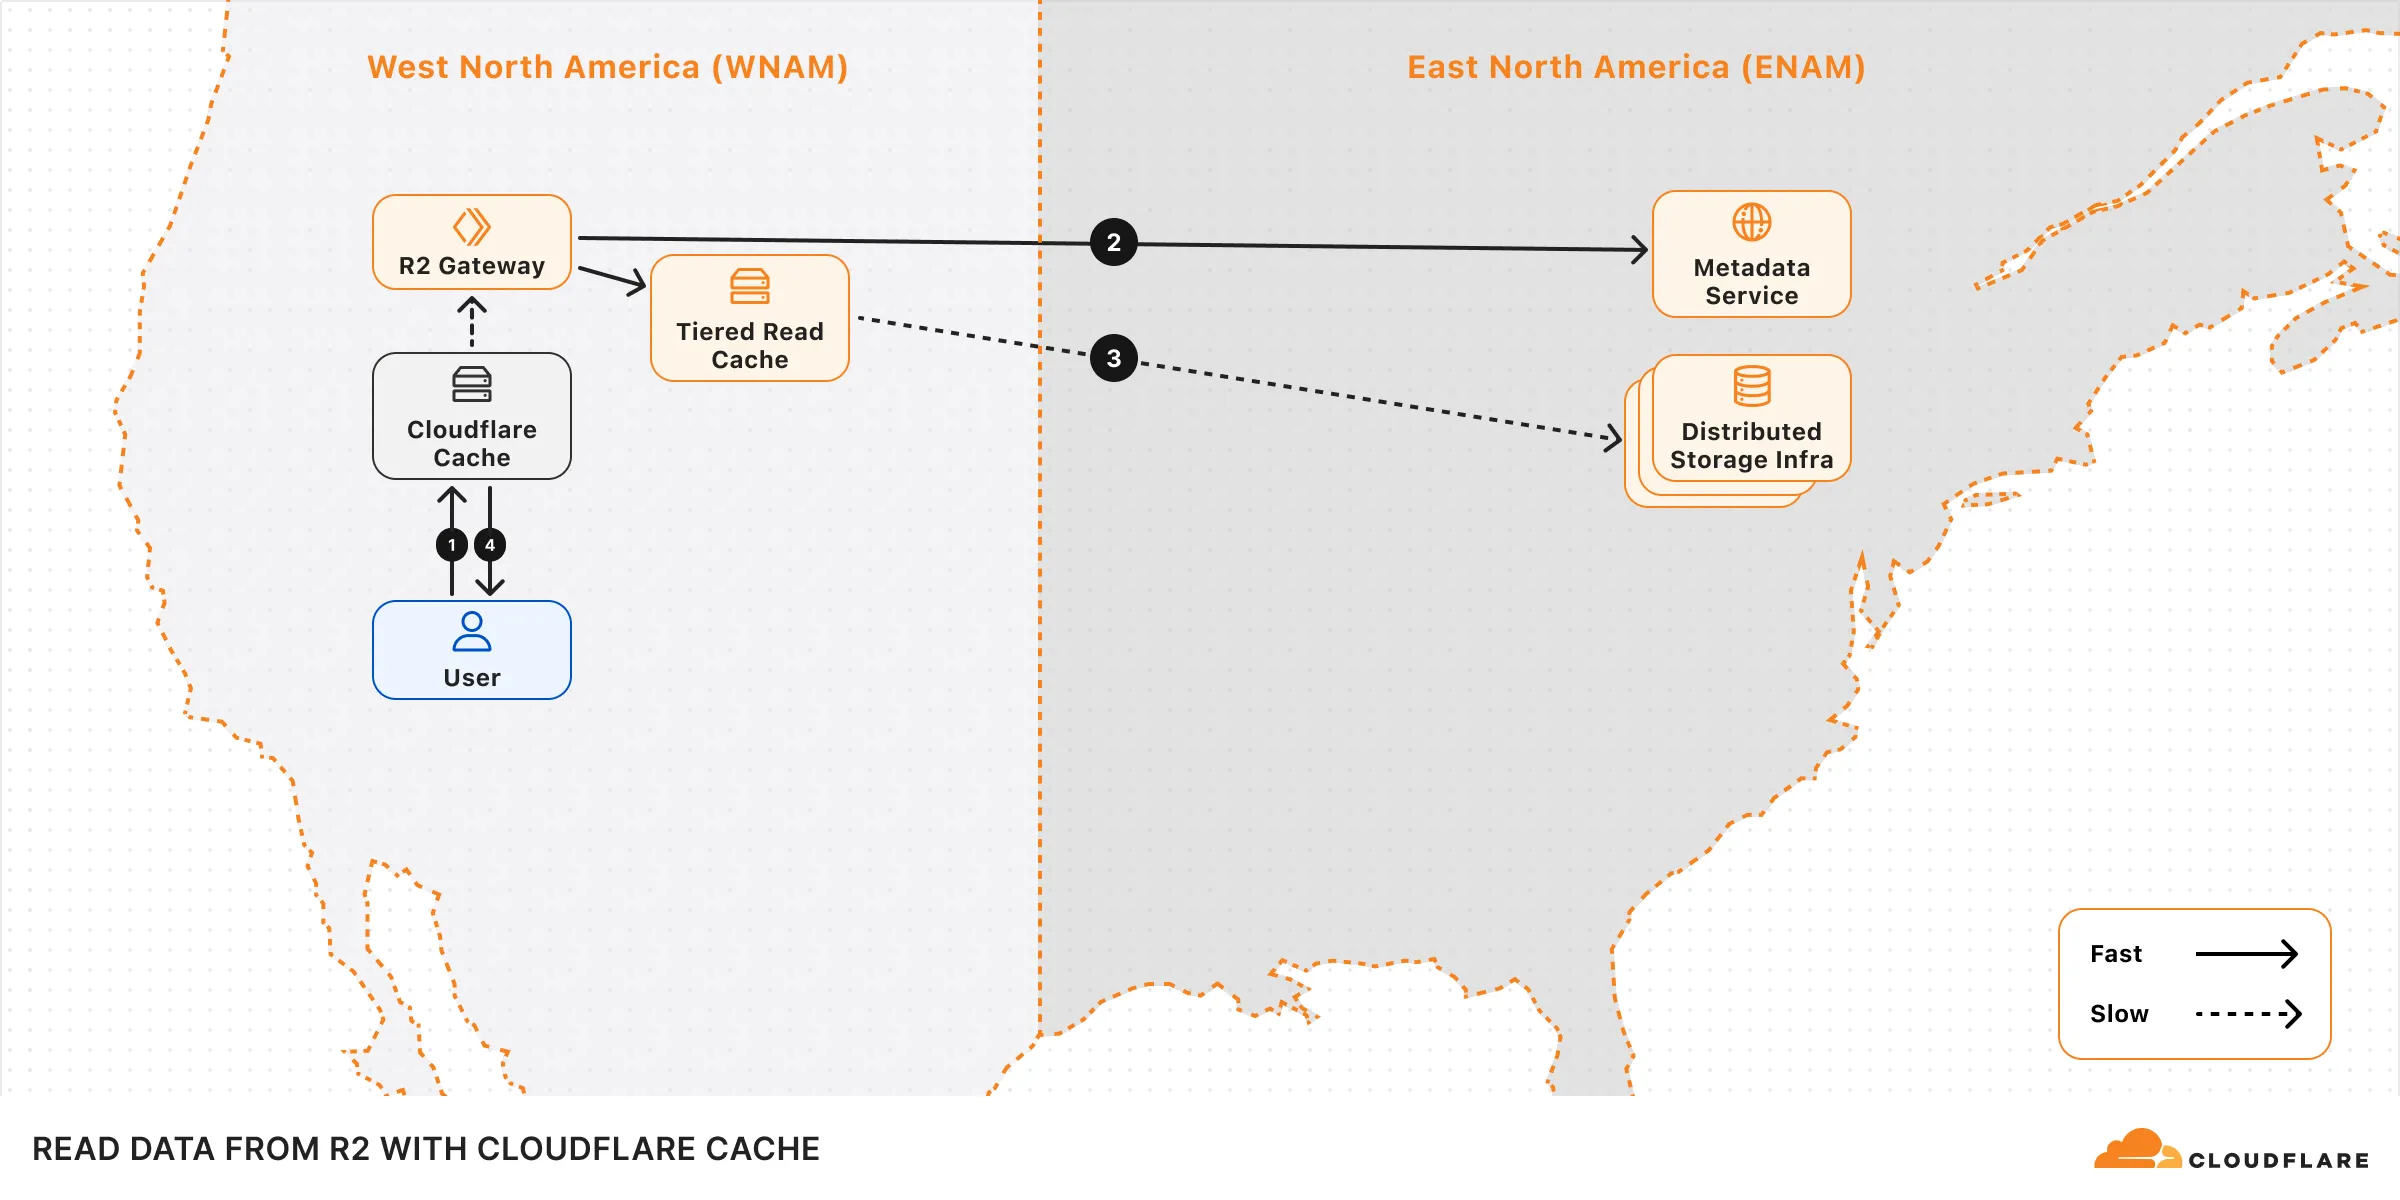
## Performance
The performance of your operations can be influenced by factors such as the bucket's geographical location, request origin, and access patterns.
To optimize upload performance for cross-region requests, enable [Local Uploads](https://developers.cloudflare.com/r2/buckets/local-uploads/) on your bucket.
To optimize read performance, enable [Cloudflare Cache](https://developers.cloudflare.com/cache/) when using a [custom domain](https://developers.cloudflare.com/r2/buckets/public-buckets/#custom-domains). When caching is enabled, read requests can bypass the R2 Gateway and be served directly from Cloudflare's edge cache, reducing latency. Note that cached data may not reflect the latest version immediately.
## Learn more
[Consistency ](https://developers.cloudflare.com/r2/reference/consistency/)Learn about R2's consistency model.
[Durability ](https://developers.cloudflare.com/r2/reference/durability/)Learn more about R2's durability guarantee.
[Data location ](https://developers.cloudflare.com/r2/reference/data-location/#jurisdictional-restrictions)Learn how R2 determines where data is stored, and details on jurisdiction restrictions.
[Data security ](https://developers.cloudflare.com/r2/reference/data-security/)Learn about R2's data security properties.
---
title: Objects · Cloudflare R2 docs
description: Objects are individual files or data that you store in an R2 bucket.
lastUpdated: 2025-05-28T15:17:46.000Z
chatbotDeprioritize: false
source_url:
html: https://developers.cloudflare.com/r2/objects/
md: https://developers.cloudflare.com/r2/objects/index.md
---
Objects are individual files or data that you store in an R2 bucket.
* [Upload objects](https://developers.cloudflare.com/r2/objects/upload-objects/)
* [Download objects](https://developers.cloudflare.com/r2/objects/download-objects/)
* [Delete objects](https://developers.cloudflare.com/r2/objects/delete-objects/)
## Other resources
For information on R2 Workers Binding API, refer to [R2 Workers API reference](https://developers.cloudflare.com/r2/api/workers/workers-api-reference/).
---
title: Platform · Cloudflare R2 docs
lastUpdated: 2025-04-09T22:46:56.000Z
chatbotDeprioritize: true
source_url:
html: https://developers.cloudflare.com/r2/platform/
md: https://developers.cloudflare.com/r2/platform/index.md
---
---
title: Pricing · Cloudflare R2 docs
description: "R2 charges based on the total volume of data stored, along with
two classes of operations on that data:"
lastUpdated: 2025-09-30T21:55:40.000Z
chatbotDeprioritize: false
source_url:
html: https://developers.cloudflare.com/r2/pricing/
md: https://developers.cloudflare.com/r2/pricing/index.md
---
R2 charges based on the total volume of data stored, along with two classes of operations on that data:
1. [Class A operations](#class-a-operations) which are more expensive and tend to mutate state.
2. [Class B operations](#class-b-operations) which tend to read existing state.
For the Infrequent Access storage class, [data retrieval](#data-retrieval) fees apply. There are no charges for egress bandwidth for any storage class.
All included usage is on a monthly basis.
Note
To learn about potential cost savings from using R2, refer to the [R2 pricing calculator](https://r2-calculator.cloudflare.com/).
## R2 pricing
| | Standard storage | Infrequent Access storage |
| - | - | - |
| Storage | $0.015 / GB-month | $0.01 / GB-month |
| Class A Operations | $4.50 / million requests | $9.00 / million requests |
| Class B Operations | $0.36 / million requests | $0.90 / million requests |
| Data Retrieval (processing) | None | $0.01 / GB |
| Egress (data transfer to Internet) | Free [1](#user-content-fn-1) | Free [1](#user-content-fn-1) |
Billable unit rounding
Cloudflare rounds up your usage to the next billing unit.
For example:
* If you have performed one million and one operations, you will be billed for two million operations.
* If you have used 1.1 GB-month, you will be billed for 2 GB-month.
* If you have retrieved data (for infrequent access storage) for 1.1 GB, you will be billed for 2 GB.
### Free tier
You can use the following amount of storage and operations each month for free.
| | Free |
| - | - |
| Storage | 10 GB-month / month |
| Class A Operations | 1 million requests / month |
| Class B Operations | 10 million requests / month |
| Egress (data transfer to Internet) | Free [1](#user-content-fn-1) |
Warning
The free tier only applies to Standard storage, and does not apply to Infrequent Access storage.
### Storage usage
Storage is billed using gigabyte-month (GB-month) as the billing metric. A GB-month is calculated by averaging the *peak* storage per day over a billing period (30 days).
For example:
* Storing 1 GB constantly for 30 days will be charged as 1 GB-month.
* Storing 3 GB constantly for 30 days will be charged as 3 GB-month.
* Storing 1 GB for 5 days, then 3 GB for the remaining 25 days will be charged as `1 GB * 5/30 month + 3 GB * 25/30 month = 2.66 GB-month`
For objects stored in Infrequent Access storage, you will be charged for the object for the minimum storage duration even if the object was deleted or moved before the duration specified.
### Class A operations
Class A Operations include `ListBuckets`, `PutBucket`, `ListObjects`, `PutObject`, `CopyObject`, `CompleteMultipartUpload`, `CreateMultipartUpload`, `LifecycleStorageTierTransition`, `ListMultipartUploads`, `UploadPart`, `UploadPartCopy`, `ListParts`, `PutBucketEncryption`, `PutBucketCors` and `PutBucketLifecycleConfiguration`.
### Class B operations
Class B Operations include `HeadBucket`, `HeadObject`, `GetObject`, `UsageSummary`, `GetBucketEncryption`, `GetBucketLocation`, `GetBucketCors` and `GetBucketLifecycleConfiguration`.
### Free operations
Free operations include `DeleteObject`, `DeleteBucket` and `AbortMultipartUpload`.
### Data retrieval
Data retrieval fees apply when you access or retrieve data from the Infrequent Access storage class. This includes any time objects are read or copied.
### Minimum storage duration
For objects stored in Infrequent Access storage, you will be charged for the object for the minimum storage duration even if the object was deleted, moved, or replaced before the specified duration.
| Storage class | Minimum storage duration |
| - | - |
| Standard storage | None |
| Infrequent Access storage | 30 days |
## R2 Data Catalog pricing
R2 Data Catalog is in **public beta**, and any developer with an [R2 subscription](https://developers.cloudflare.com/r2/pricing/) can start using it. Currently, outside of standard R2 storage and operations, you will not be billed for your use of R2 Data Catalog. We will provide at least 30 days' notice before we make any changes or start charging for usage.
To learn more about our thinking on future pricing, refer to the [R2 Data Catalog announcement blog](https://blog.cloudflare.com/r2-data-catalog-public-beta).
## Data migration pricing
### Super Slurper
Super Slurper is free to use. You are only charged for the Class A operations that Super Slurper makes to your R2 bucket. Objects with sizes < 100MiB are uploaded to R2 in a single Class A operation. Larger objects use multipart uploads to increase transfer success rates and will perform multiple Class A operations. Note that your source bucket might incur additional charges as Super Slurper copies objects over to R2.
Once migration completes, you are charged for storage & Class A/B operations as described in previous sections.
### Sippy
Sippy is free to use. You are only charged for the operations Sippy makes to your R2 bucket. If a requested object is not present in R2, Sippy will copy it over from your source bucket. Objects with sizes < 200MiB are uploaded to R2 in a single Class A operation. Larger objects use multipart uploads to increase transfer success rates, and will perform multiple Class A operations. Note that your source bucket might incur additional charges as Sippy copies objects over to R2.
As objects are migrated to R2, they are served from R2, and you are charged for storage & Class A/B operations as described in previous sections.
## Pricing calculator
To learn about potential cost savings from using R2, refer to the [R2 pricing calculator](https://r2-calculator.cloudflare.com/).
## R2 billing examples
### Standard storage example
If a user writes 1,000 objects in R2 **Standard storage** for 1 month with an average size of 1 GB and reads each object 1,000 times during the month, the estimated cost for the month would be:
| | Usage | Free Tier | Billable Quantity | Price |
| - | - | - | - | - |
| Storage | (1,000 objects) \* (1 GB per object) = 1,000 GB-months | 10 GB-months | 990 GB-months | $14.85 |
| Class A Operations | (1,000 objects) \* (1 write per object) = 1,000 writes | 1 million | 0 | $0.00 |
| Class B Operations | (1,000 objects) \* (1,000 reads per object) = 1 million reads | 10 million | 0 | $0.00 |
| Data retrieval (processing) | (1,000 objects) \* (1 GB per object) = 1,000 GB | NA | None | $0.00 |
| **TOTAL** | | | | **$14.85** |
### Infrequent access example
If a user writes 1,000 objects in R2 Infrequent Access storage with an average size of 1 GB, stores them for 5 days, and then deletes them (delete operations are free), and during those 5 days each object is read 1,000 times, the estimated cost for the month would be:
| | Usage | Free Tier | Billable Quantity | Price |
| - | - | - | - | - |
| Storage | (1,000 objects) \* (1 GB per object) = 1,000 GB-months | NA | 1,000 GB-months | $10.00 |
| Class A Operations | (1,000 objects) \* (1 write per object) = 1,000 writes | NA | 1,000 | $9.00 |
| Class B Operations | (1,000 objects) \* (1,000 reads per object) = 1 million reads | NA | 1 million | $0.90 |
| Data retrieval (processing) | (1,000 objects) \* (1 GB per object) = 1,000 GB | NA | 1,000 GB | $10.00 |
| **TOTAL** | | | | **$29.90** |
Note that the minimal storage duration for infrequent access storage is 30 days, which means the billable quantity is 1,000 GB-months, rather than 167 GB-months.
### Asset hosting
If a user writes 100,000 files with an average size of 100 KB object and reads 10,000,000 objects per day, the estimated cost in a month would be:
| | Usage | Free Tier | Billable Quantity | Price |
| - | - | - | - | - |
| Storage | (100,000 objects) \* (100KB per object) | 10 GB-months | 0 GB-months | $0.00 |
| Class A Operations | (100,000 writes) | 1 million | 0 | $0.00 |
| Class B Operations | (10,000,000 reads per day) \* (30 days) | 10 million | 290,000,000 | $104.40 |
| **TOTAL** | | | | **$104.40** |
## Cloudflare billing policy
To learn more about how usage is billed, refer to [Cloudflare Billing Policy](https://developers.cloudflare.com/billing/billing-policy/).
## Frequently asked questions
### Will I be charged for unauthorized requests to my R2 bucket?
No. You are not charged for operations when the caller does not have permission to make the request (HTTP 401 `Unauthorized` response status code).
## Footnotes
1. Egressing directly from R2, including via the [Workers API](https://developers.cloudflare.com/r2/api/workers/), [S3 API](https://developers.cloudflare.com/r2/api/s3/), and [`r2.dev` domains](https://developers.cloudflare.com/r2/buckets/public-buckets/#enable-managed-public-access) does not incur data transfer (egress) charges and is free. If you connect other metered services to an R2 bucket, you may be charged by those services. [↩](#user-content-fnref-1) [↩2](#user-content-fnref-1-2) [↩3](#user-content-fnref-1-3)
---
title: R2 SQL · Cloudflare R2 docs
description: R2 SQL is a serverless SQL interface for Cloudflare R2, enabling
querying and analyzing data.
lastUpdated: 2025-10-30T16:19:51.000Z
chatbotDeprioritize: false
source_url:
html: https://developers.cloudflare.com/r2/r2-sql/
md: https://developers.cloudflare.com/r2/r2-sql/index.md
---
---
title: Reference · Cloudflare R2 docs
lastUpdated: 2025-04-09T22:46:56.000Z
chatbotDeprioritize: true
source_url:
html: https://developers.cloudflare.com/r2/reference/
md: https://developers.cloudflare.com/r2/reference/index.md
---
* [Consistency model](https://developers.cloudflare.com/r2/reference/consistency/)
* [Data location](https://developers.cloudflare.com/r2/reference/data-location/)
* [Data security](https://developers.cloudflare.com/r2/reference/data-security/)
* [Durability](https://developers.cloudflare.com/r2/reference/durability/)
* [Unicode interoperability](https://developers.cloudflare.com/r2/reference/unicode-interoperability/)
* [Wrangler commands](https://developers.cloudflare.com/r2/reference/wrangler-commands/)
* [Partners](https://developers.cloudflare.com/r2/reference/partners/)
---
title: Tutorials · Cloudflare R2 docs
description: View tutorials to help you get started with R2.
lastUpdated: 2025-08-14T13:46:41.000Z
chatbotDeprioritize: false
source_url:
html: https://developers.cloudflare.com/r2/tutorials/
md: https://developers.cloudflare.com/r2/tutorials/index.md
---
View tutorials to help you get started with R2.
## Docs
| Name | Last Updated | Difficulty |
| - | - | - |
| [Build an end to end data pipeline](https://developers.cloudflare.com/r2-sql/tutorials/end-to-end-pipeline/) | 5 months ago | |
| [Point to R2 bucket with a custom domain](https://developers.cloudflare.com/rules/origin-rules/tutorials/point-to-r2-bucket-with-custom-domain/) | 10 months ago | Beginner |
| [Use event notification to summarize PDF files on upload](https://developers.cloudflare.com/r2/tutorials/summarize-pdf/) | over 1 year ago | Intermediate |
| [Use SSE-C](https://developers.cloudflare.com/r2/examples/ssec/) | over 1 year ago | Intermediate |
| [Use R2 as static asset storage with Cloudflare Pages](https://developers.cloudflare.com/pages/tutorials/use-r2-as-static-asset-storage-for-pages/) | over 1 year ago | Intermediate |
| [Create a fine-tuned OpenAI model with R2](https://developers.cloudflare.com/workers/tutorials/create-finetuned-chatgpt-ai-models-with-r2/) | over 1 year ago | Intermediate |
| [Protect an R2 Bucket with Cloudflare Access](https://developers.cloudflare.com/r2/tutorials/cloudflare-access/) | almost 2 years ago | |
| [Log and store upload events in R2 with event notifications](https://developers.cloudflare.com/r2/tutorials/upload-logs-event-notifications/) | almost 2 years ago | Beginner |
| [Use Cloudflare R2 as a Zero Trust log destination](https://developers.cloudflare.com/cloudflare-one/tutorials/r2-logs/) | about 2 years ago | Beginner |
| [Deploy a Browser Rendering Worker with Durable Objects](https://developers.cloudflare.com/browser-rendering/workers-bindings/browser-rendering-with-do/) | over 2 years ago | Beginner |
| [Securely access and upload assets with Cloudflare R2](https://developers.cloudflare.com/workers/tutorials/upload-assets-with-r2/) | over 2 years ago | Beginner |
| [Mastodon](https://developers.cloudflare.com/r2/tutorials/mastodon/) | about 3 years ago | Beginner |
| [Postman](https://developers.cloudflare.com/r2/tutorials/postman/) | over 3 years ago | |
## Videos
Welcome to the Cloudflare Developer Channel
Welcome to the Cloudflare Developers YouTube channel. We've got tutorials and working demos and everything you need to level up your projects. Whether you're working on your next big thing or just dorking around with some side projects, we've got you covered! So why don't you come hang out, subscribe to our developer channel and together we'll build something awesome. You're gonna love it.
Optimize your AI App & fine-tune models (AI Gateway, R2)
In this workshop, Kristian Freeman, Cloudflare Developer Advocate, shows how to optimize your existing AI applications with Cloudflare AI Gateway, and how to finetune OpenAI models using R2.
---
title: Videos · Cloudflare R2 docs
lastUpdated: 2025-06-05T08:11:08.000Z
chatbotDeprioritize: false
source_url:
html: https://developers.cloudflare.com/r2/video-tutorials/
md: https://developers.cloudflare.com/r2/video-tutorials/index.md
---
[Introduction to R2 ](https://developers.cloudflare.com/learning-paths/r2-intro/series/r2-1/)Learn about Cloudflare R2, an object storage solution designed to handle your data and files efficiently. It is ideal for storing large media files, creating data lakes, or delivering web assets.
---
title: Error codes · Cloudflare R2 docs
description: This page documents error codes returned by R2 when using the
Workers API or the S3-compatible API, along with recommended fixes to help
with troubleshooting.
lastUpdated: 2026-02-13T12:50:29.000Z
chatbotDeprioritize: false
source_url:
html: https://developers.cloudflare.com/r2/api/error-codes/
md: https://developers.cloudflare.com/r2/api/error-codes/index.md
---
This page documents error codes returned by R2 when using the [Workers API](https://developers.cloudflare.com/r2/api/workers/) or the [S3-compatible API](https://developers.cloudflare.com/r2/api/s3/), along with recommended fixes to help with troubleshooting.
## How errors are returned
For the **Workers API**, R2 operations throw exceptions that you can catch. The error code is included at the end of the `message` property:
```js
try {
await env.MY_BUCKET.put("my-key", data, { customMetadata: largeMetadata });
} catch (error) {
console.error(error.message);
// "put: Your metadata headers exceed the maximum allowed metadata size. (10012)"
}
```
For the **S3-compatible API**, errors are returned as XML in the response body:
```xml
NoSuchKey
The specified key does not exist.
```
## Error code reference
### Authentication and authorization errors
| Error Code | S3 Code | HTTP Status | Details | Recommended Fix |
| - | - | - | - | - |
| 10002 | Unauthorized | 401 | Missing or invalid authentication credentials. | Verify your [API token](https://developers.cloudflare.com/r2/api/tokens/) or access key credentials are correct and have not expired. |
| 10003 | AccessDenied | 403 | Insufficient permissions for the requested operation. | Check that your [API token](https://developers.cloudflare.com/r2/api/tokens/) has the required permissions for the bucket and operation. |
| 10018 | ExpiredRequest | 400 | Presigned URL or request signature has expired. | Regenerate the [presigned URL](https://developers.cloudflare.com/r2/api/s3/presigned-urls/) or signature. |
| 10035 | SignatureDoesNotMatch | 403 | Request signature does not match calculated signature. | Verify your secret key and signing algorithm. Check for URL encoding issues. |
| 10042 | NotEntitled | 403 | Account not entitled to this feature. | Ensure your account has an [R2 subscription](https://developers.cloudflare.com/r2/pricing/). |
### Bucket errors
| Error Code | S3 Code | HTTP Status | Details | Recommended Fix |
| - | - | - | - | - |
| 10005 | InvalidBucketName | 400 | Bucket name does not meet naming requirements. | Bucket names must be 3-63 chars, lowercase alphanumeric and hyphens, start/end with alphanumeric. |
| 10006 | NoSuchBucket | 404 | The specified bucket does not exist. | Verify the bucket name is correct and the bucket exists in your account. |
| 10008 | BucketNotEmpty | 409 | Cannot delete bucket that contains objects. | Delete all objects in the bucket before deleting the bucket. |
| 10009 | TooManyBuckets | 400 | Account bucket limit exceeded (default: 1,000,000 buckets). | Request a limit increase via the [Limits Increase Request Form](https://forms.gle/ukpeZVLWLnKeixDu7). |
| 10073 | BucketConflict | 409 | Bucket name already exists. | Choose a different bucket name. Bucket names must be unique within your account. |
### Object errors
| Error Code | S3 Code | HTTP Status | Details | Recommended Fix |
| - | - | - | - | - |
| 10007 | NoSuchKey | 404 | The specified object key does not exist. For the [Workers API](https://developers.cloudflare.com/r2/api/workers/workers-api-reference/), `get()` and `head()` return `null` instead of throwing. | Verify the object key is correct and the object has not been deleted. |
| 10020 | InvalidObjectName | 400 | Object key contains invalid characters or is too long. | Use valid UTF-8 characters. Maximum key length is 1024 bytes. |
| 100100 | EntityTooLarge | 400 | Object exceeds maximum size (5 GiB for single upload, 5 TiB for multipart). | Use [multipart upload](https://developers.cloudflare.com/r2/objects/upload-objects/#multipart-upload) for objects larger than 5 GiB. Maximum object size is 5 TiB. |
| 10012 | MetadataTooLarge | 400 | Custom metadata exceeds the 8,192 byte limit. | Reduce custom metadata size. Maximum is 8,192 bytes total for all custom metadata. |
| 10069 | ObjectLockedByBucketPolicy | 403 | Object is protected by a bucket lock rule and cannot be modified or deleted. | Wait for the retention period to expire. Refer to [bucket locks](https://developers.cloudflare.com/r2/buckets/bucket-locks/). |
### Upload and request errors
| Error Code | S3 Code | HTTP Status | Details | Recommended Fix |
| - | - | - | - | - |
| 10033 | MissingContentLength | 411 | `Content-Length` header required but missing. | Include the `Content-Length` header in PUT/POST requests. |
| 10013 | IncompleteBody | 400 | Request body terminated before expected `Content-Length`. | Ensure the full request body is sent. Check for network interruptions or client timeouts. |
| 10014 | InvalidDigest | 400 | Checksum header format is malformed. | Ensure checksums are properly encoded (base64 for SHA/CRC checksums). |
| 10037 | BadDigest | 400 | Provided checksum does not match the uploaded content. | Verify data integrity and retry the upload. |
| 10039 | InvalidRange | 416 | Requested byte range is not satisfiable. | Ensure the range start is less than object size. Check `Range` header format. |
| 10031 | PreconditionFailed | 412 | Conditional headers (`If-Match`, `If-Unmodified-Since`, etc.) were not satisfied. | Object's ETag or modification time does not match your condition. Refetch and retry. Refer to [conditional operations](https://developers.cloudflare.com/r2/api/s3/extensions/#conditional-operations-in-putobject). |
### Multipart upload errors
| Error Code | S3 Code | HTTP Status | Details | Recommended Fix |
| - | - | - | - | - |
| 10011 | EntityTooSmall | 400 | Multipart part is below minimum size (5 MiB), except for the last part. | Ensure each part (except the last) is at least 5 MiB. |
| 10024 | NoSuchUpload | 404 | Multipart upload does not exist or was aborted. | Verify the `uploadId` is correct. By default, incomplete multipart uploads expire after 7 days. Refer to [object lifecycles](https://developers.cloudflare.com/r2/buckets/object-lifecycles/). |
| 10025 | InvalidPart | 400 | One or more parts could not be found when completing the upload. | Verify each part was uploaded successfully and use the exact ETag returned from `UploadPart`. |
| 10048 | InvalidPart | 400 | All non-trailing parts must have the same size. | Ensure all parts except the last have identical sizes. R2 requires uniform part sizes for multipart uploads. |
### Service errors
| Error Code | S3 Code | HTTP Status | Details | Recommended Fix |
| - | - | - | - | - |
| 10001 | InternalError | 500 | An internal error occurred. | Retry the request. If persistent, check [Cloudflare Status](https://www.cloudflarestatus.com) or contact support. |
| 10043 | ServiceUnavailable | 503 | Service is temporarily unavailable. | Retry with exponential backoff. Check [Cloudflare Status](https://www.cloudflarestatus.com). |
| 10054 | ClientDisconnect | 400 | Client disconnected before request completed. | Check network connectivity and retry. |
| 10058 | TooManyRequests | 429 | Rate limit exceeded. Often caused by multiple concurrent requests to the same object key (limit: 1 write/second per key). | Check if multiple clients are accessing the same object key. See [R2 limits](https://developers.cloudflare.com/r2/platform/limits/). |
---
title: S3 · Cloudflare R2 docs
lastUpdated: 2025-12-29T18:01:22.000Z
chatbotDeprioritize: true
source_url:
html: https://developers.cloudflare.com/r2/api/s3/
md: https://developers.cloudflare.com/r2/api/s3/index.md
---
* [S3 API compatibility](https://developers.cloudflare.com/r2/api/s3/api/)
* [Extensions](https://developers.cloudflare.com/r2/api/s3/extensions/)
* [Presigned URLs](https://developers.cloudflare.com/r2/api/s3/presigned-urls/)
---
title: Authentication · Cloudflare R2 docs
description: You can generate an API token to serve as the Access Key for usage
with existing S3-compatible SDKs or XML APIs.
lastUpdated: 2026-02-06T11:10:34.000Z
chatbotDeprioritize: false
source_url:
html: https://developers.cloudflare.com/r2/api/tokens/
md: https://developers.cloudflare.com/r2/api/tokens/index.md
---
You can generate an API token to serve as the Access Key for usage with existing S3-compatible SDKs or XML APIs.
Note
This page contains instructions on generating API tokens *specifically* for R2. Note that this is different from generating API tokens for other services, as documented in [Create API token](https://developers.cloudflare.com/fundamentals/api/get-started/create-token/).
You must purchase R2 before you can generate an API token.
To create an API token:
1. In the Cloudflare dashboard, go to the **R2 object storage** page.
[Go to **Overview**](https://dash.cloudflare.com/?to=/:account/r2/overview)
2. Select **Manage R2 API tokens**.
3. Choose to create either:
* **Create Account API token** - These tokens are tied to the Cloudflare account itself and can be used by any authorized system or user. Only users with the Super Administrator role can view or create them. These tokens remain valid until manually revoked.
* **Create User API token** - These tokens are tied to your individual Cloudflare user. They inherit your personal permissions and become inactive if your user is removed from the account.
4. Under **Permissions**, choose a permission types for your token. Refer to [Permissions](#permissions) for information about each option.
5. (Optional) If you select the **Object Read and Write** or **Object Read** permissions, you can scope your token to a set of buckets.
6. Select **Create Account API token** or **Create User API token**.
After your token has been successfully created, review your **Secret Access Key** and **Access Key ID** values. These may often be referred to as Client Secret and Client ID, respectively.
Warning
You will not be able to access your **Secret Access Key** again after this step. Copy and record both values to avoid losing them.
You will also need to configure the `endpoint` in your S3 client to `https://.r2.cloudflarestorage.com`.
Find your [account ID in the Cloudflare dashboard](https://developers.cloudflare.com/fundamentals/account/find-account-and-zone-ids/).
Buckets created with jurisdictions must be accessed via jurisdiction-specific endpoints:
* European Union (EU): `https://.eu.r2.cloudflarestorage.com`
* FedRAMP: `https://.fedramp.r2.cloudflarestorage.com`
Warning
Jurisdictional buckets can only be accessed via the corresponding jurisdictional endpoint. Most S3 clients will not let you configure multiple `endpoints`, so you'll generally have to initialize one client per jurisdiction.
## Permissions
| Permission | Description |
| - | - |
| Admin Read & Write | Allows the ability to create, list, and delete buckets, edit bucket configuration, read, write, and list objects, and read and write to data catalog tables and associated metadata. |
| Admin Read only | Allows the ability to list buckets and view bucket configuration, read and list objects, and read from the data catalog tables and associated metadata. |
| Object Read & Write | Allows the ability to read, write, and list objects in specific buckets. |
| Object Read only | Allows the ability to read and list objects in specific buckets. |
Note
Currently **Admin Read & Write** or **Admin Read only** permission is required to use [R2 Data Catalog](https://developers.cloudflare.com/r2/data-catalog/).
## Create API tokens via API
You can create API tokens via the API and use them to generate corresponding Access Key ID and Secret Access Key values. To get started, refer to [Create API tokens via the API](https://developers.cloudflare.com/fundamentals/api/how-to/create-via-api/). Below are the specifics for R2.
### Access Policy
An Access Policy specifies what resources the token can access and the permissions it has.
#### Resources
There are two relevant resource types for R2: `Account` and `Bucket`. For more information on the Account resource type, refer to [Account](https://developers.cloudflare.com/fundamentals/api/how-to/create-via-api/#account).
##### Bucket
Include a set of R2 buckets or all buckets in an account.
A specific bucket is represented as:
```json
"com.cloudflare.edge.r2.bucket.__": "*"
```
* `ACCOUNT_ID`: Refer to [Find zone and account IDs](https://developers.cloudflare.com/fundamentals/account/find-account-and-zone-ids/#find-account-id-workers-and-pages).
* `JURISDICTION`: The [jurisdiction](https://developers.cloudflare.com/r2/reference/data-location/#available-jurisdictions) where the R2 bucket lives. For buckets not created in a specific jurisdiction this value will be `default`.
* `BUCKET_NAME`: The name of the bucket your Access Policy applies to.
All buckets in an account are represented as:
```json
"com.cloudflare.api.account.": {
"com.cloudflare.edge.r2.bucket.*": "*"
}
```
* `ACCOUNT_ID`: Refer to [Find zone and account IDs](https://developers.cloudflare.com/fundamentals/account/find-account-and-zone-ids/#find-account-id-workers-and-pages).
#### Permission groups
Determine what [permission groups](https://developers.cloudflare.com/fundamentals/api/how-to/create-via-api/#permission-groups) should be applied.
| Permission group | Resource | Description |
| - | - | - |
| `Workers R2 Storage Write` | Account | Can create, delete, and list buckets, edit bucket configuration, and read, write, and list objects. |
| `Workers R2 Storage Read` | Account | Can list buckets and view bucket configuration, and read and list objects. |
| `Workers R2 Storage Bucket Item Write` | Bucket | Can read, write, and list objects in buckets. |
| `Workers R2 Storage Bucket Item Read` | Bucket | Can read and list objects in buckets. |
| `Workers R2 Data Catalog Write` | Account | Can read from and write to data catalogs. This permission allows access to the Iceberg REST catalog interface. |
| `Workers R2 Data Catalog Read` | Account | Can read from data catalogs. This permission allows read-only access to the Iceberg REST catalog interface. |
#### Example Access Policy
```json
[
{
"id": "f267e341f3dd4697bd3b9f71dd96247f",
"effect": "allow",
"resources": {
"com.cloudflare.edge.r2.bucket.4793d734c0b8e484dfc37ec392b5fa8a_default_my-bucket": "*",
"com.cloudflare.edge.r2.bucket.4793d734c0b8e484dfc37ec392b5fa8a_eu_my-eu-bucket": "*"
},
"permission_groups": [
{
"id": "6a018a9f2fc74eb6b293b0c548f38b39",
"name": "Workers R2 Storage Bucket Item Read"
}
]
}
]
```
### Get S3 API credentials from an API token
You can get the Access Key ID and Secret Access Key values from the response of the [Create Token](https://developers.cloudflare.com/api/resources/user/subresources/tokens/methods/create/) API:
* Access Key ID: The `id` of the API token.
* Secret Access Key: The SHA-256 hash of the API token `value`.
Refer to [Authenticate against R2 API using auth tokens](https://developers.cloudflare.com/r2/examples/authenticate-r2-auth-tokens/) for a tutorial with JavaScript, Python, and Go examples.
## Temporary access credentials
If you need to create temporary credentials for a bucket or a prefix/object within a bucket, you can use the [temp-access-credentials endpoint](https://developers.cloudflare.com/api/resources/r2/subresources/temporary_credentials/methods/create/) in the API. You will need an existing R2 token to pass in as the parent access key id. You can use the credentials from the API result for an S3-compatible request by setting the credential variables like so:
```plaintext
AWS_ACCESS_KEY_ID =
AWS_SECRET_ACCESS_KEY =
AWS_SESSION_TOKEN =
```
Note
The temporary access key cannot have a permission that is higher than the parent access key. e.g. if the parent key is set to `Object Read Write`, the temporary access key could only have `Object Read Write` or `Object Read Only` permissions.
---
title: Workers API · Cloudflare R2 docs
lastUpdated: 2025-12-29T18:01:22.000Z
chatbotDeprioritize: true
source_url:
html: https://developers.cloudflare.com/r2/api/workers/
md: https://developers.cloudflare.com/r2/api/workers/index.md
---
* [Workers API reference](https://developers.cloudflare.com/r2/api/workers/workers-api-reference/)
* [Use R2 from Workers](https://developers.cloudflare.com/r2/api/workers/workers-api-usage/)
* [Use the R2 multipart API from Workers](https://developers.cloudflare.com/r2/api/workers/workers-multipart-usage/)
---
title: Connect to Iceberg engines · Cloudflare R2 docs
description: Find detailed setup instructions for Apache Spark and other common
query engines.
lastUpdated: 2025-09-25T04:10:41.000Z
chatbotDeprioritize: true
source_url:
html: https://developers.cloudflare.com/r2/data-catalog/config-examples/
md: https://developers.cloudflare.com/r2/data-catalog/config-examples/index.md
---
Below are configuration examples to connect various Iceberg engines to [R2 Data Catalog](https://developers.cloudflare.com/r2/data-catalog/):
* [Apache Trino](https://developers.cloudflare.com/r2/data-catalog/config-examples/trino/)
* [DuckDB](https://developers.cloudflare.com/r2/data-catalog/config-examples/duckdb/)
* [PyIceberg](https://developers.cloudflare.com/r2/data-catalog/config-examples/pyiceberg/)
* [Snowflake](https://developers.cloudflare.com/r2/data-catalog/config-examples/snowflake/)
* [Spark (PySpark)](https://developers.cloudflare.com/r2/data-catalog/config-examples/spark-python/)
* [Spark (Scala)](https://developers.cloudflare.com/r2/data-catalog/config-examples/spark-scala/)
* [StarRocks](https://developers.cloudflare.com/r2/data-catalog/config-examples/starrocks/)
---
title: Deleting data · Cloudflare R2 docs
description: How to properly delete data from R2 Data Catalog
lastUpdated: 2026-01-14T21:16:44.000Z
chatbotDeprioritize: false
source_url:
html: https://developers.cloudflare.com/r2/data-catalog/deleting-data/
md: https://developers.cloudflare.com/r2/data-catalog/deleting-data/index.md
---
Deleting data from R2 Data Catalog or any Apache Iceberg catalog requires that operations are done in a transaction through the catalog itself. Manually deleting metadata or data files directly can lead to data catalog corruption.
## Automatic table maintenance
R2 Data Catalog can automatically manage table maintenance operations such as snapshot expiration and compaction. These continuous operations help keep latency and storage costs down.
* **Snapshot expiration**: Automatically removes old snapshots. This reduces metadata overhead. Data files are not removed until orphan file removal is run.
* **Compaction**: Merges small data files into larger ones. This optimizes read performance and reduces the number of files read during queries.
Without enabling automatic maintenance, you need to manually handle these operations.
Learn more in the [table maintenance](https://developers.cloudflare.com/r2/data-catalog/table-maintenance/) documentation.
## Examples of enabling automatic table maintenance in R2 Data Catalog
```bash
# Enable automatic snapshot expiration for entire catalog
npx wrangler r2 bucket catalog snapshot-expiration enable my-bucket \
--older-than-days 30 \
--retain-last 5
# Enable automatic compaction for entire catalog
npx wrangler r2 bucket catalog compaction enable my-bucket \
--target-size 256
```
Refer to additional examples in the [manage catalogs](https://developers.cloudflare.com/r2/data-catalog/manage-catalogs/) documentation.
## Manually deleting and removing data
You need to manually delete data for:
* Complying with data retention policies such as GDPR or CCPA.
* Selective based deletes using conditional logic.
* Removing stale or unreferenced files that R2 Data Catalog does not manage.
The following are basic examples using PySpark but similar operations can be performed using other Iceberg-compatible engines. To configure PySpark, refer to our [example](https://developers.cloudflare.com/r2/data-catalog/config-examples/spark-python/) or the official [PySpark documentation](https://spark.apache.org/docs/latest/api/python/getting_started/index.html).
### Deleting rows from a table
```py
# Creates new snapshots and marks old files for cleanup
spark.sql("""
DELETE FROM r2dc.namespace.table_name
WHERE column_name = 'value'
""")
# The following is effectively a TRUNCATE operation
spark.sql("DELETE FROM r2dc.namespace.table_name")
# For large deletes, use partitioned tables and delete entire partitions for faster performance:
spark.sql("""
DELETE FROM r2dc.namespace.table_name
WHERE date_partition < '2024-01-01'
""")
```
### Dropping tables and namespaces
```py
# Removes table from catalog but keeps data files in R2 storage
spark.sql("DROP TABLE r2dc.namespace.table_name")
# âš ï¸ DANGER: Permanently deletes all data files from R2
# This operation cannot be undone
spark.sql("DROP TABLE r2dc.namespace.table_name PURGE")
# Use CASCADE to drop all tables within the namespace
spark.sql("DROP NAMESPACE r2dc.namespace_name CASCADE")
# You will need to PURGE the tables before running CASCADE to permanently delete data files
# This can be done with a loop over all tables in the namespace
tables = spark.sql("SHOW TABLES IN r2dc.namespace_name").collect()
for row in tables:
table_name = row['tableName']
spark.sql(f"DROP TABLE r2dc.namespace_name.{table_name} PURGE")
spark.sql("DROP NAMESPACE r2dc.namespace_name CASCADE")
```
Data loss warning
`DROP TABLE ... PURGE` permanently deletes all data files from R2 storage. This operation cannot be undone and bypasses time-travel capabilities.
### Manual maintenance operations
```py
# Remove old metadata and data files marked for deletion
# The following retains the last 5 snapshots and deletes files older than Nov 28, 2024
spark.sql("""
CALL r2dc.system.expire_snapshots(
table => 'r2dc.namespace_name.table_name',
older_than => TIMESTAMP '2024-11-28 00:00:00',
retain_last => 5
)
""")
# Removes unreferenced data files from R2 storage (orphan files)
spark.sql("""
CALL r2dc.system.remove_orphan_files(
table => 'namespace.table_name'
)
""")
# Rewrite data files with a target file size (e.g., 512 MB)
spark.sql("""
CALL r2dc.system.rewrite_data_files(
table => 'r2dc.namespace_name.table_name',
options => map('target-file-size-bytes', '536870912')
)
""")
```
## About Apache Iceberg metadata
Apache Iceberg uses a layered metadata structure to manage table data efficiently. Here are the key components and file structure:
* **metadata.json**: Top-level JSON file pointing to the current snapshot
* **snapshot-**\*: Immutable table state for a given point in time
* **manifest-list-\*.avro**: An Avro file listing all manifest files for a given snapshot
* **manifest-file-\*.avro**: An Avro file tracking data files and their statistics
* **data-\*.parquet**: Parquet files containing actual table data
* **Note**: Unchanged manifest files are reused across snapshots
Warning
Manually modifying or deleting any of these files directly can lead to data catalog corruption.
### What happens during deletion
Apache Iceberg supports two deletion modes: **Copy-on-Write (COW)** and **Merge-on-Read (MOR)**. Both create a new snapshot and mark old files for cleanup, but handle the deletion differently:
| Aspect | Copy-on-Write (COW) | Merge-on-Read (MOR) |
| - | - | - |
| **How deletes work** | Rewrites data files without deleted rows | Creates delete files marking rows to skip |
| **Query performance** | Fast (no merge needed) | Slower (requires read-time merge) |
| **Write performance** | Slower (rewrites data files) | Fast (only writes delete markers) |
| **Storage impact** | Creates new data files immediately | Accumulates delete files over time |
| **Maintenance needs** | Snapshot expiration | Snapshot expiration + compaction (`rewrite_data_files`) |
| **Best for** | Read-heavy workloads | Write-heavy workloads with frequent small mutations |
Important for all deletion modes
* Deleted data is **not immediately removed** from R2 - files are marked for cleanup
* Enable [snapshot expiration](https://developers.cloudflare.com/r2/data-catalog/table-maintenance) in R2 Data Catalog to automatically clean up old snapshots and files
### Common deletion operations
These operations work the same way for both COW and MOR tables:
| Operation | What it does | Data deleted? | Reversible? |
| - | - | - | - |
| `DELETE FROM` | Removes rows matching condition | No (marked for cleanup) | Via time travel[1](#user-content-fn-1) |
| `DROP TABLE` | Removes table from catalog | No | Yes (if data files exist) |
| `DROP TABLE ... PURGE` | Removes table and deletes data | **Yes** | **No** |
| `expire_snapshots` | Cleans up old snapshots/files | **Yes** | **No** |
| `remove_orphan_files` | Removes unreferenced files | **Yes** | **No** |
### MOR-specific operations
For Merge-on-Read tables, you may need to manually apply deletes for performance:
| Operation | What it does | When to use |
| - | - | - |
| `rewrite_data_files` (compaction) | Applies deletes and consolidates files | When query performance degrades due to many delete files |
Note
R2 Data Catalog can automate [rewriting data files](https://developers.cloudflare.com/r2/data-catalog/table-maintenance/) for you.
## Related resources
* [Table maintenance](https://developers.cloudflare.com/r2/data-catalog/table-maintenance) - Learn about automatic maintenance operations
* [R2 Data Catalog](https://developers.cloudflare.com/r2/data-catalog/) - Overview and getting started guide
* [Query data](https://developers.cloudflare.com/r2-sql/query-data) - Query tables with R2 SQL
* [Apache Iceberg Maintenance](https://iceberg.apache.org/docs/latest/maintenance/) - Official Iceberg documentation on table maintenance
## Footnotes
1. Time travel available until `expire_snapshots` is called [↩](#user-content-fnref-1)
---
title: Getting started · Cloudflare R2 docs
description: Learn how to enable the R2 Data Catalog on your bucket, load sample
data, and run your first query.
lastUpdated: 2025-09-25T04:07:16.000Z
chatbotDeprioritize: false
source_url:
html: https://developers.cloudflare.com/r2/data-catalog/get-started/
md: https://developers.cloudflare.com/r2/data-catalog/get-started/index.md
---
This guide will instruct you through:
* Creating your first [R2 bucket](https://developers.cloudflare.com/r2/buckets/) and enabling its [data catalog](https://developers.cloudflare.com/r2/data-catalog/).
* Creating an [API token](https://developers.cloudflare.com/r2/api/tokens/) needed for query engines to authenticate with your data catalog.
* Using [PyIceberg](https://py.iceberg.apache.org/) to create your first Iceberg table in a [marimo](https://marimo.io/) Python notebook.
* Using [PyIceberg](https://py.iceberg.apache.org/) to load sample data into your table and query it.
## Prerequisites
1. Sign up for a [Cloudflare account](https://dash.cloudflare.com/sign-up/workers-and-pages).
2. Install [`Node.js`](https://docs.npmjs.com/downloading-and-installing-node-js-and-npm).
Node.js version manager
Use a Node version manager like [Volta](https://volta.sh/) or [nvm](https://github.com/nvm-sh/nvm) to avoid permission issues and change Node.js versions. [Wrangler](https://developers.cloudflare.com/workers/wrangler/install-and-update/), discussed later in this guide, requires a Node version of `16.17.0` or later.
## 1. Create an R2 bucket
* Wrangler CLI
1. If not already logged in, run:
```plaintext
npx wrangler login
```
2. Create an R2 bucket:
```plaintext
npx wrangler r2 bucket create r2-data-catalog-tutorial
```
* Dashboard
1. In the Cloudflare dashboard, go to the **R2 object storage** page.
[Go to **Overview**](https://dash.cloudflare.com/?to=/:account/r2/overview)
2. Select **Create bucket**.
3. Enter the bucket name: r2-data-catalog-tutorial
4. Select **Create bucket**.
## 2. Enable the data catalog for your bucket
* Wrangler CLI
Then, enable the catalog on your chosen R2 bucket:
```plaintext
npx wrangler r2 bucket catalog enable r2-data-catalog-tutorial
```
When you run this command, take note of the "Warehouse" and "Catalog URI". You will need these later.
* Dashboard
1. In the Cloudflare dashboard, go to the **R2 object storage** page.
[Go to **Overview**](https://dash.cloudflare.com/?to=/:account/r2/overview)
2. Select the bucket: r2-data-catalog-tutorial.
3. Switch to the **Settings** tab, scroll down to **R2 Data Catalog**, and select **Enable**.
4. Once enabled, note the **Catalog URI** and **Warehouse name**.
## 3. Create an API token
Iceberg clients (including [PyIceberg](https://py.iceberg.apache.org/)) must authenticate to the catalog with an [R2 API token](https://developers.cloudflare.com/r2/api/tokens/) that has both R2 and catalog permissions.
1. In the Cloudflare dashboard, go to the **R2 object storage** page.
[Go to **Overview**](https://dash.cloudflare.com/?to=/:account/r2/overview)
2. Select **Manage API tokens**.
3. Select **Create API token**.
4. Select the **R2 Token** text to edit your API token name.
5. Under **Permissions**, choose the **Admin Read & Write** permission.
6. Select **Create API Token**.
7. Note the **Token value**.
## 4. Install uv
You need to install a Python package manager. In this guide, use [uv](https://docs.astral.sh/uv/). If you do not already have uv installed, follow the [installing uv guide](https://docs.astral.sh/uv/getting-started/installation/).
## 5. Install marimo and set up your project with uv
We will use [marimo](https://github.com/marimo-team/marimo) as a Python notebook.
1. Create a directory where our notebook will be stored:
```plaintext
mkdir r2-data-catalog-notebook
```
2. Change into our new directory:
```plaintext
cd r2-data-catalog-notebook
```
3. Initialize a new uv project (this creates a `.venv` and a `pyproject.toml`):
```plaintext
uv init
```
4. Add marimo and required dependencies:
```py
uv add marimo pyiceberg pyarrow pandas
```
## 6. Create a Python notebook to interact with the data warehouse
1. Create a file called `r2-data-catalog-tutorial.py`.
2. Paste the following code snippet into your `r2-data-catalog-tutorial.py` file:
```py
import marimo
__generated_with = "0.11.31"
app = marimo.App(width="medium")
@app.cell
def _():
import marimo as mo
return (mo,)
@app.cell
def _():
import pandas
import pyarrow as pa
import pyarrow.compute as pc
import pyarrow.parquet as pq
from pyiceberg.catalog.rest import RestCatalog
# Define catalog connection details (replace variables)
WAREHOUSE = ""
TOKEN = ""
CATALOG_URI = ""
# Connect to R2 Data Catalog
catalog = RestCatalog(
name="my_catalog",
warehouse=WAREHOUSE,
uri=CATALOG_URI,
token=TOKEN,
)
return (
CATALOG_URI,
RestCatalog,
TOKEN,
WAREHOUSE,
catalog,
pa,
pandas,
pc,
pq,
)
@app.cell
def _(catalog):
# Create default namespace if needed
catalog.create_namespace_if_not_exists("default")
return
@app.cell
def _(pa):
# Create simple PyArrow table
df = pa.table({
"id": [1, 2, 3],
"name": ["Alice", "Bob", "Charlie"],
"score": [80.0, 92.5, 88.0],
})
return (df,)
@app.cell
def _(catalog, df):
# Create or load Iceberg table
test_table = ("default", "people")
if not catalog.table_exists(test_table):
print(f"Creating table: {test_table}")
table = catalog.create_table(
test_table,
schema=df.schema,
)
else:
table = catalog.load_table(test_table)
return table, test_table
@app.cell
def _(df, table):
# Append data
table.append(df)
return
@app.cell
def _(table):
print("Table contents:")
scanned = table.scan().to_arrow()
print(scanned.to_pandas())
return (scanned,)
@app.cell
def _():
# Optional cleanup. To run uncomment and run cell
# print(f"Deleting table: {test_table}")
# catalog.drop_table(test_table)
# print("Table dropped.")
return
if __name__ == "__main__":
app.run()
```
3. Replace the `CATALOG_URI`, `WAREHOUSE`, and `TOKEN` variables with your values from sections **2** and **3** respectively.
4. Launch the notebook editor in your browser:
```plaintext
uv run marimo edit r2-data-catalog-tutorial.py
```
Once your notebook connects to the catalog, you'll see the catalog along with its namespaces and tables appear in marimo's Datasources panel.
In the Python notebook above, you:
1. Connect to your catalog.
2. Create the `default` namespace.
3. Create a simple PyArrow table.
4. Create (or load) the `people` table in the `default` namespace.
5. Append sample data to the table.
6. Print the contents of the table.
7. (Optional) Drop the `people` table we created for this tutorial.
## Learn more
[Managing catalogs ](https://developers.cloudflare.com/r2/data-catalog/manage-catalogs/)Enable or disable R2 Data Catalog on your bucket, retrieve configuration details, and authenticate your Iceberg engine.
[Connect to Iceberg engines ](https://developers.cloudflare.com/r2/data-catalog/config-examples/)Find detailed setup instructions for Apache Spark and other common query engines.
---
title: Manage catalogs · Cloudflare R2 docs
description: Understand how to manage Iceberg REST catalogs associated with R2 buckets
lastUpdated: 2026-02-06T15:42:11.000Z
chatbotDeprioritize: false
source_url:
html: https://developers.cloudflare.com/r2/data-catalog/manage-catalogs/
md: https://developers.cloudflare.com/r2/data-catalog/manage-catalogs/index.md
---
Learn how to:
* Enable and disable [R2 Data Catalog](https://developers.cloudflare.com/r2/data-catalog/) on your buckets.
* Enable and disable [table maintenance](https://developers.cloudflare.com/r2/data-catalog/table-maintenance/) features like compaction and snapshot expiration.
* Authenticate Iceberg engines using API tokens.
## Enable R2 Data Catalog on a bucket
Enabling the catalog on a bucket turns on the REST catalog interface and provides a **Catalog URI** and **Warehouse name** required by Iceberg clients. Once enabled, you can create and manage Iceberg tables in that bucket.
* Dashboard
1. In the Cloudflare dashboard, go to the **R2 object storage** page.
[Go to **Overview**](https://dash.cloudflare.com/?to=/:account/r2/overview)
2. Select the bucket you want to enable as a data catalog.
3. Switch to the **Settings** tab, scroll down to **R2 Data Catalog**, and select **Enable**.
4. Once enabled, note the **Catalog URI** and **Warehouse name**.
* Wrangler CLI
To enable the catalog on your bucket, run the [`r2 bucket catalog enable command`](https://developers.cloudflare.com/workers/wrangler/commands/#r2-bucket-catalog-enable):
```bash
npx wrangler r2 bucket catalog enable
```
After enabling, Wrangler will return your catalog URI and warehouse name.
## Disable R2 Data Catalog on a bucket
When you disable the catalog on a bucket, it immediately stops serving requests from the catalog interface. Any Iceberg table references stored in that catalog become inaccessible until you re-enable it.
* Dashboard
1. In the Cloudflare dashboard, go to the **R2 object storage** page.
[Go to **Overview**](https://dash.cloudflare.com/?to=/:account/r2/overview)
2. Select the bucket where you want to disable the data catalog.
3. Switch to the **Settings** tab, scroll down to **R2 Data Catalog**, and select **Disable**.
* Wrangler CLI
To disable the catalog on your bucket, run the [`r2 bucket catalog disable command`](https://developers.cloudflare.com/workers/wrangler/commands/#r2-bucket-catalog-disable):
```bash
npx wrangler r2 bucket catalog disable
```
## Enable compaction
Compaction improves query performance by combining the many small files created during data ingestion into fewer, larger files according to the set `target file size`. For more information about compaction and why it's valuable, refer to [About compaction](https://developers.cloudflare.com/r2/data-catalog/table-maintenance/).
API token permission requirements
Table maintenance operations such as compaction and snapshot expiration requires a Cloudflare API token with both R2 storage and R2 Data Catalog read/write permissions to act as a service credential.
Refer to [Authenticate your Iceberg engine](#authenticate-your-iceberg-engine) for details on creating a token with the required permissions.
* Dashboard
1. In the Cloudflare dashboard, go to the **R2 object storage** page.
[Go to **Overview**](https://dash.cloudflare.com/?to=/:account/r2/overview)
2. Select the bucket you want to enable compaction on.
3. Switch to the **Settings** tab, scroll down to **R2 Data Catalog**, and click on the **Edit** icon next to the compaction card.
4. Enable compaction and optionally set a target file size. The default is 128 MB.
5. (Optional) Provide a Cloudflare API token for compaction to access and rewrite files in your bucket.
6. Select **Save**.
* Wrangler CLI
To enable the compaction on your catalog, run the [`r2 bucket catalog compaction enable` command](https://developers.cloudflare.com/workers/wrangler/commands/#r2-bucket-catalog-compaction-enable):
```bash
# Enable catalog-level compaction (all tables)
npx wrangler r2 bucket catalog compaction enable --target-size 128 --token
# Enable compaction for a specific table
npx wrangler r2 bucket catalog compaction enable --target-size 128
```
Table-level vs Catalog-level compaction
* **Catalog-level**: Applies to all tables in the bucket; requires an API token as a service credential.
* **Table-level**: Applies to a specific table only.
Once enabled, compaction applies retroactively to all existing tables (for catalog-level compaction) or the specified table (for table-level compaction). During open beta, we currently compact up to 2 GB worth of files once per hour for each table.
## Disable compaction
Disabling compaction will prevent the process from running for all tables (catalog level) or a specific table (table level). You can re-enable it at any time.
* Dashboard
1. In the Cloudflare dashboard, go to the **R2 object storage** page.
[Go to **Overview**](https://dash.cloudflare.com/?to=/:account/r2/overview)
2. Select the bucket you want to enable compaction on.
3. Switch to the **Settings** tab, scroll down to **R2 Data Catalog**, and click on the **edit** icon next to the compaction card.
4. Disable compaction.
5. Select **Save**.
* Wrangler CLI
To disable the compaction on your catalog, run the [`r2 bucket catalog compaction disable` command](https://developers.cloudflare.com/workers/wrangler/commands/#r2-bucket-catalog-compaction-disable):
```bash
# Disable catalog-level compaction (all tables)
npx wrangler r2 bucket catalog compaction disable
# Disable compaction for a specific table
npx wrangler r2 bucket catalog compaction disable
```
## Enable snapshot expiration
Snapshot expiration automatically removes old table snapshots to reduce metadata bloat and storage costs. For more information about snapshot expiration and why it is valuable, refer to [Table maintenance](https://developers.cloudflare.com/r2/data-catalog/table-maintenance/).
Note
Snapshot expiration commands are available as of Wrangler version 4.56.0.
To enable snapshot expiration on your catalog, run the [`r2 bucket catalog snapshot-expiration enable` command](https://developers.cloudflare.com/workers/wrangler/commands/#r2-bucket-catalog-snapshot-expiration-enable):
```bash
# Enable catalog-level snapshot expiration (all tables)
npx wrangler r2 bucket catalog snapshot-expiration enable \
--token \
--older-than-days 7 \
--retain-last 10
# Enable snapshot expiration for a specific table
npx wrangler r2 bucket catalog snapshot-expiration enable \
--older-than-days 2 \
--retain-last 5
```
## Disable snapshot expiration
Disabling snapshot expiration prevents the process from running for all tables (catalog level) or a specific table (table level). You can re-enable snapshot expiration at any time.
```bash
# Disable catalog-level snapshot expiration (all tables)
npx wrangler r2 bucket catalog snapshot-expiration disable
# Disable snapshot expiration for a specific table
npx wrangler r2 bucket catalog snapshot-expiration disable
```
## Authenticate your Iceberg engine
To connect your Iceberg engine to R2 Data Catalog, you must provide a Cloudflare API token with **both** R2 Data Catalog permissions and R2 storage permissions. Iceberg engines interact with R2 Data Catalog to perform table operations. The catalog also provides engines with SigV4 credentials, which are required to access the underlying data files stored in R2.
### Create API token in the dashboard
Create an [R2 API token](https://developers.cloudflare.com/r2/api/tokens/#permissions) with **Admin Read & Write** or **Admin Read only** permissions. These permissions include both:
* Access to R2 Data Catalog (read-only or read/write, depending on chosen permission)
* Access to R2 storage (read-only or read/write, depending on chosen permission)
Providing the resulting token value to your Iceberg engine gives it the ability to manage catalog metadata and handle data operations (reads or writes to R2).
### Create API token via API
To create an API token programmatically for use with R2 Data Catalog, you'll need to specify both R2 Data Catalog and R2 storage permission groups in your [Access Policy](https://developers.cloudflare.com/r2/api/tokens/#access-policy).
#### Example Access Policy
```json
[
{
"id": "f267e341f3dd4697bd3b9f71dd96247f",
"effect": "allow",
"resources": {
"com.cloudflare.edge.r2.bucket.4793d734c0b8e484dfc37ec392b5fa8a_default_my-bucket": "*",
"com.cloudflare.edge.r2.bucket.4793d734c0b8e484dfc37ec392b5fa8a_eu_my-eu-bucket": "*"
},
"permission_groups": [
{
"id": "d229766a2f7f4d299f20eaa8c9b1fde9",
"name": "Workers R2 Data Catalog Write"
},
{
"id": "2efd5506f9c8494dacb1fa10a3e7d5b6",
"name": "Workers R2 Storage Bucket Item Write"
}
]
}
]
```
To learn more about how to create API tokens for R2 Data Catalog using the API, including required permission groups and usage examples, refer to the [Create API tokens via API documentation](https://developers.cloudflare.com/r2/api/tokens/#create-api-tokens-via-api).
## R2 Local Uploads
[Local Uploads](https://developers.cloudflare.com/r2/buckets/local-uploads) writes object data to a nearby location, then asynchronously copies it to your bucket. Data is queryable immediately and remains strongly consistent. This can significantly improve latency of writes from Apache Iceberg clients outside of the region of the respective R2 Data Catalog bucket.
To enable R2 Local Uploads, you can use the following Wrangler command:
```bash
npx wrangler r2 bucket catalog local-uploads enable
```
## Limitations
* R2 Data Catalog does not currently support R2 buckets in a non-default jurisdiction.
## Learn more
[Get started ](https://developers.cloudflare.com/r2/data-catalog/get-started/)Learn how to enable the R2 Data Catalog on your bucket, load sample data, and run your first query.
[Connect to Iceberg engines ](https://developers.cloudflare.com/r2/data-catalog/config-examples/)Find detailed setup instructions for Apache Spark and other common query engines.
---
title: Table maintenance · Cloudflare R2 docs
description: Learn how R2 Data Catalog automates table maintenance
lastUpdated: 2025-12-18T17:16:51.000Z
chatbotDeprioritize: false
source_url:
html: https://developers.cloudflare.com/r2/data-catalog/table-maintenance/
md: https://developers.cloudflare.com/r2/data-catalog/table-maintenance/index.md
---
Table maintenance encompasses a set of operations that keep your Apache Iceberg tables performant and cost-efficient over time. As data is written, updated, and deleted, tables accumulate metadata and files that can degrade query performance over time.
R2 Data Catalog automates two critical maintenance operations:
* **Compaction**: Combines small data files into larger, more efficient files to improve query performance
* **Snapshot expiration**: Removes old table snapshots to reduce metadata overhead and storage costs
Without regular maintenance, tables can suffer from:
* **Query performance degradation**: More files to scan means slower queries and higher compute costs
* **Increased storage costs**: Accumulation of small files and old snapshots consumes unnecessary storage
* **Metadata overhead**: Large metadata files slow down query planning and table operations
By enabling automatic table maintenance, R2 Data Catalog ensures your tables remain optimized without having to manually run them yourself.
## Why do I need compaction?
Every write operation in [Apache Iceberg](https://iceberg.apache.org/), no matter how small or large, results in a series of new files being generated. As time goes on, the number of files can grow unbounded. This can lead to:
* Slower queries and increased I/O operations: Without compaction, query engines will have to open and read each individual file, resulting in longer query times and increased costs.
* Increased metadata overhead: Query engines must scan metadata files to determine which ones to read. With thousands of small files, query planning takes longer even before data is accessed.
* Reduced compression efficiency: Smaller files compress less efficiently than larger files, leading to higher storage costs and more data to transfer during queries.
## R2 Data Catalog automatic compaction
R2 Data Catalog can now [manage compaction](https://developers.cloudflare.com/r2/data-catalog/manage-catalogs/) for Apache Iceberg tables stored in R2. When enabled, compaction runs automatically and combines new files that have not been compacted yet.
Compacted files are prefixed with `compacted-` in the `/data/` directory of a respective table.
### Examples
```bash
# Enable catalog-level compaction (all tables)
npx wrangler r2 bucket catalog compaction enable my-bucket \
--target-size 128 \
--token $R2_CATALOG_TOKEN
# Enable compaction for a specific table
npx wrangler r2 bucket catalog compaction enable my-bucket my-namespace my-table \
--target-size 256
# Disable catalog-level compaction
npx wrangler r2 bucket catalog compaction disable my-bucket
# Disable compaction for a specific table
npx wrangler r2 bucket catalog compaction disable my-bucket my-namespace my-table
```
For more details on managing compaction, refer to [Manage catalogs](https://developers.cloudflare.com/r2/data-catalog/manage-catalogs/).
### Choose the right target file size
You can configure the target file size for compaction. Currently, the minimum is 64 MB and the maximum is 512 MB.
Different compute engines have different optimal file sizes, so check their documentation.
Performance tradeoffs depend on your use case. For example, queries that return small amounts of data may perform better with smaller files, as larger files could result in reading unnecessary data.
* For workloads that are more latency sensitive, consider a smaller target file size (for example, 64 MB - 128 MB)
* For streaming ingest workloads, consider medium file sizes (for example, 128 MB - 256 MB)
* For OLAP style queries that need to scan a lot of data, consider larger file sizes (for example, 256 MB - 512 MB)
## Why do I need snapshot expiration?
Every write to an Iceberg table—whether an insert, update, or delete—creates a new snapshot. Over time, these snapshots can accumulate and cause performance issues:
* **Metadata overhead**: Each snapshot adds entries to the table's metadata files. As the number of snapshots grows, metadata files become larger, slowing down query planning and table operations
* **Increased storage costs**: Old snapshots reference data files that may no longer be needed, preventing them from being cleaned up and consuming unnecessary storage
* **Slower table operations**: Operations like listing snapshots or accessing table history become slower over time
## R2 Data Catalog automatic snapshot expiration
### Configure snapshot expiration
Snapshot expiration uses two parameters to determine which snapshots to remove:
* `--older-than-days`: Remove snapshots older than this many days (default: 30 days)
* `--retain-last`: Always keep this minimum number of recent snapshots (default: 5 snapshots)
Both conditions must be met for a snapshot to be expired. This ensures you always retain recent snapshots even if they are older than the age threshold.
### Examples
```bash
# Enable snapshot expiration for entire catalog
# Keep minimum 10 snapshots, expire those older than 7 days
npx wrangler r2 bucket catalog snapshot-expiration enable my-bucket \
--token $R2_CATALOG_TOKEN \
--older-than-days 7 \
--retain-last 10
# Enable for specific table
# Keep minimum 5 snapshots, expire those older than 2 days
npx wrangler r2 bucket catalog snapshot-expiration enable my-bucket my-namespace my-table \
--token $R2_CATALOG_TOKEN \
--older-than-days 2 \
--retain-last 5
# Disable snapshot expiration for a catalog
npx wrangler r2 bucket catalog snapshot-expiration disable my-bucket
```
### Choose the right retention policy
Different workloads require different snapshot retention strategies:
* **Development/testing tables**: Shorter retention (2-7 days, 5 snapshots) to minimize storage costs
* **Production analytics tables**: Medium retention (7-30 days, 10-20 snapshots) for debugging and analysis
* **Compliance/audit tables**: Longer retention (30-90 days, 50+ snapshots) to meet regulatory requirements
* **High-frequency ingest**: Higher minimum snapshot count to preserve more granular history
These are generic recommendations, make sure to consider:
* Time travel requirements
* Compliance requirements
* Storage costs
## Current limitations
* During open beta, compaction will compact up to 2 GB worth of files once per hour for each table.
* Only data files stored in parquet format are currently supported with compaction.
* Orphan file cleanup is not supported yet.
* Minimum target file size for compaction is 64 MB and maximum is 512 MB.
---
title: Migration Strategies · Cloudflare R2 docs
description: You can use a combination of Super Slurper and Sippy to effectively
migrate all objects with minimal downtime.
lastUpdated: 2025-10-21T17:09:06.000Z
chatbotDeprioritize: false
source_url:
html: https://developers.cloudflare.com/r2/data-migration/migration-strategies/
md: https://developers.cloudflare.com/r2/data-migration/migration-strategies/index.md
---
You can use a combination of Super Slurper and Sippy to effectively migrate all objects with minimal downtime.
### When the source bucket is actively being read from / written to
1. Enable Sippy and start using the R2 bucket in your application.
* This copies objects from your previous bucket into the R2 bucket on demand when they are requested by the application.
* New uploads will go to the R2 bucket.
2. Use Super Slurper to trigger a one-off migration to copy the remaining objects into the R2 bucket.
* In the **Destination R2 bucket** > **Overwrite files?**, select "Skip existing".
### When the source bucket is not being read often
1. Use Super Slurper to copy all objects to the R2 bucket.
* Note that Super Slurper may skip some objects if they are uploaded after it lists the objects to be copied.
2. Enable Sippy on your R2 bucket, then start using the R2 bucket in your application.
* New uploads will go to the R2 bucket.
* Objects which were uploaded while Super Slurper was copying the objects will be copied on-demand (by Sippy) when they are requested by the application.
### Optimizing your Slurper data migration performance
For an account, you can run three concurrent Slurper migration jobs at any given time, and each Slurper migration job can process a set amount of requests per second.
To increase overall throughput and reliability, we recommend splitting your migration into smaller, concurrent jobs using the prefix (or bucket subpath) option.
When creating a migration job:
1. Go to the **Source bucket** step.
2. Under **Define rules**, in **Bucket subpath**, specify subpaths to divide your data by prefix.
3. Complete the data migration set up.
For example, suppose your source bucket contains:
You can create separate jobs with prefixes such as:
* `/photos/2024` to migrate all 2024 files
* `/photos/202` to migrate all files from 2023 and 2024
Each prefix runs as an independent migration job, allowing Slurper to transfer data in parallel. This improves total transfer speed and ensures that a failure in one job does not interrupt the others.
---
title: Sippy · Cloudflare R2 docs
description: Sippy is a data migration service that allows you to copy data from
other cloud providers to R2 as the data is requested, without paying
unnecessary cloud egress fees typically associated with moving large amounts
of data.
lastUpdated: 2025-09-03T16:40:54.000Z
chatbotDeprioritize: false
source_url:
html: https://developers.cloudflare.com/r2/data-migration/sippy/
md: https://developers.cloudflare.com/r2/data-migration/sippy/index.md
---
Sippy is a data migration service that allows you to copy data from other cloud providers to R2 as the data is requested, without paying unnecessary cloud egress fees typically associated with moving large amounts of data.
Migration-specific egress fees are reduced by leveraging requests within the flow of your application where you would already be paying egress fees to simultaneously copy objects to R2.
## How it works
When enabled for an R2 bucket, Sippy implements the following migration strategy across [Workers](https://developers.cloudflare.com/r2/api/workers/), [S3 API](https://developers.cloudflare.com/r2/api/s3/), and [public buckets](https://developers.cloudflare.com/r2/buckets/public-buckets/):
* When an object is requested, it is served from your R2 bucket if it is found.
* If the object is not found in R2, the object will simultaneously be returned from your source storage bucket and copied to R2.
* All other operations, including put and delete, continue to work as usual.
## When is Sippy useful?
Using Sippy as part of your migration strategy can be a good choice when:
* You want to start migrating your data, but you want to avoid paying upfront egress fees to facilitate the migration of your data all at once.
* You want to experiment by serving frequently accessed objects from R2 to eliminate egress fees, without investing time in data migration.
* You have frequently changing data and are looking to conduct a migration while avoiding downtime. Sippy can be used to serve requests while [Super Slurper](https://developers.cloudflare.com/r2/data-migration/super-slurper/) can be used to migrate your remaining data.
If you are looking to migrate all of your data from an existing cloud provider to R2 at one time, we recommend using [Super Slurper](https://developers.cloudflare.com/r2/data-migration/super-slurper/).
## Get started with Sippy
Before getting started, you will need:
* An existing R2 bucket. If you don't already have one, refer to [Create buckets](https://developers.cloudflare.com/r2/buckets/create-buckets/).
* [API credentials](https://developers.cloudflare.com/r2/data-migration/sippy/#create-credentials-for-storage-providers) for your source object storage bucket.
* (Wrangler only) Cloudflare R2 Access Key ID and Secret Access Key with read and write permissions. For more information, refer to [Authentication](https://developers.cloudflare.com/r2/api/tokens/).
### Enable Sippy via the Dashboard
1. In the Cloudflare dashboard, go to the **R2 object storage** page.
[Go to **Overview**](https://dash.cloudflare.com/?to=/:account/r2/overview)
2. Select the bucket you'd like to migrate objects to.
3. Switch to the **Settings** tab, then scroll down to the **On Demand Migration** card.
4. Select **Enable** and enter details for the AWS / GCS bucket you'd like to migrate objects from. The credentials you enter must have permissions to read from this bucket. Cloudflare also recommends scoping your credentials to only allow reads from this bucket.
5. Select **Enable**.
### Enable Sippy via Wrangler
#### Set up Wrangler
To begin, install [`npm`](https://docs.npmjs.com/getting-started). Then [install Wrangler, the Developer Platform CLI](https://developers.cloudflare.com/workers/wrangler/install-and-update/).
#### Enable Sippy on your R2 bucket
Log in to Wrangler with the [`wrangler login` command](https://developers.cloudflare.com/workers/wrangler/commands/#login). Then run the [`r2 bucket sippy enable` command](https://developers.cloudflare.com/workers/wrangler/commands/#r2-bucket-sippy-enable):
```sh
npx wrangler r2 bucket sippy enable
```
This will prompt you to select between supported object storage providers and lead you through setup.
### Enable Sippy via API
For information on required parameters and examples of how to enable Sippy, refer to the [API documentation](https://developers.cloudflare.com/api/resources/r2/subresources/buckets/subresources/sippy/methods/update/). For information about getting started with the Cloudflare API, refer to [Make API calls](https://developers.cloudflare.com/fundamentals/api/how-to/make-api-calls/).
Note
If your bucket is setup with [jurisdictional restrictions](https://developers.cloudflare.com/r2/reference/data-location/#jurisdictional-restrictions), you will need to pass a `cf-r2-jurisdiction` request header with that jurisdiction. For example, `cf-r2-jurisdiction: eu`.
### View migration metrics
When enabled, Sippy exposes metrics that help you understand the progress of your ongoing migrations.
| Metric | Description |
| - | - |
| Requests served by Sippy | The percentage of overall requests served by R2 over a period of time. A higher percentage indicates that fewer requests need to be made to the source bucket. |
| Data migrated by Sippy | The amount of data that has been copied from the source bucket to R2 over a period of time. Reported in bytes. |
To view current and historical metrics:
1. In the Cloudflare dashboard, go to the **R2 object storage** page.
[Go to **Overview**](https://dash.cloudflare.com/?to=/:account/r2/overview)
2. Select your bucket.
3. Select the **Metrics** tab.
You can optionally select a time window to query. This defaults to the last 24 hours.
## Disable Sippy on your R2 bucket
### Dashboard
1. In the Cloudflare dashboard, go to the **R2 object storage** page.
[Go to **Overview**](https://dash.cloudflare.com/?to=/:account/r2/overview)
2. Select the bucket you'd like to disable Sippy for.
3. Switch to the **Settings** tab and scroll down to the **On Demand Migration** card.
4. Press **Disable**.
### Wrangler
To disable Sippy, run the [`r2 bucket sippy disable` command](https://developers.cloudflare.com/workers/wrangler/commands/#r2-bucket-sippy-disable):
```sh
npx wrangler r2 bucket sippy disable
```
### API
For more information on required parameters and examples of how to disable Sippy, refer to the [API documentation](https://developers.cloudflare.com/api/resources/r2/subresources/buckets/subresources/sippy/methods/delete/).
## Supported cloud storage providers
Cloudflare currently supports copying data from the following cloud object storage providers to R2:
* Amazon S3
* Google Cloud Storage (GCS)
## R2 API interactions
When Sippy is enabled, it changes the behavior of certain actions on your R2 bucket across [Workers](https://developers.cloudflare.com/r2/api/workers/), [S3 API](https://developers.cloudflare.com/r2/api/s3/), and [public buckets](https://developers.cloudflare.com/r2/buckets/public-buckets/).
| Action | New behavior |
| - | - |
| GetObject | Calls to GetObject will first attempt to retrieve the object from your R2 bucket. If the object is not present, the object will be served from the source storage bucket and simultaneously uploaded to the requested R2 bucket. Additional considerations:- Modifications to objects in the source bucket will not be reflected in R2 after the initial copy. Once an object is stored in R2, it will not be re-retrieved and updated.
- Only user-defined metadata that is prefixed by `x-amz-meta-` in the HTTP response will be migrated. Remaining metadata will be omitted.
- For larger objects (greater than 199 MiB), multiple GET requests may be required to fully copy the object to R2.
- If there are multiple simultaneous GET requests for an object which has not yet been fully copied to R2, Sippy may fetch the object from the source storage bucket multiple times to serve those requests. |
| HeadObject | Behaves similarly to GetObject, but only retrieves object metadata. Will not copy objects to the requested R2 bucket. |
| PutObject | No change to behavior. Calls to PutObject will add objects to the requested R2 bucket. |
| DeleteObject | No change to behavior. Calls to DeleteObject will delete objects in the requested R2 bucket. Additional considerations:- If deletes to objects in R2 are not also made in the source storage bucket, subsequent GetObject requests will result in objects being retrieved from the source bucket and copied to R2. |
Actions not listed above have no change in behavior. For more information, refer to [Workers API reference](https://developers.cloudflare.com/r2/api/workers/workers-api-reference/) or [S3 API compatibility](https://developers.cloudflare.com/r2/api/s3/api/).
## Create credentials for storage providers
### Amazon S3
To copy objects from Amazon S3, Sippy requires access permissions to your bucket. While you can use any AWS Identity and Access Management (IAM) user credentials with the correct permissions, Cloudflare recommends you create a user with a narrow set of permissions.
To create credentials with the correct permissions:
1. Log in to your AWS IAM account.
2. Create a policy with the following format and replace `` with the bucket you want to grant access to:
```json
{
"Version": "2012-10-17",
"Statement": [
{
"Effect": "Allow",
"Action": ["s3:ListBucket*", "s3:GetObject*"],
"Resource": [
"arn:aws:s3:::",
"arn:aws:s3:::/*"
]
}
]
}
```
3. Create a new user and attach the created policy to that user.
You can now use both the Access Key ID and Secret Access Key when enabling Sippy.
### Google Cloud Storage
To copy objects from Google Cloud Storage (GCS), Sippy requires access permissions to your bucket. Cloudflare recommends using the Google Cloud predefined `Storage Object Viewer` role.
To create credentials with the correct permissions:
1. Log in to your Google Cloud console.
2. Go to **IAM & Admin** > **Service Accounts**.
3. Create a service account with the predefined `Storage Object Viewer` role.
4. Go to the **Keys** tab of the service account you created.
5. Select **Add Key** > **Create a new key** and download the JSON key file.
You can now use this JSON key file when enabling Sippy via Wrangler or API.
## Caveats
### ETags
While R2's ETag generation is compatible with S3's during the regular course of operations, ETags are not guaranteed to be equal when an object is migrated using Sippy. Sippy makes autonomous decisions about the operations it uses when migrating objects to optimize for performance and network usage. It may choose to migrate an object in multiple parts, which affects [ETag calculation](https://developers.cloudflare.com/r2/objects/upload-objects/#etags).
For example, a 320 MiB object originally uploaded to S3 using a single `PutObject` operation might be migrated to R2 via multipart operations. In this case, its ETag on R2 will not be the same as its ETag on S3. Similarly, an object originally uploaded to S3 using multipart operations might also have a different ETag on R2 if the part sizes Sippy chooses for its migration differ from the part sizes this object was originally uploaded with.
Relying on matching ETags before and after the migration is therefore discouraged.
---
title: Super Slurper · Cloudflare R2 docs
description: Super Slurper allows you to quickly and easily copy objects from
other cloud providers to an R2 bucket of your choice.
lastUpdated: 2025-09-03T16:40:54.000Z
chatbotDeprioritize: false
source_url:
html: https://developers.cloudflare.com/r2/data-migration/super-slurper/
md: https://developers.cloudflare.com/r2/data-migration/super-slurper/index.md
---
Super Slurper allows you to quickly and easily copy objects from other cloud providers to an R2 bucket of your choice.
Migration jobs:
* Preserve custom object metadata from source bucket by copying them on the migrated objects on R2.
* Do not delete any objects from source bucket.
* Use TLS encryption over HTTPS connections for safe and private object transfers.
## When to use Super Slurper
Using Super Slurper as part of your strategy can be a good choice if the cloud storage bucket you are migrating consists primarily of objects less than 1 TB. Objects greater than 1 TB will be skipped and need to be copied separately.
For migration use cases that do not meet the above criteria, we recommend using tools such as [rclone](https://developers.cloudflare.com/r2/examples/rclone/).
## Use Super Slurper to migrate data to R2
1. In the Cloudflare dashboard, go to the **R2 data migration** page.
[Go to **Data migration**](https://dash.cloudflare.com/?to=/:account/r2/slurper)
2. Select **Migrate files**.
3. Select the source cloud storage provider that you will be migrating data from.
4. Enter your source bucket name and associated credentials and select **Next**.
5. Enter your R2 bucket name and associated credentials and select **Next**.
6. After you finish reviewing the details of your migration, select **Migrate files**.
You can view the status of your migration job at any time by selecting your migration from **Data Migration** page.
### Source bucket options
#### Bucket sub path (optional)
This setting specifies the prefix within the source bucket where objects will be copied from.
### Destination R2 bucket options
#### Overwrite files?
This setting determines what happens when an object being copied from the source storage bucket matches the path of an existing object in the destination R2 bucket. There are two options:
* Overwrite (default)
* Skip
## Supported cloud storage providers
Cloudflare currently supports copying data from the following cloud object storage providers to R2:
* Amazon S3
* Cloudflare R2
* Google Cloud Storage (GCS)
* All S3-compatible storage providers
### Tested S3-compatible storage providers
The following S3-compatible storage providers have been tested and verified to work with Super Slurper:
* Backblaze B2
* DigitalOcean Spaces
* Scaleway Object Storage
* Wasabi Cloud Object Storage
Super Slurper should support transfers from all S3-compatible storage providers, but the ones listed have been explicitly tested.
Note
Have you tested and verified another S3-compatible provider? [Open a pull request](https://github.com/cloudflare/cloudflare-docs/edit/production/src/content/docs/r2/data-migration/super-slurper.mdx) or [create a GitHub issue](https://github.com/cloudflare/cloudflare-docs/issues/new).
## Create credentials for storage providers
### Amazon S3
To copy objects from Amazon S3, Super Slurper requires access permissions to your S3 bucket. While you can use any AWS Identity and Access Management (IAM) user credentials with the correct permissions, Cloudflare recommends you create a user with a narrow set of permissions.
To create credentials with the correct permissions:
1. Log in to your AWS IAM account.
2. Create a policy with the following format and replace `` with the bucket you want to grant access to:
```json
{
"Version": "2012-10-17",
"Statement": [
{
"Effect": "Allow",
"Action": ["s3:Get*", "s3:List*"],
"Resource": ["arn:aws:s3:::", "arn:aws:s3:::/*"]
}
]
}
```
1. Create a new user and attach the created policy to that user.
You can now use both the Access Key ID and Secret Access Key when defining your source bucket.
### Google Cloud Storage
To copy objects from Google Cloud Storage (GCS), Super Slurper requires access permissions to your GCS bucket. You can use the Google Cloud predefined `Storage Admin` role, but Cloudflare recommends creating a custom role with a narrower set of permissions.
To create a custom role with the necessary permissions:
1. Log in to your Google Cloud console.
2. Go to **IAM & Admin** > **Roles**.
3. Find the `Storage Object Viewer` role and select **Create role from this role**.
4. Give your new role a name.
5. Select **Add permissions** and add the `storage.buckets.get` permission.
6. Select **Create**.
To create credentials with your custom role:
1. Log in to your Google Cloud console.
2. Go to **IAM & Admin** > **Service Accounts**.
3. Create a service account with the your custom role.
4. Go to the **Keys** tab of the service account you created.
5. Select **Add Key** > **Create a new key** and download the JSON key file.
You can now use this JSON key file when enabling Super Slurper.
## Caveats
### ETags
While R2's ETag generation is compatible with S3's during the regular course of operations, ETags are not guaranteed to be equal when an object is migrated using Super Slurper. Super Slurper makes autonomous decisions about the operations it uses when migrating objects to optimize for performance and network usage. It may choose to migrate an object in multiple parts, which affects [ETag calculation](https://developers.cloudflare.com/r2/objects/upload-objects/#etags).
For example, a 320 MiB object originally uploaded to S3 using a single `PutObject` operation might be migrated to R2 via multipart operations. In this case, its ETag on R2 will not be the same as its ETag on S3. Similarly, an object originally uploaded to S3 using multipart operations might also have a different ETag on R2 if the part sizes Super Slurper chooses for its migration differ from the part sizes this object was originally uploaded with.
Relying on matching ETags before and after the migration is therefore discouraged.
### Archive storage classes
Objects stored using AWS S3 [archival storage classes](https://aws.amazon.com/s3/storage-classes/#Archive) will be skipped and need to be copied separately. Specifically:
* Files stored using S3 Glacier tiers (not including Glacier Instant Retrieval) will be skipped and logged in the migration log.
* Files stored using S3 Intelligent Tiering and placed in Deep Archive tier will be skipped and logged in the migration log.
---
title: Bucket locks · Cloudflare R2 docs
description: Bucket locks prevent the deletion and overwriting of objects in an
R2 bucket for a specified period — or indefinitely. When enabled, bucket locks
enforce retention policies on your objects, helping protect them from
accidental or premature deletions.
lastUpdated: 2025-09-03T16:40:54.000Z
chatbotDeprioritize: false
source_url:
html: https://developers.cloudflare.com/r2/buckets/bucket-locks/
md: https://developers.cloudflare.com/r2/buckets/bucket-locks/index.md
---
Bucket locks prevent the deletion and overwriting of objects in an R2 bucket for a specified period — or indefinitely. When enabled, bucket locks enforce retention policies on your objects, helping protect them from accidental or premature deletions.
## Get started with bucket locks
Before getting started, you will need:
* An existing R2 bucket. If you do not already have an existing R2 bucket, refer to [Create buckets](https://developers.cloudflare.com/r2/buckets/create-buckets/).
* (API only) An API token with [permissions](https://developers.cloudflare.com/r2/api/tokens/#permissions) to edit R2 bucket configuration.
### Enable bucket lock via dashboard
1. In the Cloudflare dashboard, go to the **R2 object storage** page.
[Go to **Overview**](https://dash.cloudflare.com/?to=/:account/r2/overview)
2. Select the bucket you would like to add bucket lock rule to.
3. Switch to the **Settings** tab, then scroll down to the **Bucket lock rules** card.
4. Select **Add rule** and enter the rule name, prefix, and retention period.
5. Select **Save changes**.
### Enable bucket lock via Wrangler
1. Install [`npm`](https://docs.npmjs.com/getting-started).
2. Install [Wrangler, the Developer Platform CLI](https://developers.cloudflare.com/workers/wrangler/install-and-update/).
3. Log in to Wrangler with the [`wrangler login` command](https://developers.cloudflare.com/workers/wrangler/commands/#login).
4. Add a bucket lock rule to your bucket by running the [`r2 bucket lock add` command](https://developers.cloudflare.com/workers/wrangler/commands/#r2-bucket-lock-add).
```sh
npx wrangler r2 bucket lock add [OPTIONS]
```
Alternatively, you can set the entire bucket lock configuration for a bucket from a JSON file using the [`r2 bucket lock set` command](https://developers.cloudflare.com/workers/wrangler/commands/#r2-bucket-lock-set).
```sh
npx wrangler r2 bucket lock set --file
```
The JSON file should be in the format of the request body of the [put bucket lock configuration API](https://developers.cloudflare.com/api/resources/r2/subresources/buckets/subresources/locks/methods/update/).
### Enable bucket lock via API
For information about getting started with the Cloudflare API, refer to [Make API calls](https://developers.cloudflare.com/fundamentals/api/how-to/make-api-calls/). For information on required parameters and more examples of how to set bucket lock configuration, refer to the [API documentation](https://developers.cloudflare.com/api/resources/r2/subresources/buckets/subresources/locks/methods/update/).
Below is an example of setting a bucket lock configuration (a collection of rules):
```bash
curl -X PUT "https://api.cloudflare.com/client/v4/accounts//r2/buckets//lock" \
-H "Authorization: Bearer " \
-H "Content-Type: application/json" \
-d '{
"rules": [
{
"id": "lock-logs-7d",
"enabled": true,
"prefix": "logs/",
"condition": {
"type": "Age",
"maxAgeSeconds": 604800
}
},
{
"id": "lock-images-indefinite",
"enabled": true,
"prefix": "images/",
"condition": {
"type": "Indefinite"
}
}
]
}'
```
This request creates two rules:
* `lock-logs-7d`: Objects under the `logs/` prefix are retained for 7 days (604800 seconds).
* `lock-images-indefinite`: Objects under the `images/` prefix are locked indefinitely.
Note
If your bucket is setup with [jurisdictional restrictions](https://developers.cloudflare.com/r2/reference/data-location/#jurisdictional-restrictions), you will need to pass a `cf-r2-jurisdiction` request header with that jurisdiction. For example, `cf-r2-jurisdiction: eu`.
## Get bucket lock rules for your R2 bucket
### Dashboard
1. In the Cloudflare dashboard, go to the **R2 object storage** page.
[Go to **Overview**](https://dash.cloudflare.com/?to=/:account/r2/overview)
2. Select the bucket you would like to add bucket lock rule to.
3. Switch to the **Settings** tab, then scroll down to the **Bucket lock rules** card.
### Wrangler
To list bucket lock rules, run the [`r2 bucket lock list` command](https://developers.cloudflare.com/workers/wrangler/commands/#r2-bucket-lock-list):
```sh
npx wrangler r2 bucket lock list
```
### API
For more information on required parameters and examples of how to get bucket lock rules, refer to the [API documentation](https://developers.cloudflare.com/api/resources/r2/subresources/buckets/subresources/locks/methods/get/).
## Remove bucket lock rules from your R2 bucket
### Dashboard
1. In the Cloudflare dashboard, go to the **R2 object storage** page.
[Go to **Overview**](https://dash.cloudflare.com/?to=/:account/r2/overview)
2. Select the bucket you would like to add bucket lock rule to.
3. Switch to the **Settings** tab, then scroll down to the **Bucket lock rules** card.
4. Locate the rule you want to remove, select the `...` icon next to it, and then select **Delete**.
### Wrangler
To remove a bucket lock rule, run the [`r2 bucket lock remove` command](https://developers.cloudflare.com/workers/wrangler/commands/#r2-bucket-lock-remove):
```sh
npx wrangler r2 bucket lock remove --id
```
### API
To remove bucket lock rules via API, exclude them from your updated configuration and use the [put bucket lock configuration API](https://developers.cloudflare.com/api/resources/r2/subresources/buckets/subresources/locks/methods/update/).
## Bucket lock rules
A bucket lock configuration can include up to 1,000 rules. Each rule specifies which objects it covers (via prefix) and how long those objects must remain locked. You can:
* Lock objects for a specific duration. For example, 90 days.
* Retain objects until a certain date. For example, until January 1, 2026.
* Keep objects locked indefinitely.
If multiple rules apply to the same prefix or object key, the strictest (longest) retention requirement takes precedence.
## Notes
* Rules without prefix apply to all objects in the bucket.
* Rules apply to both new and existing objects in the bucket.
* Bucket lock rules take precedence over [lifecycle rules](https://developers.cloudflare.com/r2/buckets/object-lifecycles/). For example, if a lifecycle rule attempts to delete an object at 30 days but a bucket lock rule requires it be retained for 90 days, the object will not be deleted until the 90-day requirement is met.
---
title: Configure CORS · Cloudflare R2 docs
description: Cross-Origin Resource Sharing (CORS) is a standardized method that
prevents domain X from accessing the resources of domain Y. It does so by
using special headers in HTTP responses from domain Y, that allow your browser
to verify that domain Y permits domain X to access these resources.
lastUpdated: 2025-12-12T19:03:39.000Z
chatbotDeprioritize: false
source_url:
html: https://developers.cloudflare.com/r2/buckets/cors/
md: https://developers.cloudflare.com/r2/buckets/cors/index.md
---
[Cross-Origin Resource Sharing (CORS)](https://developer.mozilla.org/en-US/docs/Web/HTTP/CORS) is a standardized method that prevents domain X from accessing the resources of domain Y. It does so by using special headers in HTTP responses from domain Y, that allow your browser to verify that domain Y permits domain X to access these resources.
While CORS can help protect your data from malicious websites, CORS is also used to interact with objects in your bucket and configure policies on your bucket.
CORS is used when you interact with a bucket from a web browser, and you have two options:
**[Set a bucket to public:](#use-cors-with-a-public-bucket)** This option makes your bucket accessible on the Internet as read-only, which means anyone can request and load objects from your bucket in their browser or anywhere else. This option is ideal if your bucket contains images used in a public blog.
**[Presigned URLs:](#use-cors-with-a-presigned-url)** Allows anyone with access to the unique URL to perform specific actions on your bucket.
## Prerequisites
Before you configure CORS, you must have:
* An R2 bucket with at least one object. If you need to create a bucket, refer to [Create a public bucket](https://developers.cloudflare.com/r2/buckets/public-buckets/).
* A domain you can use to access the object. This can also be a `localhost`.
* (Optional) Access keys. An access key is only required when creating a presigned URL.
## Use CORS with a public bucket
[To use CORS with a public bucket](https://developers.cloudflare.com/r2/buckets/public-buckets/), ensure your bucket is set to allow public access.
Next, [add a CORS policy](#add-cors-policies-from-the-dashboard) to your bucket to allow the file to be shared.
## Use CORS with a presigned URL
[Presigned URLs](https://developers.cloudflare.com/r2/api/s3/presigned-urls/) allow temporary access to perform specific actions on your bucket without exposing your credentials. While presigned URLs handle authentication, you still need to configure CORS when making requests from a browser.
When a browser makes a request to a presigned URL on a different origin, the browser enforces CORS. Without a CORS policy, browser-based uploads and downloads using presigned URLs will fail, even though the presigned URL itself is valid.
To enable browser-based access with presigned URLs:
1. [Add a CORS policy](#add-cors-policies-from-the-dashboard) to your bucket that allows requests from your application's origin.
2. Set `AllowedMethods` to match the operations your presigned URLs perform, use `GET`, `PUT`, `HEAD`, and/or `DELETE`.
3. Set `AllowedHeaders` to include any headers the client will send when using the presigned URL, such as headers for content type, checksums, caching, or custom metadata.
4. (Optional) Set `ExposeHeaders` to allow your JavaScript to read response headers like `ETag`, which contains the object's hash and is useful for verifying uploads.
5. (Optional) Set `MaxAgeSeconds` to cache the preflight response and reduce the number of preflight requests the browser makes.
The following example allows browser-based uploads from `https://example.com` with a `Content-Type` header:
```json
[
{
"AllowedOrigins": ["https://example.com"],
"AllowedMethods": ["PUT"],
"AllowedHeaders": ["Content-Type"],
"ExposeHeaders": ["ETag"],
"MaxAgeSeconds": 3600
}
]
```
## Use CORS with a custom domain
[Custom domains](https://developers.cloudflare.com/r2/buckets/public-buckets/#custom-domains) connected to an R2 bucket with a CORS policy automatically return CORS response headers for [cross-origin requests](https://fetch.spec.whatwg.org/#http-cors-protocol).
Cross-origin requests must include a valid `Origin` request header, for example, `Origin: https://example.com`. If you are testing directly or using a command-line tool such as `curl`, you will not see CORS `Access-Control-*` response headers unless the `Origin` request header is included in the request.
Caching and CORS headers
If you set a CORS policy on a bucket that is already serving traffic using a custom domain, any existing cached assets will not reflect the CORS response headers until they are refreshed in cache. Use [Cache Purge](https://developers.cloudflare.com/cache/how-to/purge-cache/) to purge the cache for that hostname after making any CORS policy related changes.
## Add CORS policies from the dashboard
1. In the Cloudflare dashboard, go to the **R2 object storage** page.
[Go to **Overview**](https://dash.cloudflare.com/?to=/:account/r2/overview)
2. Locate and select your bucket from the list.
3. Select **Settings**.
4. Under **CORS Policy**, select **Add CORS policy**.
5. From the **JSON** tab, manually enter or copy and paste your policy into the text box.
6. When you are done, select **Save**.
Your policy displays on the **Settings** page for your bucket.
## Add CORS policies via Wrangler CLI
You can configure CORS rules using the [Wrangler CLI](https://developers.cloudflare.com/r2/reference/wrangler-commands/).
1. Create a JSON file with your CORS configuration:
```json
{
"rules": [
{
"allowed": {
"origins": ["https://example.com"],
"methods": ["GET"]
}
}
]
}
```
1. Apply the CORS policy to your bucket:
```sh
npx wrangler r2 bucket cors set --file cors.json
```
1. Verify the CORS policy was applied:
```sh
npx wrangler r2 bucket cors list
```
## Response headers
The following fields in an R2 CORS policy map to HTTP response headers. These response headers are only returned when the incoming HTTP request is a valid CORS request.
| Field Name | Description | Example |
| - | - | - |
| `AllowedOrigins` | Specifies the value for the `Access-Control-Allow-Origin` header R2 sets when requesting objects in a bucket from a browser. | If a website at `www.test.com` needs to access resources (e.g. fonts, scripts) on a [custom domain](https://developers.cloudflare.com/r2/buckets/public-buckets/#custom-domains) of `static.example.com`, you would set `https://www.test.com` as an `AllowedOrigin`. |
| `AllowedMethods` | Specifies the value for the `Access-Control-Allow-Methods` header R2 sets when requesting objects in a bucket from a browser. | `GET`, `POST`, `PUT` |
| `AllowedHeaders` | Specifies the value for the `Access-Control-Allow-Headers` header R2 sets when requesting objects in this bucket from a browser.Cross-origin requests that include custom headers (e.g. `x-user-id`) should specify these headers as `AllowedHeaders`. | `x-requested-by`, `User-Agent` |
| `ExposeHeaders` | Specifies the headers that can be exposed back, and accessed by, the JavaScript making the cross-origin request. If you need to access headers beyond the [safelisted response headers](https://developer.mozilla.org/en-US/docs/Web/HTTP/Reference/Headers/Access-Control-Expose-Headers#examples), such as `Content-Encoding` or `cf-cache-status`, you must specify it here. | `Content-Encoding`, `cf-cache-status`, `Date` |
| `MaxAgeSeconds` | Specifies the amount of time (in seconds) browsers are allowed to cache CORS preflight responses. Browsers may limit this to 2 hours or less, even if the maximum value (86400) is specified. | `3600` |
## Example
This example shows a CORS policy added for a bucket that contains the `Roboto-Light.ttf` object, which is a font file.
The `AllowedOrigins` specify the web server being used, and `localhost:3000` is the hostname where the web server is running. The `AllowedMethods` specify that only `GET` requests are allowed and can read objects in your bucket.
```json
[
{
"AllowedOrigins": ["http://localhost:3000"],
"AllowedMethods": ["GET"]
}
]
```
In general, a good strategy for making sure you have set the correct CORS rules is to look at the network request that is being blocked by your browser.
* Make sure the rule's `AllowedOrigins` includes the origin where the request is being made from. (like `http://localhost:3000` or `https://yourdomain.com`)
* Make sure the rule's `AllowedMethods` includes the blocked request's method.
* Make sure the rule's `AllowedHeaders` includes the blocked request's headers.
Also note that CORS rule propagation can, in rare cases, take up to 30 seconds.
## Common Issues
* Only a cross-origin request will include CORS response headers.
* A cross-origin request is identified by the presence of an `Origin` HTTP request header, with the value of the `Origin` representing a valid, allowed origin as defined by the `AllowedOrigins` field of your CORS policy.
* A request without an `Origin` HTTP request header will *not* return any CORS response headers. Origin values must match exactly.
* The value(s) for `AllowedOrigins` in your CORS policy must be a valid [HTTP Origin header value](https://fetch.spec.whatwg.org/#origin-header). A valid `Origin` header does *not* include a path component and must only be comprised of a `scheme://host[:port]` (where port is optional).
* Valid `AllowedOrigins` value: `https://static.example.com` - includes the scheme and host. A port is optional and implied by the scheme.
* Invalid `AllowedOrigins` value: `https://static.example.com/` or `https://static.example.com/fonts/Calibri.woff2` - incorrectly includes the path component.
* If you need to access specific header values via JavaScript on the origin page, such as when using a video player, ensure you set `Access-Control-Expose-Headers` correctly and include the headers your JavaScript needs access to, such as `Content-Length`.
---
title: Create new buckets · Cloudflare R2 docs
description: You can create a bucket from the Cloudflare dashboard or using Wrangler.
lastUpdated: 2025-05-28T15:17:46.000Z
chatbotDeprioritize: false
source_url:
html: https://developers.cloudflare.com/r2/buckets/create-buckets/
md: https://developers.cloudflare.com/r2/buckets/create-buckets/index.md
---
You can create a bucket from the Cloudflare dashboard or using Wrangler.
Note
Wrangler is [a command-line tool](https://developers.cloudflare.com/workers/wrangler/install-and-update/) for building with Cloudflare's developer products, including R2.
The R2 support in Wrangler allows you to manage buckets and perform basic operations against objects in your buckets. For more advanced use-cases, including bulk uploads or mirroring files from legacy object storage providers, we recommend [rclone](https://developers.cloudflare.com/r2/examples/rclone/) or an [S3-compatible](https://developers.cloudflare.com/r2/api/s3/) tool of your choice.
## Bucket-Level Operations
Create a bucket with the [`r2 bucket create`](https://developers.cloudflare.com/workers/wrangler/commands/#r2-bucket-create) command:
```sh
wrangler r2 bucket create your-bucket-name
```
Note
* Bucket names can only contain lowercase letters (a-z), numbers (0-9), and hyphens (-).
* Bucket names cannot begin or end with a hyphen.
* Bucket names can only be between 3-63 characters in length.
The placeholder text is only for the example.
List buckets in the current account with the [`r2 bucket list`](https://developers.cloudflare.com/workers/wrangler/commands/#r2-bucket-list) command:
```sh
wrangler r2 bucket list
```
Delete a bucket with the [`r2 bucket delete`](https://developers.cloudflare.com/workers/wrangler/commands/#r2-bucket-delete) command. Note that the bucket must be empty and all objects must be deleted.
```sh
wrangler r2 bucket delete BUCKET_TO_DELETE
```
## Notes
* Bucket names and buckets are not public by default. To allow public access to a bucket, refer to [Public buckets](https://developers.cloudflare.com/r2/buckets/public-buckets/).
* For information on controlling access to your R2 bucket with Cloudflare Access, refer to [Protect an R2 Bucket with Cloudflare Access](https://developers.cloudflare.com/r2/tutorials/cloudflare-access/).
* Invalid (unauthorized) access attempts to private buckets do not incur R2 operations charges against that bucket. Refer to the [R2 pricing FAQ](https://developers.cloudflare.com/r2/pricing/#frequently-asked-questions) to understand what operations are billed vs. not billed.
---
title: Event notifications · Cloudflare R2 docs
description: Event notifications send messages to your queue when data in your
R2 bucket changes. You can consume these messages with a consumer Worker or
pull over HTTP from outside of Cloudflare Workers.
lastUpdated: 2025-09-03T16:40:54.000Z
chatbotDeprioritize: false
source_url:
html: https://developers.cloudflare.com/r2/buckets/event-notifications/
md: https://developers.cloudflare.com/r2/buckets/event-notifications/index.md
---
Event notifications send messages to your [queue](https://developers.cloudflare.com/queues/) when data in your R2 bucket changes. You can consume these messages with a [consumer Worker](https://developers.cloudflare.com/queues/reference/how-queues-works/#create-a-consumer-worker) or [pull over HTTP](https://developers.cloudflare.com/queues/configuration/pull-consumers/) from outside of Cloudflare Workers.
## Get started with event notifications
### Prerequisites
Before getting started, you will need:
* An existing R2 bucket. If you do not already have an existing R2 bucket, refer to [Create buckets](https://developers.cloudflare.com/r2/buckets/create-buckets/).
* An existing queue. If you do not already have a queue, refer to [Create a queue](https://developers.cloudflare.com/queues/get-started/#2-create-a-queue).
* A [consumer Worker](https://developers.cloudflare.com/queues/reference/how-queues-works/#create-a-consumer-worker) or [HTTP pull](https://developers.cloudflare.com/queues/configuration/pull-consumers/) enabled on your Queue.
### Enable event notifications via Dashboard
1. In the Cloudflare dashboard, go to the **R2 object storage** page.
[Go to **Overview**](https://dash.cloudflare.com/?to=/:account/r2/overview)
2. Select the bucket you'd like to add an event notification rule to.
3. Switch to the **Settings** tab, then scroll down to the **Event notifications** card.
4. Select **Add notification** and choose the queue you'd like to receive notifications and the [type of events](https://developers.cloudflare.com/r2/buckets/event-notifications/#event-types) that will trigger them.
5. Select **Add notification**.
### Enable event notifications via Wrangler
#### Set up Wrangler
To begin, install [`npm`](https://docs.npmjs.com/getting-started). Then [install Wrangler, the Developer Platform CLI](https://developers.cloudflare.com/workers/wrangler/install-and-update/).
#### Enable event notifications on your R2 bucket
Log in to Wrangler with the [`wrangler login` command](https://developers.cloudflare.com/workers/wrangler/commands/#login). Then add an [event notification rule](https://developers.cloudflare.com/r2/buckets/event-notifications/#event-notification-rules) to your bucket by running the [`r2 bucket notification create` command](https://developers.cloudflare.com/workers/wrangler/commands/#r2-bucket-notification-create).
```sh
npx wrangler r2 bucket notification create --event-type --queue
```
To add filtering based on `prefix` or `suffix` use the `--prefix` or `--suffix` flag, respectively.
```sh
# Filter using prefix
$ npx wrangler r2 bucket notification create --event-type --queue --prefix ""
# Filter using suffix
$ npx wrangler r2 bucket notification create --event-type --queue --suffix ""
# Filter using prefix and suffix. Both the conditions will be used for filtering
$ npx wrangler r2 bucket notification create --event-type --queue --prefix "" --suffix ""
```
For a more complete step-by-step example, refer to the [Log and store upload events in R2 with event notifications](https://developers.cloudflare.com/r2/tutorials/upload-logs-event-notifications/) example.
## Event notification rules
Event notification rules determine the [event types](https://developers.cloudflare.com/r2/buckets/event-notifications/#event-types) that trigger notifications and optionally enable filtering based on object `prefix` and `suffix`. You can have up to 100 event notification rules per R2 bucket.
## Event types
| Event type | Description | Trigger actions |
| - | - | - |
| `object-create` | Triggered when new objects are created or existing objects are overwritten. | * `PutObject`
* `CopyObject`
* `CompleteMultipartUpload` |
| `object-delete` | Triggered when an object is explicitly removed from the bucket. | - `DeleteObject`
- `LifecycleDeletion` |
## Message format
Queue consumers receive notifications as [Messages](https://developers.cloudflare.com/queues/configuration/javascript-apis/#message). The following is an example of the body of a message that a consumer Worker will receive:
```json
{
"account": "3f4b7e3dcab231cbfdaa90a6a28bd548",
"action": "CopyObject",
"bucket": "my-bucket",
"object": {
"key": "my-new-object",
"size": 65536,
"eTag": "c846ff7a18f28c2e262116d6e8719ef0"
},
"eventTime": "2024-05-24T19:36:44.379Z",
"copySource": {
"bucket": "my-bucket",
"object": "my-original-object"
}
}
```
### Properties
| Property | Type | Description |
| - | - | - |
| `account` | String | The Cloudflare account ID that the event is associated with. |
| `action` | String | The type of action that triggered the event notification. Example actions include: `PutObject`, `CopyObject`, `CompleteMultipartUpload`, `DeleteObject`. |
| `bucket` | String | The name of the bucket where the event occurred. |
| `object` | Object | A nested object containing details about the object involved in the event. |
| `object.key` | String | The key (or name) of the object within the bucket. |
| `object.size` | Number | The size of the object in bytes. Note: not present for object-delete events. |
| `object.eTag` | String | The entity tag (eTag) of the object. Note: not present for object-delete events. |
| `eventTime` | String | The time when the action that triggered the event occurred. |
| `copySource` | Object | A nested object containing details about the source of a copied object. Note: only present for events triggered by `CopyObject`. |
| `copySource.bucket` | String | The bucket that contained the source object. |
| `copySource.object` | String | The name of the source object. |
## Notes
* Queues [per-queue message throughput](https://developers.cloudflare.com/queues/platform/limits/) is currently 5,000 messages per second. If your workload produces more than 5,000 notifications per second, we recommend splitting notification rules across multiple queues.
* Rules without prefix/suffix apply to all objects in the bucket.
* Overlapping or conflicting rules that could trigger multiple notifications for the same event are not allowed. For example, if you have an `object-create` (or `PutObject` action) rule without a prefix and suffix, then adding another `object-create` (or `PutObject` action) rule with a prefix like `images/` could trigger more than one notification for a single upload, which is invalid.
---
title: Local uploads · Cloudflare R2 docs
description: You can enable Local Uploads on your bucket to improve the
performance of upload requests when clients upload data from a different
region than your bucket. Local Uploads writes object data to a nearby
location, then asynchronously copies it to your bucket. Data is available
immediately and remains strongly consistent.
lastUpdated: 2026-02-03T04:13:50.000Z
chatbotDeprioritize: false
source_url:
html: https://developers.cloudflare.com/r2/buckets/local-uploads/
md: https://developers.cloudflare.com/r2/buckets/local-uploads/index.md
---
You can enable Local Uploads on your bucket to improve the performance of upload requests when clients upload data from a different region than your bucket. Local Uploads writes object data to a nearby location, then asynchronously copies it to your bucket. Data is available immediately and remains strongly consistent.
## How it works
The following sections describe how R2 handles upload requests with and without Local Uploads enabled.
### Without Local Uploads
When a client uploads an object to your R2 bucket, the object data must travel from the client to the storage infrastructure of your bucket. This behavior can result in higher latency and lower reliability when your client is in a different region than the bucket. Refer to [How R2 works](https://developers.cloudflare.com/r2/how-r2-works/) for details.
### With Local Uploads
When you make an upload request (i.e. `PutObject` and `UploadPart`) to a bucket with Local Uploads enabled, there are two cases that are handled:
* **Client and bucket in same region:** R2 follows the normal upload flow where object data is uploaded from the client to the storage infrastructure of your bucket.
* **Client and bucket in different regions:** Object data is written to storage near the client, then asynchronously replicated to your bucket. The object is immediately accessible and remains durable during the process.
## When to use local uploads
Local uploads are built for workloads that receive a lot of uploads originating from different geographic regions than where your bucket is located. This feature is ideal when:
* Your users are globally distributed
* Upload performance and reliability is critical to your application
* You want to optimize write performance without changing your bucket's primary location
To understand the geographic distribution of where your read and write requests are initiated:
1. Log in to the Cloudflare dashboard, and go to R2 Overview.
[Go to **Overview**](https://dash.cloudflare.com/?to=/:account/r2/overview)
2. Select your bucket.
3. Select **Metrics** and view the **Request Distribution** chart.
### Read latency considerations
When local uploads is enabled, uploaded data may temporarily reside near the client before replication completes.
If your workload requires immediate read after write, consider where your read requests originate. Reads from the uploader's region will be fast, while reads from near the bucket's region may experience cross-region latency until replication completes.
### Jurisdiction restriction
Local uploads are not supported for buckets with [jurisdictional restrictions](https://developers.cloudflare.com/r2/reference/data-location/#jurisdictional-restrictions), because it requires temporarily routing data through locations outside the bucket’s region.
## Enable local uploads
When you enable Local Uploads, existing uploads will complete as expected with no interruption to traffic.
* Dashboard
1. Log in to the Cloudflare dashboard, and go to R2 Overview.
[Go to **Overview**](https://dash.cloudflare.com/?to=/:account/r2/overview)
2. Select your bucket.
3. Select **Settings**.
4. Under **Local Uploads**, select **Enable**.
* Wrangler
Run the following command:
```sh
npx wrangler r2 bucket local-uploads enable
```
## Disable local uploads
You can disable local uploads at any time. Existing requests made with local uploads will complete replication with no interruption to your traffic.
* Dashboard
1. Log in to the Cloudflare dashboard, and go to R2 Overview.
[Go to **Overview**](https://dash.cloudflare.com/?to=/:account/r2/overview)
2. Select your bucket.
3. Select **Settings**.
4. Under **Local Uploads**, select **Disable**.
* Wrangler
Run the following command:
```sh
npx wrangler r2 bucket local-uploads disable
```
## Pricing
There is **no additional cost** to enable local uploads. Upload requests made with this feature enabled incur the standard [Class A operation costs](https://developers.cloudflare.com/r2/pricing/), same as upload requests made without local uploads.
---
title: Object lifecycles · Cloudflare R2 docs
description: Object lifecycles determine the retention period of objects
uploaded to your bucket and allow you to specify when objects should
transition from Standard storage to Infrequent Access storage.
lastUpdated: 2025-09-03T16:40:54.000Z
chatbotDeprioritize: false
source_url:
html: https://developers.cloudflare.com/r2/buckets/object-lifecycles/
md: https://developers.cloudflare.com/r2/buckets/object-lifecycles/index.md
---
Object lifecycles determine the retention period of objects uploaded to your bucket and allow you to specify when objects should transition from Standard storage to Infrequent Access storage.
A lifecycle configuration is a collection of lifecycle rules that define actions to apply to objects during their lifetime.
For example, you can create an object lifecycle rule to delete objects after 90 days, or you can set a rule to transition objects to Infrequent Access storage after 30 days.
## Behavior
* Objects will typically be removed from a bucket within 24 hours of the `x-amz-expiration` value.
* When a lifecycle configuration is applied that deletes objects, newly uploaded objects' `x-amz-expiration` value immediately reflects the expiration based on the new rules, but existing objects may experience a delay. Most objects will be transitioned within 24 hours but may take longer depending on the number of objects in the bucket. While objects are being migrated, you may see old applied rules from the previous configuration.
* An object is no longer billable once it has been deleted.
* Buckets have a default lifecycle rule to expire multipart uploads seven days after initiation.
* When an object is transitioned from Standard storage to Infrequent Access storage, a [Class A operation](https://developers.cloudflare.com/r2/pricing/#class-a-operations) is incurred.
* When rules conflict and specify both a storage class transition and expire transition within a 24-hour period, the expire (or delete) lifecycle transition takes precedence over transitioning storage class.
## Configure lifecycle rules for your bucket
When you create an object lifecycle rule, you can specify which prefix you would like it to apply to.
* Note that object lifecycles currently has a 1000 rule maximum.
* Managing object lifecycles is a bucket-level action, and requires an API token with the [`Workers R2 Storage Write`](https://developers.cloudflare.com/r2/api/tokens/#permission-groups) permission group.
### Dashboard
1. In the Cloudflare dashboard, go to the **R2 object storage** page.
[Go to **Overview**](https://dash.cloudflare.com/?to=/:account/r2/overview)
2. Locate and select your bucket from the list.
3. From the bucket page, select **Settings**.
4. Under **Object Lifecycle Rules**, select **Add rule**.
5. Fill out the fields for the new rule.
6. When you are done, select **Save changes**.
### Wrangler
1. Install [`npm`](https://docs.npmjs.com/getting-started).
2. Install [Wrangler, the Developer Platform CLI](https://developers.cloudflare.com/workers/wrangler/install-and-update/).
3. Log in to Wrangler with the [`wrangler login` command](https://developers.cloudflare.com/workers/wrangler/commands/#login).
4. Add a lifecycle rule to your bucket by running the [`r2 bucket lifecycle add` command](https://developers.cloudflare.com/workers/wrangler/commands/#r2-bucket-lifecycle-add).
```sh
npx wrangler r2 bucket lifecycle add [OPTIONS]
```
Alternatively you can set the entire lifecycle configuration for a bucket from a JSON file using the [`r2 bucket lifecycle set` command](https://developers.cloudflare.com/workers/wrangler/commands/#r2-bucket-lifecycle-set).
```sh
npx wrangler r2 bucket lifecycle set --file
```
The JSON file should be in the format of the request body of the [put object lifecycle configuration API](https://developers.cloudflare.com/api/resources/r2/subresources/buckets/subresources/lifecycle/methods/update/).
### S3 API
Below is an example of configuring a lifecycle configuration (a collection of lifecycle rules) with different sets of rules for different potential use cases.
```js
const client = new S3({
endpoint: "https://.r2.cloudflarestorage.com",
credentials: {
accessKeyId: "",
secretAccessKey: "",
},
region: "auto",
});
```
```javascript
await client
.putBucketLifecycleConfiguration({
Bucket: "testBucket",
LifecycleConfiguration: {
Rules: [
// Example: deleting objects on a specific date
// Delete 2019 documents in 2024
{
ID: "Delete 2019 Documents",
Status: "Enabled",
Filter: {
Prefix: "2019/",
},
Expiration: {
Date: new Date("2024-01-01"),
},
},
// Example: transitioning objects to Infrequent Access storage by age
// Transition objects older than 30 days to Infrequent Access storage
{
ID: "Transition Objects To Infrequent Access",
Status: "Enabled",
Transitions: [
{
Days: 30,
StorageClass: "STANDARD_IA",
},
],
},
// Example: deleting objects by age
// Delete logs older than 90 days
{
ID: "Delete Old Logs",
Status: "Enabled",
Filter: {
Prefix: "logs/",
},
Expiration: {
Days: 90,
},
},
// Example: abort all incomplete multipart uploads after a week
{
ID: "Abort Incomplete Multipart Uploads",
Status: "Enabled",
AbortIncompleteMultipartUpload: {
DaysAfterInitiation: 7,
},
},
// Example: abort user multipart uploads after a day
{
ID: "Abort User Incomplete Multipart Uploads",
Status: "Enabled",
Filter: {
Prefix: "useruploads/",
},
AbortIncompleteMultipartUpload: {
// For uploads matching the prefix, this rule will take precedence
// over the one above due to its earlier expiration.
DaysAfterInitiation: 1,
},
},
],
},
})
.promise();
```
## Get lifecycle rules for your bucket
### Wrangler
To get the list of lifecycle rules associated with your bucket, run the [`r2 bucket lifecycle list` command](https://developers.cloudflare.com/workers/wrangler/commands/#r2-bucket-lifecycle-list).
```sh
npx wrangler r2 bucket lifecycle list
```
### S3 API
```js
import S3 from "aws-sdk/clients/s3.js";
// Configure the S3 client to talk to R2.
const client = new S3({
endpoint: "https://.r2.cloudflarestorage.com",
credentials: {
accessKeyId: "",
secretAccessKey: "",
},
region: "auto",
});
// Get lifecycle configuration for bucket
console.log(
await client
.getBucketLifecycleConfiguration({
Bucket: "bucketName",
})
.promise(),
);
```
## Delete lifecycle rules from your bucket
### Dashboard
1. In the Cloudflare dashboard, go to the **R2 object storage** page.
[Go to **Overview**](https://dash.cloudflare.com/?to=/:account/r2/overview)
2. Locate and select your bucket from the list.
3. From the bucket page, select **Settings**.
4. Under **Object lifecycle rules**, select the rules you would like to delete.
5. When you are done, select **Delete rule(s)**.
### Wrangler
To remove a specific lifecycle rule from your bucket, run the [`r2 bucket lifecycle remove` command](https://developers.cloudflare.com/workers/wrangler/commands/#r2-bucket-lifecycle-remove).
```sh
npx wrangler r2 bucket lifecycle remove --id
```
### S3 API
```js
import S3 from "aws-sdk/clients/s3.js";
// Configure the S3 client to talk to R2.
const client = new S3({
endpoint: "https://.r2.cloudflarestorage.com",
credentials: {
accessKeyId: "",
secretAccessKey: "",
},
region: "auto",
});
// Delete lifecycle configuration for bucket
await client
.deleteBucketLifecycle({
Bucket: "bucketName",
})
.promise();
```
---
title: Public buckets · Cloudflare R2 docs
description: Public Bucket is a feature that allows users to expose the contents
of their R2 buckets directly to the Internet. By default, buckets are never
publicly accessible and will always require explicit user permission to
enable.
lastUpdated: 2025-10-23T19:01:53.000Z
chatbotDeprioritize: false
source_url:
html: https://developers.cloudflare.com/r2/buckets/public-buckets/
md: https://developers.cloudflare.com/r2/buckets/public-buckets/index.md
---
Public Bucket is a feature that allows users to expose the contents of their R2 buckets directly to the Internet. By default, buckets are never publicly accessible and will always require explicit user permission to enable.
Public buckets can be set up in either one of two ways:
* Expose your bucket as a custom domain under your control.
* Expose your bucket using a Cloudflare-managed `https://r2.dev` subdomain for non-production use cases.
These options can be used independently. Enabling custom domains does not require enabling `r2.dev` access.
To use features like WAF custom rules, caching, access controls, or bot management, you must configure your bucket behind a custom domain. These capabilities are not available when using the `r2.dev` development url.
Note
Currently, public buckets do not let you list the bucket contents at the root of your (sub) domain.
## Custom domains
### Caching
Domain access through a custom domain allows you to use [Cloudflare Cache](https://developers.cloudflare.com/cache/) to accelerate access to your R2 bucket.
Configure your cache to use [Smart Tiered Cache](https://developers.cloudflare.com/cache/how-to/tiered-cache/#smart-tiered-cache) to have a single upper tier data center next to your R2 bucket.
Note
By default, only certain file types are cached. To cache all files in your bucket, you must set a Cache Everything page rule.
For more information on default Cache behavior and how to customize it, refer to [Default Cache Behavior](https://developers.cloudflare.com/cache/concepts/default-cache-behavior/#default-cached-file-extensions)
### Access control
To restrict access to your custom domain's bucket, use Cloudflare's existing security products.
* [Cloudflare Zero Trust Access](https://developers.cloudflare.com/cloudflare-one/access-controls/): Protects buckets that should only be accessible by your teammates. Refer to [Protect an R2 Bucket with Cloudflare Access](https://developers.cloudflare.com/r2/tutorials/cloudflare-access/) tutorial for more information.
* [Cloudflare WAF Token Authentication](https://developers.cloudflare.com/waf/custom-rules/use-cases/configure-token-authentication/): Restricts access to documents, files, and media to selected users by providing them with an access token.
Warning
Disable public access to your [`r2.dev` subdomain](#disable-public-development-url) when using products like WAF or Cloudflare Access. If you do not disable public access, your bucket will remain publicly available through your `r2.dev` subdomain.
### Minimum TLS Version & Cipher Suites
To customise the minimum TLS version or cipher suites of a custom hostname of an R2 bucket, you can issue an API call to edit [R2 custom domain settings](https://developers.cloudflare.com/api/resources/r2/subresources/buckets/subresources/domains/subresources/custom/methods/update/). You will need to add the optional `minTLS` and `ciphers` parameters to the request body. For a list of the cipher suites you can specify, refer to [Supported cipher suites](https://developers.cloudflare.com/ssl/edge-certificates/additional-options/cipher-suites/supported-cipher-suites/).
## Add your domain to Cloudflare
The domain being used must have been added as a [zone](https://developers.cloudflare.com/fundamentals/concepts/accounts-and-zones/#zones) in the same account as the R2 bucket.
* If your domain is already managed by Cloudflare, you can proceed to [Connect a bucket to a custom domain](https://developers.cloudflare.com/r2/buckets/public-buckets/#connect-a-bucket-to-a-custom-domain).
* If your domain is not managed by Cloudflare, you need to set it up using a [partial (CNAME) setup](https://developers.cloudflare.com/dns/zone-setups/partial-setup/) to add it to your account.
Once the domain exists in your Cloudflare account (regardless of setup type), you can link it to your bucket.
## Connect a bucket to a custom domain
1. In the Cloudflare dashboard, go to the **R2 object storage** page.
[Go to **Overview**](https://dash.cloudflare.com/?to=/:account/r2/overview)
2. Select your bucket.
3. Select **Settings**.
4. Under **Custom Domains**, select **Add**.
5. Enter the domain name you want to connect to and select **Continue**.
6. Review the new record that will be added to the DNS table and select **Connect Domain**.
Your domain is now connected. The status takes a few minutes to change from **Initializing** to **Active**, and you may need to refresh to review the status update. If the status has not changed, select the *...* next to your bucket and select **Retry connection**.
To view the added DNS record, select **...** next to the connected domain and select **Manage DNS**.
Note
If the zone is on an Enterprise plan, make sure that you [release the zone hold](https://developers.cloudflare.com/fundamentals/account/account-security/zone-holds/#release-zone-holds) before adding the custom domain.
A zone hold would prevent the custom subdomain from activating.
## Disable domain access
Disabling a domain will turn off public access to your bucket through that domain. Access through other domains or the managed `r2.dev` subdomain are unaffected. The specified domain will also remain connected to R2 until you remove it or delete the bucket.
To disable a domain:
1. In **R2**, select the bucket you want to modify.
2. On the bucket page, Select **Settings**, go to **Custom Domains**.
3. Next to the domain you want to disable, select **...** and **Disable domain**.
4. The badge under **Access to Bucket** will update to **Not allowed**.
## Remove domain
Removing a custom domain will disconnect it from your bucket and delete its configuration from the dashboard. Your bucket will remain publicly accessible through any other enabled access method, but the domain will no longer appear in the connected domains list.
To remove a domain:
1. In **R2**, select the bucket you want to modify.
2. On the bucket page, Select **Settings**, go to **Custom Domains**.
3. Next to the domain you want to disable, select **...** and **Remove domain**.
4. Select **Remove domain** in the confirmation window. This step also removes the CNAME record pointing to the domain. You can always add the domain again.
## Public development URL
Expose the contents of this R2 bucket to the internet through a Cloudflare-managed r2.dev subdomain. This endpoint is intended for non-production traffic.
Note
Public access through `r2.dev` subdomains are rate limited and should only be used for development purposes.
To enable access management, Cache and bot management features, you must set up a custom domain when enabling public access to your bucket.
Avoid creating a CNAME record pointing to the `r2.dev` subdomain. This is an **unsupported access path**, and we cannot guarantee consistent reliability or performance. For production use, [add your domain to Cloudflare](#add-your-domain-to-cloudflare) instead.
### Enable public development url
When you enable public development URL access for your bucket, its contents become available on the internet through a Cloudflare-managed `r2.dev` subdomain.
To enable access through `r2.dev` for your buckets:
1. In **R2**, select the bucket you want to modify.
2. On the bucket page, select **Settings**.
3. Under **Public Development URL**, select **Enable**.
4. In **Allow Public Access?**, confirm your choice by typing `allow` to confirm and select **Allow**.
5. You can now access the bucket and its objects using the Public Bucket URL.
To verify that your bucket is publicly accessible, check that **Public URL Access** shows **Allowed** in you bucket settings.
### Disable public development url
Disabling public development URL access removes your bucket's exposure through the `r2.dev` subdomain. The bucket and its objects will no longer be accessible via the Public Bucket URL.
If you have connected other domains, the bucket will remain accessible for those domains.
To disable public access for your bucket:
1. In **R2**, select the bucket you want to modify.
2. On the bucket page, select **Settings**.
3. Under **Public Development URL**, select **Disable**.
4. In **Disallow Public Access?**, type `disallow` to confirm and select **Disallow**.
---
title: Storage classes · Cloudflare R2 docs
description: Storage classes allow you to trade off between the cost of storage
and the cost of accessing data. Every object stored in R2 has an associated
storage class.
lastUpdated: 2025-10-14T11:41:30.000Z
chatbotDeprioritize: false
source_url:
html: https://developers.cloudflare.com/r2/buckets/storage-classes/
md: https://developers.cloudflare.com/r2/buckets/storage-classes/index.md
---
Storage classes allow you to trade off between the cost of storage and the cost of accessing data. Every object stored in R2 has an associated storage class.
All storage classes share the following characteristics:
* Compatible with Workers API, S3 API, and public buckets.
* 99.999999999% (eleven 9s) of annual durability.
* No minimum object size.
## Available storage classes
| Storage class | Minimum storage duration | Data retrieval fees (processing) | Egress fees (data transfer to Internet) |
| - | - | - | - |
| Standard | None | None | None |
| Infrequent Access | 30 days | Yes | None |
For more information on how storage classes impact pricing, refer to [Pricing](https://developers.cloudflare.com/r2/pricing/).
### Standard storage
Standard storage is designed for data that is accessed frequently. This is the default storage class for new R2 buckets unless otherwise specified.
#### Example use cases
* Website and application data
* Media content (e.g., images, video)
* Storing large datasets for analysis and processing
* AI training data
* Other workloads involving frequently accessed data
### Infrequent Access storage
Infrequent Access storage is ideal for data that is accessed less frequently. This storage class offers lower storage cost compared to Standard storage, but includes [retrieval fees](https://developers.cloudflare.com/r2/pricing/#data-retrieval) and a 30 day [minimum storage duration](https://developers.cloudflare.com/r2/pricing/#minimum-storage-duration) requirement.
Note
For objects stored in Infrequent Access storage, you will be charged for the object for the minimum storage duration even if the object was deleted, moved, or replaced before the specified duration.
#### Example use cases
* Long-term data archiving (for example, logs and historical records needed for compliance)
* Data backup and disaster recovery
* Long tail user-generated content
## Set default storage class for buckets
By setting the default storage class for a bucket, all objects uploaded into the bucket will automatically be assigned the selected storage class unless otherwise specified. Default storage class can be changed after bucket creation in the Dashboard.
To learn more about creating R2 buckets, refer to [Create new buckets](https://developers.cloudflare.com/r2/buckets/create-buckets/).
## Set storage class for objects
### Specify storage class during object upload
To learn more about how to specify the storage class for new objects, refer to the [Workers API](https://developers.cloudflare.com/r2/api/workers/) and [S3 API](https://developers.cloudflare.com/r2/api/s3/) documentation.
### Use object lifecycle rules to transition objects to Infrequent Access storage
Note
Once an object is stored in Infrequent Access, it cannot be transitioned to Standard Access using lifecycle policies.
To learn more about how to transition objects from Standard storage to Infrequent Access storage, refer to [Object lifecycles](https://developers.cloudflare.com/r2/buckets/object-lifecycles/).
## Change storage class for objects
You can change the storage class of an object which is already stored in R2 using the [`CopyObject` API](https://docs.aws.amazon.com/AmazonS3/latest/API/API_CopyObject.html).
Use the `x-amz-storage-class` header to change between `STANDARD` and `STANDARD_IA`.
An example of switching an object from `STANDARD` to `STANDARD_IA` using `aws cli` is shown below:
```sh
aws s3api copy-object \
--endpoint-url https://.r2.cloudflarestorage.com \
--bucket bucket-name \
--key path/to/object.txt \
--copy-source /bucket-name/path/to/object.txt \
--storage-class STANDARD_IA
```
* Refer to [aws CLI](https://developers.cloudflare.com/r2/examples/aws/aws-cli/) for more information on using `aws CLI`.
* Refer to [object-level operations](https://developers.cloudflare.com/r2/api/s3/api/#object-level-operations) for the full list of object-level API operations with R2-compatible S3 API.
---
title: Authenticate against R2 API using auth tokens · Cloudflare R2 docs
description: The following example shows how to authenticate against R2 using
the S3 API and an API token.
lastUpdated: 2026-01-27T21:11:25.000Z
chatbotDeprioritize: false
source_url:
html: https://developers.cloudflare.com/r2/examples/authenticate-r2-auth-tokens/
md: https://developers.cloudflare.com/r2/examples/authenticate-r2-auth-tokens/index.md
---
The following example shows how to authenticate against R2 using the S3 API and an API token.
Note
For providing secure access to bucket objects for anonymous users, we recommend using [pre-signed URLs](https://developers.cloudflare.com/r2/api/s3/presigned-urls/) instead.
Pre-signed URLs do not require users to be a member of your organization and enable direct programmatic access to R2.
Ensure you have set the following environment variables prior to running either example. Refer to [Authentication](https://developers.cloudflare.com/r2/api/tokens/) for more information.
```sh
export AWS_REGION=auto
export AWS_ENDPOINT_URL=https://.r2.cloudflarestorage.com
export AWS_ACCESS_KEY_ID=your_access_key_id
export AWS_SECRET_ACCESS_KEY=your_secret_access_key
```
* JavaScript
Install the `@aws-sdk/client-s3` package for the S3 API:
* npm
```sh
npm i @aws-sdk/client-s3
```
* yarn
```sh
yarn add @aws-sdk/client-s3
```
* pnpm
```sh
pnpm add @aws-sdk/client-s3
```
Run the following Node.js script with `node index.js`. Ensure you change `Bucket` to the name of your bucket, and `Key` to point to an existing file in your R2 bucket.
Note, tutorial below should function for TypeScript as well.
```javascript
import { GetObjectCommand, S3Client } from "@aws-sdk/client-s3";
const s3 = new S3Client();
const Bucket = "";
const Key = "pfp.jpg";
const object = await s3.send(
new GetObjectCommand({
Bucket,
Key,
}),
);
console.log("Successfully fetched the object", object.$metadata);
// Process the data as needed
// For example, to get the content as a Buffer:
// const content = data.Body;
// Or to save the file (requires 'fs' module):
// import { writeFile } from "node:fs/promises";
// await writeFile('ingested_0001.parquet', data.Body);
```
* Python
Install the `boto3` S3 API client:
```sh
pip install boto3
```
Run the following Python script with `python3 get_r2_object.py`. Ensure you change `bucket` to the name of your bucket, and `object_key` to point to an existing file in your R2 bucket.
```python
import boto3
from botocore.client import Config
# Configure the S3 client for Cloudflare R2
s3_client = boto3.client('s3',
config=Config(signature_version='s3v4')
)
# Specify the object key
#
bucket = ''
object_key = '2024/08/02/ingested_0001.parquet'
try:
# Fetch the object
response = s3_client.get_object(Bucket=bucket, Key=object_key)
print('Successfully fetched the object')
# Process the response content as needed
# For example, to read the content:
# object_content = response['Body'].read()
# Or to save the file:
# with open('ingested_0001.parquet', 'wb') as f:
# f.write(response['Body'].read())
except Exception as e:
print(f'Failed to fetch the object. Error: {str(e)}')
```
* Go
Use `go get` to add the `aws-sdk-go-v2` packages to your Go project:
```sh
go get github.com/aws/aws-sdk-go-v2
go get github.com/aws/aws-sdk-go-v2/config
go get github.com/aws/aws-sdk-go-v2/credentials
go get github.com/aws/aws-sdk-go-v2/service/s3
```
Run the following Go application as a script with `go run main.go`. Ensure you change `bucket` to the name of your bucket, and `objectKey` to point to an existing file in your R2 bucket.
```go
package main
import (
"context"
"fmt"
"io"
"log"
"github.com/aws/aws-sdk-go-v2/aws"
"github.com/aws/aws-sdk-go-v2/config"
"github.com/aws/aws-sdk-go-v2/service/s3"
)
func main() {
cfg, err := config.LoadDefaultConfig(context.TODO())
if err != nil {
log.Fatalf("Unable to load SDK config, %v", err)
}
// Create an S3 client
client := s3.NewFromConfig(cfg)
// Specify the object key
bucket := ""
objectKey := "pfp.jpg"
// Fetch the object
output, err := client.GetObject(context.TODO(), &s3.GetObjectInput{
Bucket: aws.String(bucket),
Key: aws.String(objectKey),
})
if err != nil {
log.Fatalf("Unable to fetch object, %v", err)
}
defer output.Body.Close()
fmt.Println("Successfully fetched the object")
// Process the object content as needed
// For example, to save the file:
// file, err := os.Create("ingested_0001.parquet")
// if err != nil {
// log.Fatalf("Unable to create file, %v", err)
// }
// defer file.Close()
// _, err = io.Copy(file, output.Body)
// if err != nil {
// log.Fatalf("Unable to write file, %v", err)
// }
// Or to read the content:
content, err := io.ReadAll(output.Body)
if err != nil {
log.Fatalf("Unable to read object content, %v", err)
}
fmt.Printf("Object content length: %d bytes\n", len(content))
}
```
* npm
```sh
npm i @aws-sdk/client-s3
```
* yarn
```sh
yarn add @aws-sdk/client-s3
```
* pnpm
```sh
pnpm add @aws-sdk/client-s3
```
---
title: Use the Cache API · Cloudflare R2 docs
description: Use the Cache API to store R2 objects in Cloudflare's cache.
lastUpdated: 2026-01-27T21:11:25.000Z
chatbotDeprioritize: false
source_url:
html: https://developers.cloudflare.com/r2/examples/cache-api/
md: https://developers.cloudflare.com/r2/examples/cache-api/index.md
---
Use the [Cache API](https://developers.cloudflare.com/workers/runtime-apis/cache/) to store R2 objects in Cloudflare's cache.
Note
You will need to [connect a custom domain](https://developers.cloudflare.com/workers/configuration/routing/custom-domains/) or [route](https://developers.cloudflare.com/workers/configuration/routing/routes/) to your Worker in order to use the Cache API. Cache API operations in the Cloudflare Workers dashboard editor, Playground previews, and any `*.workers.dev` deployments will have no impact.
```js
export default {
async fetch(request, env, context) {
try {
const url = new URL(request.url);
// Construct the cache key from the cache URL
const cacheKey = new Request(url.toString(), request);
const cache = caches.default;
// Check whether the value is already available in the cache
// if not, you will need to fetch it from R2, and store it in the cache
// for future access
let response = await cache.match(cacheKey);
if (response) {
console.log(`Cache hit for: ${request.url}.`);
return response;
}
console.log(
`Response for request url: ${request.url} not present in cache. Fetching and caching request.`
);
// If not in cache, get it from R2
const objectKey = url.pathname.slice(1);
const object = await env.MY_BUCKET.get(objectKey);
if (object === null) {
return new Response('Object Not Found', { status: 404 });
}
// Set the appropriate object headers
const headers = new Headers();
object.writeHttpMetadata(headers);
headers.set('etag', object.httpEtag);
// Cache API respects Cache-Control headers. Setting s-max-age to 10
// will limit the response to be in cache for 10 seconds max
// Any changes made to the response here will be reflected in the cached value
headers.append('Cache-Control', 's-maxage=10');
response = new Response(object.body, {
headers,
});
// Store the fetched response as cacheKey
// Use waitUntil so you can return the response without blocking on
// writing to cache
context.waitUntil(cache.put(cacheKey, response.clone()));
return response;
} catch (e) {
return new Response('Error thrown ' + e.message);
}
},
};
```
---
title: S3 SDKs · Cloudflare R2 docs
lastUpdated: 2024-09-29T02:09:56.000Z
chatbotDeprioritize: true
source_url:
html: https://developers.cloudflare.com/r2/examples/aws/
md: https://developers.cloudflare.com/r2/examples/aws/index.md
---
* [aws CLI](https://developers.cloudflare.com/r2/examples/aws/aws-cli/)
* [aws-sdk-go](https://developers.cloudflare.com/r2/examples/aws/aws-sdk-go/)
* [aws-sdk-java](https://developers.cloudflare.com/r2/examples/aws/aws-sdk-java/)
* [aws-sdk-js](https://developers.cloudflare.com/r2/examples/aws/aws-sdk-js/)
* [aws-sdk-js-v3](https://developers.cloudflare.com/r2/examples/aws/aws-sdk-js-v3/)
* [aws-sdk-net](https://developers.cloudflare.com/r2/examples/aws/aws-sdk-net/)
* [aws-sdk-php](https://developers.cloudflare.com/r2/examples/aws/aws-sdk-php/)
* [aws-sdk-ruby](https://developers.cloudflare.com/r2/examples/aws/aws-sdk-ruby/)
* [aws-sdk-rust](https://developers.cloudflare.com/r2/examples/aws/aws-sdk-rust/)
* [aws4fetch](https://developers.cloudflare.com/r2/examples/aws/aws4fetch/)
* [boto3](https://developers.cloudflare.com/r2/examples/aws/boto3/)
* [Configure custom headers](https://developers.cloudflare.com/r2/examples/aws/custom-header/)
* [s3mini](https://developers.cloudflare.com/r2/examples/aws/s3mini/)
---
title: Multi-cloud setup · Cloudflare R2 docs
lastUpdated: 2024-08-13T19:56:56.000Z
chatbotDeprioritize: false
source_url:
html: https://developers.cloudflare.com/r2/examples/multi-cloud/
md: https://developers.cloudflare.com/r2/examples/multi-cloud/index.md
---
---
title: Rclone · Cloudflare R2 docs
description: You must generate an Access Key before getting started. All
examples will utilize access_key_id and access_key_secret variables which
represent the Access Key ID and Secret Access Key values you generated.
lastUpdated: 2026-01-27T21:11:25.000Z
chatbotDeprioritize: false
source_url:
html: https://developers.cloudflare.com/r2/examples/rclone/
md: https://developers.cloudflare.com/r2/examples/rclone/index.md
---
You must [generate an Access Key](https://developers.cloudflare.com/r2/api/tokens/) before getting started. All examples will utilize `access_key_id` and `access_key_secret` variables which represent the **Access Key ID** and **Secret Access Key** values you generated.
Rclone is a command-line tool which manages files on cloud storage. You can use rclone to upload objects to R2 concurrently.
## Configure rclone
With [`rclone`](https://rclone.org/install/) installed, you may run [`rclone config`](https://rclone.org/s3/) to configure a new S3 storage provider. You will be prompted with a series of questions for the new provider details.
Recommendation
It is recommended that you choose a unique provider name and then rely on all default answers to the prompts.
This will create a `rclone` configuration file, which you can then modify with the preset configuration given below.
1. Create new remote by selecting `n`.
2. Select a name for the new remote. For example, use `r2`.
3. Select the `Amazon S3 Compliant Storage Providers` storage type.
4. Select `Cloudflare R2 storage` for the provider.
5. Select whether you would like to enter AWS credentials manually, or get it from the runtime environment.
6. Enter the AWS Access Key ID.
7. Enter AWS Secret Access Key (password).
8. Select the region to connect to (optional).
9. Select the S3 API endpoint.
Note
Ensure you are running `rclone` v1.59 or greater ([rclone downloads](https://beta.rclone.org/)). Versions prior to v1.59 may return `HTTP 401: Unauthorized` errors, as earlier versions of `rclone` do not strictly align to the S3 specification in all cases.
### Edit an existing rclone configuration
If you have already configured `rclone` in the past, you may run `rclone config file` to print the location of your `rclone` configuration file:
```sh
rclone config file
# Configuration file is stored at:
# ~/.config/rclone/rclone.conf
```
Then use an editor (`nano` or `vim`, for example) to add or edit the new provider. This example assumes you are adding a new `r2` provider:
```toml
[r2]
type = s3
provider = Cloudflare
access_key_id = abc123
secret_access_key = xyz456
endpoint = https://.r2.cloudflarestorage.com
acl = private
```
Note
If you are using a token with [Object-level permissions](https://developers.cloudflare.com/r2/api/tokens/#permissions), you will need to add `no_check_bucket = true` to the configuration to avoid errors.
You may then use the new `rclone` provider for any of your normal workflows.
## List buckets & objects
The [rclone tree](https://rclone.org/commands/rclone_tree/) command can be used to list the contents of the remote, in this case Cloudflare R2.
```sh
rclone tree r2:
# /
# ├── user-uploads
# │ └── foobar.png
# └── my-bucket-name
# ├── cat.png
# └── todos.txt
rclone tree r2:my-bucket-name
# /
# ├── cat.png
# └── todos.txt
```
## Upload and retrieve objects
The [rclone copy](https://rclone.org/commands/rclone_copy/) command can be used to upload objects to an R2 bucket and vice versa - this allows you to upload files up to the 5 TB maximum object size that R2 supports.
```sh
# Upload dog.txt to the user-uploads bucket
rclone copy dog.txt r2:user-uploads/
rclone tree r2:user-uploads
# /
# ├── foobar.png
# └── dog.txt
# Download dog.txt from the user-uploads bucket
rclone copy r2:user-uploads/dog.txt .
```
### A note about multipart upload part sizes
For multipart uploads, part sizes can significantly affect the number of Class A operations that are used, which can alter how much you end up being charged. Every part upload counts as a separate operation, so larger part sizes will use fewer operations, but might be costly to retry if the upload fails. Also consider that a multipart upload is always going to consume at least 3 times as many operations as a single `PutObject`, because it will include at least one `CreateMultipartUpload`, `UploadPart` & `CompleteMultipartUpload` operations.
Balancing part size depends heavily on your use-case, but these factors can help you minimize your bill, so they are worth thinking about.
You can configure rclone's multipart upload part size using the `--s3-chunk-size` CLI argument. Note that you might also have to adjust the `--s3-upload-cutoff` argument to ensure that rclone is using multipart uploads. Both of these can be set in your configuration file as well. Generally, `--s3-upload-cutoff` will be no less than `--s3-chunk-size`.
```sh
rclone copy long-video.mp4 r2:user-uploads/ --s3-upload-cutoff=100M --s3-chunk-size=100M
```
## Generate presigned URLs
You can also generate presigned links which allow you to share public access to a file temporarily using the [rclone link](https://rclone.org/commands/rclone_link/) command.
```sh
# You can pass the --expire flag to determine how long the presigned link is valid. The --unlink flag isn't supported by R2.
rclone link r2:my-bucket-name/cat.png --expire 3600
# https://.r2.cloudflarestorage.com/my-bucket-name/cat.png?X-Amz-Algorithm=AWS4-HMAC-SHA256&X-Amz-Credential=&X-Amz-Date=&X-Amz-Expires=3600&X-Amz-SignedHeaders=host&X-Amz-Signature=
```
---
title: Use SSE-C · Cloudflare R2 docs
description: The following tutorial shows some snippets for how to use
Server-Side Encryption with Customer-Provided Keys (SSE-C) on Cloudflare R2.
lastUpdated: 2025-10-09T15:47:46.000Z
chatbotDeprioritize: false
source_url:
html: https://developers.cloudflare.com/r2/examples/ssec/
md: https://developers.cloudflare.com/r2/examples/ssec/index.md
---
The following tutorial shows some snippets for how to use Server-Side Encryption with Customer-Provided Keys (SSE-C) on R2.
## Before you begin
* When using SSE-C, make sure you store your encryption key(s) in a safe place. In the event you misplace them, Cloudflare will be unable to recover the body of any objects encrypted using those keys.
* While SSE-C does provide MD5 hashes, this hash can be used for identification of keys only. The MD5 hash is not used in the encryption process itself.
## Workers
* TypeScript
```typescript
interface Environment {
R2: R2Bucket
/**
* In this example, your SSE-C is stored as a hexadecimal string (preferably a secret).
* The R2 API also supports providing an ArrayBuffer directly, if you want to generate/
* store your keys dynamically.
*/
SSEC_KEY: string
}
export default {
async fetch(req: Request, env: Env) {
const { SSEC_KEY, R2 } = env;
const { pathname: filename } = new URL(req.url);
switch(req.method) {
case "GET": {
const maybeObj = await env.BUCKET.get(filename, {
onlyIf: req.headers,
ssecKey: SSEC_KEY,
});
if(!maybeObj) {
return new Response("Not Found", {
status: 404
});
}
const headers = new Headers();
maybeObj.writeHttpMetadata(headers);
return new Response(body, {
headers
});
}
case 'POST': {
const multipartUpload = await env.BUCKET.createMultipartUpload(filename, {
httpMetadata: req.headers,
ssecKey: SSEC_KEY,
});
/**
* This example only provides a single-part "multipart" upload.
* For multiple parts, the process is the same(the key must be provided)
* for every part.
*/
const partOne = await multipartUpload.uploadPart(1, req.body, ssecKey);
const obj = await multipartUpload.complete([partOne]);
const headers = new Headers();
obj.writeHttpMetadata(headers);
return new Response(null, {
headers,
status: 201
});
}
case 'PUT': {
const obj = await env.BUCKET.put(filename, req.body, {
httpMetadata: req.headers,
ssecKey: SSEC_KEY,
});
const headers = new Headers();
maybeObj.writeHttpMetadata(headers);
return new Response(null, {
headers,
status: 201
});
}
default: {
return new Response("Method not allowed", {
status: 405
});
}
}
}
}
```
* JavaScript
```javascript
/**
* In this example, your SSE-C is stored as a hexadecimal string(preferably a secret).
* The R2 API also supports providing an ArrayBuffer directly, if you want to generate/
* store your keys dynamically.
*/
export default {
async fetch(req, env) {
const { SSEC_KEY, R2 } = env;
const { pathname: filename } = new URL(req.url);
switch(req.method) {
case "GET": {
const maybeObj = await env.BUCKET.get(filename, {
onlyIf: req.headers,
ssecKey: SSEC_KEY,
});
if(!maybeObj) {
return new Response("Not Found", {
status: 404
});
}
const headers = new Headers();
maybeObj.writeHttpMetadata(headers);
return new Response(body, {
headers
});
}
case 'POST': {
const multipartUpload = await env.BUCKET.createMultipartUpload(filename, {
httpMetadata: req.headers,
ssecKey: SSEC_KEY,
});
/**
* This example only provides a single-part "multipart" upload.
* For multiple parts, the process is the same(the key must be provided)
* for every part.
*/
const partOne = await multipartUpload.uploadPart(1, req.body, ssecKey);
const obj = await multipartUpload.complete([partOne]);
const headers = new Headers();
obj.writeHttpMetadata(headers);
return new Response(null, {
headers,
status: 201
});
}
case 'PUT': {
const obj = await env.BUCKET.put(filename, req.body, {
httpMetadata: req.headers,
ssecKey: SSEC_KEY,
});
const headers = new Headers();
maybeObj.writeHttpMetadata(headers);
return new Response(null, {
headers,
status: 201
});
}
default: {
return new Response("Method not allowed", {
status: 405
});
}
}
}
}
```
## S3-API
* @aws-sdk/client-s3
```typescript
import {
UploadPartCommand,
PutObjectCommand, S3Client,
CompleteMultipartUploadCommand,
CreateMultipartUploadCommand,
type UploadPartCommandOutput
} from "@aws-sdk/client-s3";
const s3 = new S3Client({
endpoint: process.env.R2_ENDPOINT,
credentials: {
accessKeyId: process.env.R2_ACCESS_KEY_ID,
secretAccessKey: process.env.R2_SECRET_ACCESS_KEY,
},
});
const SSECustomerAlgorithm = "AES256";
const SSECustomerKey = process.env.R2_SSEC_KEY;
const SSECustomerKeyMD5 = process.env.R2_SSEC_KEY_MD5;
await s3.send(
new PutObjectCommand({
Bucket: "your-bucket",
Key: "single-part",
Body: "BeepBoop",
SSECustomerAlgorithm,
SSECustomerKey,
SSECustomerKeyMD5,
}),
);
const multi = await s3.send(
new CreateMultipartUploadCommand({
Bucket: "your-bucket",
Key: "multi-part",
SSECustomerAlgorithm,
SSECustomerKey,
SSECustomerKeyMD5,
}),
);
const UploadId = multi.UploadId;
const parts: UploadPartCommandOutput[] = [];
parts.push(
await s3.send(
new UploadPartCommand({
Bucket: "your-bucket",
Key: "multi-part",
UploadId,
// filledBuf()` generates some random data.
// Replace with a function/body of your choice.
Body: filledBuf(),
PartNumber: 1,
SSECustomerAlgorithm,
SSECustomerKey,
SSECustomerKeyMD5,
}),
),
);
parts.push(
await s3.send(
new UploadPartCommand({
Bucket: "your-bucket",
Key: "multi-part",
UploadId,
// filledBuf()` generates some random data.
// Replace with a function/body of your choice.
Body: filledBuf(),
PartNumber: 2,
SSECustomerAlgorithm,
SSECustomerKey,
SSECustomerKeyMD5,
}),
),
);
await s3.send(
new CompleteMultipartUploadCommand({
Bucket: "your-bucket",
Key: "multi-part",
UploadId,
MultipartUpload: {
Parts: parts.map(({ ETag }, PartNumber) => ({
ETag,
PartNumber: PartNumber + 1,
})),
},
SSECustomerAlgorithm,
SSECustomerKey,
SSECustomerKeyMD5,
}),
);
const HeadObjectOutput = await s3.send(
new HeadObjectCommand({
Bucket: "your-bucket",
Key: "multi-part",
SSECustomerAlgorithm,
SSECustomerKey,
SSECustomerKeyMD5,
}),
);
const GetObjectOutput = await s3.send(
new GetObjectCommand({
Bucket: "your-bucket",
Key: "single-part",
SSECustomerAlgorithm,
SSECustomerKey,
SSECustomerKeyMD5,
}),
);
```
---
title: Terraform · Cloudflare R2 docs
description: You must generate an Access Key before getting started. All
examples will utilize access_key_id and access_key_secret variables which
represent the Access Key ID and Secret Access Key values you generated.
lastUpdated: 2026-01-27T21:11:25.000Z
chatbotDeprioritize: false
source_url:
html: https://developers.cloudflare.com/r2/examples/terraform/
md: https://developers.cloudflare.com/r2/examples/terraform/index.md
---
You must [generate an Access Key](https://developers.cloudflare.com/r2/api/tokens/) before getting started. All examples will utilize `access_key_id` and `access_key_secret` variables which represent the **Access Key ID** and **Secret Access Key** values you generated.
This example shows how to configure R2 with Terraform using the [Cloudflare provider](https://github.com/cloudflare/terraform-provider-cloudflare).
Note for using AWS provider
When using the Cloudflare Terraform provider, you can only manage buckets. To configure items such as CORS and object lifecycles, you will need to use the [AWS Provider](https://developers.cloudflare.com/r2/examples/terraform-aws/).
With [`terraform`](https://developer.hashicorp.com/terraform/downloads) installed, create `main.tf` and copy the content below replacing with your API Token.
```hcl
terraform {
required_providers {
cloudflare = {
source = "cloudflare/cloudflare"
version = "~> 4"
}
}
}
provider "cloudflare" {
api_token = ""
}
resource "cloudflare_r2_bucket" "cloudflare-bucket" {
account_id = ""
name = "my-tf-test-bucket"
location = "WEUR"
}
```
You can then use `terraform plan` to view the changes and `terraform apply` to apply changes.
---
title: Terraform (AWS) · Cloudflare R2 docs
description: You must generate an Access Key before getting started. All
examples will utilize access_key_id and access_key_secret variables which
represent the Access Key ID and Secret Access Key values you generated.
lastUpdated: 2026-01-27T21:11:25.000Z
chatbotDeprioritize: false
source_url:
html: https://developers.cloudflare.com/r2/examples/terraform-aws/
md: https://developers.cloudflare.com/r2/examples/terraform-aws/index.md
---
You must [generate an Access Key](https://developers.cloudflare.com/r2/api/tokens/) before getting started. All examples will utilize `access_key_id` and `access_key_secret` variables which represent the **Access Key ID** and **Secret Access Key** values you generated.
This example shows how to configure R2 with Terraform using the [AWS provider](https://github.com/hashicorp/terraform-provider-aws).
Note for using AWS provider
For using only the Cloudflare provider, see [Terraform](https://developers.cloudflare.com/r2/examples/terraform/).
With [`terraform`](https://developer.hashicorp.com/terraform/downloads) installed:
1. Create `main.tf` file, or edit your existing Terraform configuration
2. Populate the endpoint URL at `endpoints.s3` with your [Cloudflare account ID](https://developers.cloudflare.com/fundamentals/account/find-account-and-zone-ids/)
3. Populate `access_key` and `secret_key` with the corresponding [R2 API credentials](https://developers.cloudflare.com/r2/api/tokens/).
4. Ensure that `skip_region_validation = true`, `skip_requesting_account_id = true`, and `skip_credentials_validation = true` are set in the provider configuration.
```hcl
terraform {
required_providers {
aws = {
source = "hashicorp/aws"
version = "~> 5"
}
}
}
provider "aws" {
region = "us-east-1"
access_key =
secret_key =
# Required for R2.
# These options disable S3-specific validation on the client (Terraform) side.
skip_credentials_validation = true
skip_region_validation = true
skip_requesting_account_id = true
endpoints {
s3 = "https://.r2.cloudflarestorage.com"
}
}
resource "aws_s3_bucket" "default" {
bucket = "-test"
}
resource "aws_s3_bucket_cors_configuration" "default" {
bucket = aws_s3_bucket.default.id
cors_rule {
allowed_methods = ["GET"]
allowed_origins = ["*"]
}
}
resource "aws_s3_bucket_lifecycle_configuration" "default" {
bucket = aws_s3_bucket.default.id
rule {
id = "expire-bucket"
status = "Enabled"
expiration {
days = 1
}
}
rule {
id = "abort-multipart-upload"
status = "Enabled"
abort_incomplete_multipart_upload {
days_after_initiation = 1
}
}
}
```
You can then use `terraform plan` to view the changes and `terraform apply` to apply changes.
---
title: CLI · Cloudflare R2 docs
description: Use R2 from the command line with Wrangler, rclone, or AWS CLI.
lastUpdated: 2026-01-26T20:24:24.000Z
chatbotDeprioritize: false
source_url:
html: https://developers.cloudflare.com/r2/get-started/cli/
md: https://developers.cloudflare.com/r2/get-started/cli/index.md
---
Manage R2 buckets and objects directly from your terminal. Use CLI tools to automate tasks and manage objects.
| Tool | Best for |
| - | - |
| [Wrangler](https://developers.cloudflare.com/workers/wrangler/) | Single object operations and managing bucket settings with minimal setup |
| [rclone](https://developers.cloudflare.com/r2/examples/rclone/) | Bulk object operations, migrations, and syncing directories |
| [AWS CLI](https://developers.cloudflare.com/r2/examples/aws/aws-cli/) | Existing AWS workflows or familiarity with AWS CLI |
## 1. Create a bucket
A bucket stores your objects in R2. To create a new R2 bucket:
* Wrangler CLI
1. Log in to your Cloudflare account:
```sh
npx wrangler login
```
2. Create a bucket named `my-bucket`:
```sh
npx wrangler r2 bucket create my-bucket
```
If prompted, select the account you want to create the bucket in.
3. Verify the bucket was created:
```sh
npx wrangler r2 bucket list
```
* Dashboard
1. In the Cloudflare Dashboard, go to **R2 object storage**.
[Go to **Overview**](https://dash.cloudflare.com/?to=/:account/r2/overview)
2. Select **Create bucket**.
3. Enter a name for your bucket.
4. Select a [location](https://developers.cloudflare.com/r2/reference/data-location) for your bucket and a [default storage class](https://developers.cloudflare.com/r2/buckets/storage-classes/).
5. Select **Create bucket**.
## 2. Generate API credentials
CLI tools that use the S3 API ([AWS CLI](https://developers.cloudflare.com/r2/examples/aws/aws-cli/), [rclone](https://developers.cloudflare.com/r2/examples/rclone/)) require an Access Key ID and Secret Access Key. If you are using [Wrangler](https://developers.cloudflare.com/workers/wrangler/), you can skip this step.
1. In the Cloudflare dashboard, go to **R2**.
2. Select **Manage R2 API tokens**.
3. Select **Create API token**.
4. Choose **Object Read & Write** permission and select the buckets you want to access.
5. Select **Create API Token**.
6. Copy the **Access Key ID** and **Secret Access Key**. Store these securely — you cannot view the secret again.
## 3. Set up a CLI tool
* Wrangler
[Wrangler](https://developers.cloudflare.com/r2/reference/wrangler-commands/) is the Cloudflare Workers CLI. It authenticates with your Cloudflare account directly, so no API credentials needed.
1. Install Wrangler:
* npm
```sh
npm i -D wrangler
```
* yarn
```sh
yarn add -D wrangler
```
* pnpm
```sh
pnpm add -D wrangler
```
2. Log in to your Cloudflare account:
```sh
wrangler login
```
* rclone
[rclone](https://developers.cloudflare.com/r2/examples/rclone/) is ideal for bulk uploads, migrations, and syncing directories.
1. [Install rclone](https://rclone.org/install/) (version 1.59 or later).
2. Configure a new remote:
```sh
rclone config
```
3. Create new remote by selecting `n`.
4. Name your remote `r2`
5. Select **Amazon S3 Compliant Storage Providers** as the storage type.
6. Select **Cloudflare R2** as the provider.
7. Select whether you would like to enter AWS credentials manually, or get it from the runtime environment.
8. Enter your Access Key ID and Secret Access Key when prompted.
9. Select the region to connect to (optional).
10. Provide your S3 API endpoint.
* AWS CLI
The [AWS CLI](https://developers.cloudflare.com/r2/examples/aws/aws-cli/) works with R2 by specifying a custom endpoint.
1. [Install the AWS CLI](https://docs.aws.amazon.com/cli/latest/userguide/getting-started-install.html) for your operating system.
2. Configure your credentials:
```sh
aws configure
```
3. When prompted, enter:
* **AWS Access Key ID**: Your R2 Access Key ID
* **AWS Secret Access Key**: Your R2 Secret Access Key
* **Default region name**: `auto`
* **Default output format**: `json` (or press Enter to skip)
* npm
```sh
npm i -D wrangler
```
* yarn
```sh
yarn add -D wrangler
```
* pnpm
```sh
pnpm add -D wrangler
```
## 4. Upload and download objects
(Optional) Create a test file to upload. Run this command in the directory where you plan to run the CLI commands:
```sh
echo 'Hello, R2!' > myfile.txt
```
* Wrangler
```sh
# Upload myfile.txt to my-bucket
wrangler r2 object put my-bucket/myfile.txt --file ./myfile.txt
# Download myfile.txt and save it as downloaded.txt
wrangler r2 object get my-bucket/myfile.txt --file ./downloaded.txt
# List all objects in my-bucket
wrangler r2 object list my-bucket
```
Refer to the [Wrangler R2 commands](https://developers.cloudflare.com/r2/reference/wrangler-commands/) for all available operations.
* rclone
```sh
# Upload myfile.txt to my-bucket
rclone copy myfile.txt r2:my-bucket/
# Download myfile.txt from my-bucket to the current directory
rclone copy r2:my-bucket/myfile.txt .
```
Refer to the [rclone documentation](https://developers.cloudflare.com/r2/examples/rclone/) for more configuration options.
* AWS CLI
```sh
# Upload myfile.txt to my-bucket
aws s3 cp myfile.txt s3://my-bucket/ --endpoint-url https://.r2.cloudflarestorage.com
# Download myfile.txt from my-bucket to current directory
aws s3 cp s3://my-bucket/myfile.txt ./ --endpoint-url https://.r2.cloudflarestorage.com
# List all objects in my-bucket
aws s3 ls s3://my-bucket/ --endpoint-url https://.r2.cloudflarestorage.com
```
Refer to the [AWS CLI documentation](https://developers.cloudflare.com/r2/examples/aws/aws-cli/) for more examples.
## Next steps
[Presigned URLs ](https://developers.cloudflare.com/r2/api/s3/presigned-urls/)Generate temporary URLs for private object access.
[Public buckets ](https://developers.cloudflare.com/r2/buckets/public-buckets/)Serve files directly over HTTP with a public bucket.
[CORS ](https://developers.cloudflare.com/r2/buckets/cors/)Configure CORS for browser-based uploads.
[Object lifecycles ](https://developers.cloudflare.com/r2/buckets/object-lifecycles/)Set up lifecycle rules to automatically delete old objects.
---
title: S3 · Cloudflare R2 docs
description: Use R2 with S3-compatible SDKs like boto3 and the AWS SDK.
lastUpdated: 2026-01-26T20:24:24.000Z
chatbotDeprioritize: false
source_url:
html: https://developers.cloudflare.com/r2/get-started/s3/
md: https://developers.cloudflare.com/r2/get-started/s3/index.md
---
R2 provides support for a [S3-compatible API](https://developers.cloudflare.com/r2/api/s3/api/), which means you can use any S3 SDK, library, or tool to interact with your buckets. If you have existing code that works with S3, you can use it with R2 by changing the endpoint URL.
## 1. Create a bucket
A bucket stores your objects in R2. To create a new R2 bucket:
* Wrangler CLI
1. Log in to your Cloudflare account:
```sh
npx wrangler login
```
2. Create a bucket named `my-bucket`:
```sh
npx wrangler r2 bucket create my-bucket
```
If prompted, select the account you want to create the bucket in.
3. Verify the bucket was created:
```sh
npx wrangler r2 bucket list
```
* Dashboard
1. In the Cloudflare Dashboard, go to **R2 object storage**.
[Go to **Overview**](https://dash.cloudflare.com/?to=/:account/r2/overview)
2. Select **Create bucket**.
3. Enter a name for your bucket.
4. Select a [location](https://developers.cloudflare.com/r2/reference/data-location) for your bucket and a [default storage class](https://developers.cloudflare.com/r2/buckets/storage-classes/).
5. Select **Create bucket**.
## 2. Generate API credentials
To use the S3 API, you need to generate [credentials](https://developers.cloudflare.com/r2/api/tokens/) and get an Access Key ID and Secret Access Key:
1. Go to the [Cloudflare Dashboard](https://dash.cloudflare.com/).
2. Select **Storage & databases > R2 > Overview**.
3. Select **Manage** in API Tokens.
4. Select **Create Account API token** or **Create User API token**
5. Choose **Object Read & Write** permission and **Apply to specific buckets only** to select the buckets you want to access.
6. Select **Create API Token**.
7. Copy the **Access Key ID** and **Secret Access Key**. Store these securely as you cannot view the secret again.
You also need your S3 API endpoint URL which you can find at the bottom of the Create API Token confirmation page once you have created your token, or on the R2 Overview page:
```txt
https://.r2.cloudflarestorage.com
```
## 3. Use an AWS SDK
The following examples show how to use Python and JavaScript SDKs. For other languages, refer to [S3-compatible SDK examples](https://developers.cloudflare.com/r2/examples/aws/) for [Go](https://developers.cloudflare.com/r2/examples/aws/aws-sdk-go/), [Java](https://developers.cloudflare.com/r2/examples/aws/aws-sdk-java/), [PHP](https://developers.cloudflare.com/r2/examples/aws/aws-sdk-php/), [Ruby](https://developers.cloudflare.com/r2/examples/aws/aws-sdk-ruby/), and [Rust](https://developers.cloudflare.com/r2/examples/aws/aws-sdk-rust/).
* Python (boto3)
1. Install [boto3](https://boto3.amazonaws.com/v1/documentation/api/latest/index.html):
```sh
pip install boto3
```
2. Create a test file to upload:
```sh
echo 'Hello, R2!' > myfile.txt
```
3. Use your credentials to create an S3 client and interact with your bucket:
```python
import boto3
s3 = boto3.client(
service_name='s3',
# Provide your R2 endpoint: https://.r2.cloudflarestorage.com
endpoint_url='https://.r2.cloudflarestorage.com',
# Provide your R2 Access Key ID and Secret Access Key
aws_access_key_id='',
aws_secret_access_key='',
region_name='auto', # Required by boto3, not used by R2
)
# Upload a file
s3.upload_file('myfile.txt', 'my-bucket', 'myfile.txt')
print('Uploaded myfile.txt')
# Download a file
s3.download_file('my-bucket', 'myfile.txt', 'downloaded.txt')
print('Downloaded to downloaded.txt')
# List objects
response = s3.list_objects_v2(Bucket='my-bucket')
for obj in response.get('Contents', []):
print(f"Object: {obj['Key']}")
```
4. Save this as `example.py` and run it:
```sh
python example.py
```
```sh
Uploaded myfile.txt
Downloaded to downloaded.txt
Object: myfile.txt
```
Refer to [boto3 examples](https://developers.cloudflare.com/r2/examples/aws/boto3/) for more operations.
* JavaScript
1. Install the [@aws-sdk/client-s3](https://www.npmjs.com/package/@aws-sdk/client-s3) package:
```sh
npm install @aws-sdk/client-s3
```
2. Use your credentials to create an S3 client and interact with your bucket:
```js
import {
S3Client,
PutObjectCommand,
GetObjectCommand,
ListObjectsV2Command,
} from "@aws-sdk/client-s3";
const s3 = new S3Client({
region: "auto", // Required by AWS SDK, not used by R2
// Provide your R2 endpoint: https://.r2.cloudflarestorage.com
endpoint: "https://.r2.cloudflarestorage.com",
credentials: {
// Provide your R2 Access Key ID and Secret Access Key
accessKeyId: "",
secretAccessKey: "",
},
});
// Upload a file
await s3.send(
new PutObjectCommand({
Bucket: "my-bucket",
Key: "myfile.txt",
Body: "Hello, R2!",
}),
);
console.log("Uploaded myfile.txt");
// Download a file
const response = await s3.send(
new GetObjectCommand({
Bucket: "my-bucket",
Key: "myfile.txt",
}),
);
const content = await response.Body.transformToString();
console.log("Downloaded:", content);
// List objects
const list = await s3.send(
new ListObjectsV2Command({
Bucket: "my-bucket",
}),
);
console.log(
"Objects:",
list.Contents.map((obj) => obj.Key),
);
```
3. Save this as `example.mjs` and run it:
```sh
node example.mjs
```
```sh
Uploaded myfile.txt
Downloaded: Hello, R2!
Objects: [ 'myfile.txt' ]
```
Refer to [AWS SDK for JavaScript examples](https://developers.cloudflare.com/r2/examples/aws/aws-sdk-js-v3/) for more operations.
## Next steps
[Presigned URLs ](https://developers.cloudflare.com/r2/api/s3/presigned-urls/)Generate temporary URLs for private object access.
[Public buckets ](https://developers.cloudflare.com/r2/buckets/public-buckets/)Serve files directly over HTTP with a public bucket.
[CORS ](https://developers.cloudflare.com/r2/buckets/cors/)Configure CORS for browser-based uploads.
[Object lifecycles ](https://developers.cloudflare.com/r2/buckets/object-lifecycles/)Set up lifecycle rules to automatically delete old objects.
---
title: Workers API · Cloudflare R2 docs
description: Use R2 from Cloudflare Workers with the Workers API.
lastUpdated: 2026-01-29T10:38:24.000Z
chatbotDeprioritize: false
source_url:
html: https://developers.cloudflare.com/r2/get-started/workers-api/
md: https://developers.cloudflare.com/r2/get-started/workers-api/index.md
---
[Workers](https://developers.cloudflare.com/workers/) let you run code at the edge. When you bind an R2 bucket to a Worker, you can read and write objects directly using the [Workers API](https://developers.cloudflare.com/r2/api/workers/workers-api-usage/).
## 1. Create a bucket
A bucket stores your objects in R2. To create a new R2 bucket:
* Wrangler CLI
1. Log in to your Cloudflare account:
```sh
npx wrangler login
```
2. Create a bucket named `my-bucket`:
```sh
npx wrangler r2 bucket create my-bucket
```
If prompted, select the account you want to create the bucket in.
3. Verify the bucket was created:
```sh
npx wrangler r2 bucket list
```
* Dashboard
1. In the Cloudflare Dashboard, go to **R2 object storage**.
[Go to **Overview**](https://dash.cloudflare.com/?to=/:account/r2/overview)
2. Select **Create bucket**.
3. Enter a name for your bucket.
4. Select a [location](https://developers.cloudflare.com/r2/reference/data-location) for your bucket and a [default storage class](https://developers.cloudflare.com/r2/buckets/storage-classes/).
5. Select **Create bucket**.
## 2. Create a Worker with an R2 binding
1. Create a new Worker project:
* npm
```sh
npm create cloudflare@latest -- r2-worker
```
* yarn
```sh
yarn create cloudflare r2-worker
```
* pnpm
```sh
pnpm create cloudflare@latest r2-worker
```
When prompted, select **Hello World example** and **JavaScript** (or TypeScript) as your template.
2. Move into the project directory:
```sh
cd r2-worker
```
3. Add an R2 binding to your Wrangler configuration file. Replace `my-bucket` with your bucket name:
* wrangler.jsonc
```jsonc
{
"r2_buckets": [
{
"binding": "MY_BUCKET",
"bucket_name": "my-bucket"
}
]
}
```
* wrangler.toml
```toml
[[r2_buckets]]
binding = "MY_BUCKET"
bucket_name = "my-bucket"
```
4. (Optional) If you are using TypeScript, regenerate types:
```sh
npx wrangler types
```
## 3. Read and write objects
Use the binding to interact with your bucket. This example stores and retrieves objects based on the URL path:
* JavaScript
```js
export default {
async fetch(request, env) {
// Get the object key from the URL path
// For example: /images/cat.png → images/cat.png
const url = new URL(request.url);
const key = url.pathname.slice(1);
// PUT: Store the request body in R2
if (request.method === "PUT") {
await env.MY_BUCKET.put(key, request.body);
return new Response(`Put ${key} successfully!`);
}
// GET: Retrieve the object from R2
const object = await env.MY_BUCKET.get(key);
if (object === null) {
return new Response("Object not found", { status: 404 });
}
return new Response(object.body);
},
};
```
* TypeScript
```ts
export default {
async fetch(request, env): Promise {
// Get the object key from the URL path
// For example: /images/cat.png → images/cat.png
const url = new URL(request.url);
const key = url.pathname.slice(1);
// PUT: Store the request body in R2
if (request.method === "PUT") {
await env.MY_BUCKET.put(key, request.body);
return new Response(`Put ${key} successfully!`);
}
// GET: Retrieve the object from R2
const object = await env.MY_BUCKET.get(key);
if (object === null) {
return new Response("Object not found", { status: 404 });
}
return new Response(object.body);
},
} satisfies ExportedHandler;
```
## 4. Test and deploy
1. Test your Worker locally:
```sh
npx wrangler dev
```
Local development
By default, `wrangler dev` uses a local R2 simulation. Objects you store during development exist only on your machine in the `.wrangler/state` folder and do not affect your production bucket.
To connect to your real R2 bucket during development, add `"remote": true` to your R2 binding in your Wrangler configuration file. Refer to [remote bindings](https://developers.cloudflare.com/workers/development-testing/#remote-bindings) for more information.
2. Once the dev server is running, test storing and retrieving objects:
```sh
# Store an object
curl -X PUT http://localhost:8787/my-file.txt -d 'Hello, R2!'
# Retrieve the object
curl http://localhost:8787/my-file.txt
```
3. Deploy to production:
```sh
npx wrangler deploy
```
4. After deploying, Wrangler outputs your Worker's URL (for example, `https://r2-worker..workers.dev`). Test storing and retrieving objects:
```sh
# Store an object
curl -X PUT https://r2-worker..workers.dev/my-file.txt -d 'Hello, R2!'
# Retrieve the object
curl https://r2-worker..workers.dev/my-file.txt
```
Refer to the [Workers R2 API documentation](https://developers.cloudflare.com/r2/api/workers/workers-api-usage/) for the complete API reference.
## Next steps
[Presigned URLs ](https://developers.cloudflare.com/r2/api/s3/presigned-urls/)Generate temporary URLs for private object access.
[Public buckets ](https://developers.cloudflare.com/r2/buckets/public-buckets/)Serve files directly over HTTP with a public bucket.
[CORS ](https://developers.cloudflare.com/r2/buckets/cors/)Configure CORS for browser-based uploads.
[Object lifecycles ](https://developers.cloudflare.com/r2/buckets/object-lifecycles/)Set up lifecycle rules to automatically delete old objects.
---
title: Delete objects · Cloudflare R2 docs
description: You can delete objects from R2 using the dashboard, Workers API, S3
API, or command-line tools.
lastUpdated: 2025-12-02T15:31:53.000Z
chatbotDeprioritize: false
source_url:
html: https://developers.cloudflare.com/r2/objects/delete-objects/
md: https://developers.cloudflare.com/r2/objects/delete-objects/index.md
---
You can delete objects from R2 using the dashboard, Workers API, S3 API, or command-line tools.
## Delete via dashboard
1. In the Cloudflare dashboard, go to the **R2 object storage** page.
[Go to **Overview**](https://dash.cloudflare.com/?to=/:account/r2/overview)
2. Locate and select your bucket.
3. Locate the object you want to delete. You can select multiple objects to delete at one time.
4. Select your objects and select **Delete**.
5. Confirm your choice by selecting **Delete**.
## Delete via Workers API
Use R2 [bindings](https://developers.cloudflare.com/workers/runtime-apis/bindings/) in Workers to delete objects:
```ts
export default {
async fetch(request: Request, env: Env, ctx: ExecutionContext) {
await env.MY_BUCKET.delete("image.png");
return new Response("Deleted");
},
} satisfies ExportedHandler;
```
For complete documentation, refer to [Workers API](https://developers.cloudflare.com/r2/api/workers/workers-api-usage/).
## Delete via S3 API
Use S3-compatible SDKs to delete objects. You'll need your [account ID](https://developers.cloudflare.com/fundamentals/account/find-account-and-zone-ids/) and [R2 API token](https://developers.cloudflare.com/r2/api/tokens/).
* JavaScript
```ts
import { S3Client, DeleteObjectCommand } from "@aws-sdk/client-s3";
const S3 = new S3Client({
region: "auto", // Required by SDK but not used by R2
// Provide your Cloudflare account ID
endpoint: `https://.r2.cloudflarestorage.com`,
// Retrieve your S3 API credentials for your R2 bucket via API tokens (see: https://developers.cloudflare.com/r2/api/tokens)
credentials: {
accessKeyId: '',
secretAccessKey: '',
},
});
await S3.send(
new DeleteObjectCommand({
Bucket: "my-bucket",
Key: "image.png",
}),
);
```
* Python
```python
import boto3
s3 = boto3.client(
service_name="s3",
# Provide your Cloudflare account ID
endpoint_url=f"https://{ACCOUNT_ID}.r2.cloudflarestorage.com",
# Retrieve your S3 API credentials for your R2 bucket via API tokens (see: https://developers.cloudflare.com/r2/api/tokens)
aws_access_key_id=ACCESS_KEY_ID,
aws_secret_access_key=SECRET_ACCESS_KEY,
region_name="auto", # Required by SDK but not used by R2
)
s3.delete_object(Bucket="my-bucket", Key="image.png")
```
For complete S3 API documentation, refer to [S3 API](https://developers.cloudflare.com/r2/api/s3/api/).
## Delete via Wrangler
Warning
Deleting objects from a bucket is irreversible.
Use [Wrangler](https://developers.cloudflare.com/workers/wrangler/install-and-update/) to delete objects. Run the [`r2 object delete` command](https://developers.cloudflare.com/workers/wrangler/commands/#r2-object-delete):
```sh
wrangler r2 object delete test-bucket/image.png
```
---
title: Download objects · Cloudflare R2 docs
description: You can download objects from R2 using the dashboard, Workers API,
S3 API, or command-line tools.
lastUpdated: 2025-12-02T15:31:53.000Z
chatbotDeprioritize: false
source_url:
html: https://developers.cloudflare.com/r2/objects/download-objects/
md: https://developers.cloudflare.com/r2/objects/download-objects/index.md
---
You can download objects from R2 using the dashboard, Workers API, S3 API, or command-line tools.
## Download via dashboard
1. In the Cloudflare dashboard, go to the **R2 object storage** page.
[Go to **Overview**](https://dash.cloudflare.com/?to=/:account/r2/overview)
2. Select your bucket.
3. Locate the object you want to download.
4. Select **...** for the object and click **Download**.
## Download via Workers API
Use R2 [bindings](https://developers.cloudflare.com/workers/runtime-apis/bindings/) in Workers to download objects:
```ts
export default {
async fetch(request: Request, env: Env, ctx: ExecutionContext) {
const object = await env.MY_BUCKET.get("image.png");
return new Response(object.body);
},
} satisfies ExportedHandler;
```
For complete documentation, refer to [Workers API](https://developers.cloudflare.com/r2/api/workers/workers-api-usage/).
## Download via S3 API
Use S3-compatible SDKs to download objects. You'll need your [account ID](https://developers.cloudflare.com/fundamentals/account/find-account-and-zone-ids/) and [R2 API token](https://developers.cloudflare.com/r2/api/tokens/).
* JavaScript
```ts
import { S3Client, GetObjectCommand } from "@aws-sdk/client-s3";
const S3 = new S3Client({
region: "auto", // Required by SDK but not used by R2
// Provide your Cloudflare account ID
endpoint: `https://.r2.cloudflarestorage.com`,
// Retrieve your S3 API credentials for your R2 bucket via API tokens (see: https://developers.cloudflare.com/r2/api/tokens)
credentials: {
accessKeyId: '',
secretAccessKey: '',
},
});
const response = await S3.send(
new GetObjectCommand({
Bucket: "my-bucket",
Key: "image.png",
}),
);
```
* Python
```python
import boto3
s3 = boto3.client(
service_name="s3",
# Provide your Cloudflare account ID
endpoint_url=f"https://{ACCOUNT_ID}.r2.cloudflarestorage.com",
# Retrieve your S3 API credentials for your R2 bucket via API tokens (see: https://developers.cloudflare.com/r2/api/tokens)
aws_access_key_id=ACCESS_KEY_ID,
aws_secret_access_key=SECRET_ACCESS_KEY,
region_name="auto", # Required by SDK but not used by R2
)
response = s3.get_object(Bucket="my-bucket", Key="image.png")
image_data = response["Body"].read()
```
Refer to R2's [S3 API documentation](https://developers.cloudflare.com/r2/api/s3/api/) for all S3 API methods.
### Presigned URLs
For client-side downloads where users download directly from R2, use presigned URLs. Your server generates a temporary download URL that clients can use without exposing your API credentials.
1. Your application generates a presigned GET URL using an S3 SDK
2. Send the URL to your client
3. Client downloads directly from R2 using the presigned URL
For details on generating and using presigned URLs, refer to [Presigned URLs](https://developers.cloudflare.com/r2/api/s3/presigned-urls/).
## Download via Wrangler
Use [Wrangler](https://developers.cloudflare.com/workers/wrangler/install-and-update/) to download objects. Run the [`r2 object get` command](https://developers.cloudflare.com/workers/wrangler/commands/#r2-object-get):
```sh
wrangler r2 object get test-bucket/image.png
```
The file will be downloaded into the current working directory. You can also use the `--file` flag to set a new name for the object as it is downloaded, and the `--pipe` flag to pipe the download to standard output (stdout).
---
title: Upload objects · Cloudflare R2 docs
description: There are several ways to upload objects to R2. Which approach you
choose depends on the size of your objects and your performance requirements.
lastUpdated: 2026-02-13T12:50:29.000Z
chatbotDeprioritize: false
source_url:
html: https://developers.cloudflare.com/r2/objects/upload-objects/
md: https://developers.cloudflare.com/r2/objects/upload-objects/index.md
---
There are several ways to upload objects to R2. Which approach you choose depends on the size of your objects and your performance requirements.
## Choose an upload method
| | Single upload (`PUT`) | Multipart upload |
| - | - | - |
| **Best for** | Small to medium files (under \~100 MB) | Large files, or when you need parallelism and resumability |
| **Maximum object size** | 5 GiB | 5 TiB (up to 10,000 parts) |
| **Part size** | N/A | 5 MiB – 5 GiB per part |
| **Resumable** | No — must restart the entire upload | Yes — only failed parts need to be retried |
| **Parallel upload** | No | Yes — parts can be uploaded concurrently |
| **When to use** | Quick, simple uploads of small objects | Video, backups, datasets, or any file where reliability matters |
Note
Most S3-compatible SDKs and tools (such as `rclone`) automatically choose multipart upload for large files based on a configurable threshold. You do not typically need to implement multipart logic yourself when using the S3 API.
## Upload via dashboard
To upload objects to your bucket from the Cloudflare dashboard:
1. In the Cloudflare dashboard, go to the **R2 object storage** page.
[Go to **Overview**](https://dash.cloudflare.com/?to=/:account/r2/overview)
2. Select your bucket.
3. Select **Upload**.
4. Drag and drop your file into the upload area or **select from computer**.
You will receive a confirmation message after a successful upload.
## Upload via Workers API
Use R2 [bindings](https://developers.cloudflare.com/workers/runtime-apis/bindings/) in Workers to upload objects server-side. Refer to [Use R2 from Workers](https://developers.cloudflare.com/r2/api/workers/workers-api-usage/) for instructions on setting up an R2 binding.
### Single upload
Use `put()` to upload an object in a single request. This is the simplest approach for small to medium objects.
* JavaScript
```js
export default {
async fetch(request, env) {
try {
const object = await env.MY_BUCKET.put("image.png", request.body, {
httpMetadata: {
contentType: "image/png",
},
});
if (object === null) {
return new Response("Precondition failed or upload returned null", {
status: 412,
});
}
return Response.json({
key: object.key,
size: object.size,
etag: object.etag,
});
} catch (err) {
return new Response(`Upload failed: ${err}`, { status: 500 });
}
},
};
```
* TypeScript
```ts
export default {
async fetch(request: Request, env: Env): Promise {
try {
const object = await env.MY_BUCKET.put("image.png", request.body, {
httpMetadata: {
contentType: "image/png",
},
});
if (object === null) {
return new Response("Precondition failed or upload returned null", { status: 412 });
}
return Response.json({
key: object.key,
size: object.size,
etag: object.etag,
});
} catch (err) {
return new Response(`Upload failed: ${err}`, { status: 500 });
}
},
} satisfies ExportedHandler;
```
### Multipart upload
Use `createMultipartUpload()` and `resumeMultipartUpload()` for large files or when you need to upload parts in parallel. Each part must be at least 5 MiB (except the last part).
* JavaScript
```js
export default {
async fetch(request, env) {
const key = "large-file.bin";
// Create a new multipart upload
const multipartUpload = await env.MY_BUCKET.createMultipartUpload(key);
try {
// In a real application, these would be actual data chunks.
// Each part except the last must be at least 5 MiB.
const firstChunk = new Uint8Array(5 * 1024 * 1024); // placeholder
const secondChunk = new Uint8Array(1024); // placeholder
const part1 = await multipartUpload.uploadPart(1, firstChunk);
const part2 = await multipartUpload.uploadPart(2, secondChunk);
// Complete the upload with all parts
const object = await multipartUpload.complete([part1, part2]);
return Response.json({
key: object.key,
etag: object.httpEtag,
});
} catch (err) {
// Abort on failure so incomplete uploads do not count against storage
await multipartUpload.abort();
return new Response(`Multipart upload failed: ${err}`, { status: 500 });
}
},
};
```
* TypeScript
```ts
export default {
async fetch(request: Request, env: Env): Promise {
const key = "large-file.bin";
// Create a new multipart upload
const multipartUpload = await env.MY_BUCKET.createMultipartUpload(key);
try {
// In a real application, these would be actual data chunks.
// Each part except the last must be at least 5 MiB.
const firstChunk = new Uint8Array(5 * 1024 * 1024); // placeholder
const secondChunk = new Uint8Array(1024); // placeholder
const part1 = await multipartUpload.uploadPart(1, firstChunk);
const part2 = await multipartUpload.uploadPart(2, secondChunk);
// Complete the upload with all parts
const object = await multipartUpload.complete([part1, part2]);
return Response.json({
key: object.key,
etag: object.httpEtag,
});
} catch (err) {
// Abort on failure so incomplete uploads do not count against storage
await multipartUpload.abort();
return new Response(`Multipart upload failed: ${err}`, { status: 500 });
}
},
} satisfies ExportedHandler;
```
In most cases, the multipart state (the `uploadId` and uploaded part ETags) is tracked by the client sending requests to your Worker. The following example exposes an HTTP API that a client application can call to create, upload parts for, and complete a multipart upload:
* JavaScript
```js
export default {
async fetch(request, env) {
const url = new URL(request.url);
const key = url.pathname.slice(1);
const action = url.searchParams.get("action");
if (!key || !action) {
return new Response("Missing key or action", { status: 400 });
}
switch (action) {
// Step 1: Client calls POST /?action=mpu-create
case "mpu-create": {
const upload = await env.MY_BUCKET.createMultipartUpload(key);
return Response.json({ key: upload.key, uploadId: upload.uploadId });
}
// Step 2: Client calls PUT /?action=mpu-uploadpart&uploadId=...&partNumber=...
case "mpu-uploadpart": {
const uploadId = url.searchParams.get("uploadId");
const partNumber = Number(url.searchParams.get("partNumber"));
if (!uploadId || !partNumber || !request.body) {
return new Response("Missing uploadId, partNumber, or body", {
status: 400,
});
}
const upload = env.MY_BUCKET.resumeMultipartUpload(key, uploadId);
try {
const part = await upload.uploadPart(partNumber, request.body);
return Response.json(part);
} catch (err) {
return new Response(String(err), { status: 400 });
}
}
// Step 3: Client calls POST /?action=mpu-complete&uploadId=...
case "mpu-complete": {
const uploadId = url.searchParams.get("uploadId");
if (!uploadId) {
return new Response("Missing uploadId", { status: 400 });
}
const upload = env.MY_BUCKET.resumeMultipartUpload(key, uploadId);
const body = await request.json();
try {
const object = await upload.complete(body.parts);
return new Response(null, {
headers: { etag: object.httpEtag },
});
} catch (err) {
return new Response(String(err), { status: 400 });
}
}
// Abort an in-progress upload
case "mpu-abort": {
const uploadId = url.searchParams.get("uploadId");
if (!uploadId) {
return new Response("Missing uploadId", { status: 400 });
}
const upload = env.MY_BUCKET.resumeMultipartUpload(key, uploadId);
try {
await upload.abort();
} catch (err) {
return new Response(String(err), { status: 400 });
}
return new Response(null, { status: 204 });
}
default:
return new Response(`Unknown action: ${action}`, { status: 400 });
}
},
};
```
* TypeScript
```ts
export default {
async fetch(request: Request, env: Env): Promise {
const url = new URL(request.url);
const key = url.pathname.slice(1);
const action = url.searchParams.get("action");
if (!key || !action) {
return new Response("Missing key or action", { status: 400 });
}
switch (action) {
// Step 1: Client calls POST /?action=mpu-create
case "mpu-create": {
const upload = await env.MY_BUCKET.createMultipartUpload(key);
return Response.json({ key: upload.key, uploadId: upload.uploadId });
}
// Step 2: Client calls PUT /?action=mpu-uploadpart&uploadId=...&partNumber=...
case "mpu-uploadpart": {
const uploadId = url.searchParams.get("uploadId");
const partNumber = Number(url.searchParams.get("partNumber"));
if (!uploadId || !partNumber || !request.body) {
return new Response("Missing uploadId, partNumber, or body", { status: 400 });
}
const upload = env.MY_BUCKET.resumeMultipartUpload(key, uploadId);
try {
const part = await upload.uploadPart(partNumber, request.body);
return Response.json(part);
} catch (err) {
return new Response(String(err), { status: 400 });
}
}
// Step 3: Client calls POST /?action=mpu-complete&uploadId=...
case "mpu-complete": {
const uploadId = url.searchParams.get("uploadId");
if (!uploadId) {
return new Response("Missing uploadId", { status: 400 });
}
const upload = env.MY_BUCKET.resumeMultipartUpload(key, uploadId);
const body = await request.json<{ parts: R2UploadedPart[] }>();
try {
const object = await upload.complete(body.parts);
return new Response(null, {
headers: { etag: object.httpEtag },
});
} catch (err) {
return new Response(String(err), { status: 400 });
}
}
// Abort an in-progress upload
case "mpu-abort": {
const uploadId = url.searchParams.get("uploadId");
if (!uploadId) {
return new Response("Missing uploadId", { status: 400 });
}
const upload = env.MY_BUCKET.resumeMultipartUpload(key, uploadId);
try {
await upload.abort();
} catch (err) {
return new Response(String(err), { status: 400 });
}
return new Response(null, { status: 204 });
}
default:
return new Response(`Unknown action: ${action}`, { status: 400 });
}
},
} satisfies ExportedHandler;
```
For the complete Workers API reference, refer to [Workers API reference](https://developers.cloudflare.com/r2/api/workers/workers-api-reference/).
### Presigned URLs (Workers)
When you need clients (browsers, mobile apps) to upload directly to R2 without proxying through your Worker, generate a presigned URL server-side and hand it to the client:
* JavaScript
```js
import { AwsClient } from "aws4fetch";
export default {
async fetch(request, env) {
const r2 = new AwsClient({
accessKeyId: env.R2_ACCESS_KEY_ID,
secretAccessKey: env.R2_SECRET_ACCESS_KEY,
});
// Generate a presigned PUT URL valid for 1 hour
const url = new URL(
"https://.r2.cloudflarestorage.com/my-bucket/image.png",
);
url.searchParams.set("X-Amz-Expires", "3600");
const signed = await r2.sign(new Request(url, { method: "PUT" }), {
aws: { signQuery: true },
});
// Return the signed URL to the client — they can PUT directly to R2
return Response.json({ url: signed.url });
},
};
```
* TypeScript
```ts
import { AwsClient } from "aws4fetch";
interface Env {
R2_ACCESS_KEY_ID: string;
R2_SECRET_ACCESS_KEY: string;
}
export default {
async fetch(request: Request, env: Env): Promise {
const r2 = new AwsClient({
accessKeyId: env.R2_ACCESS_KEY_ID,
secretAccessKey: env.R2_SECRET_ACCESS_KEY,
});
// Generate a presigned PUT URL valid for 1 hour
const url = new URL(
"https://.r2.cloudflarestorage.com/my-bucket/image.png",
);
url.searchParams.set("X-Amz-Expires", "3600");
const signed = await r2.sign(
new Request(url, { method: "PUT" }),
{ aws: { signQuery: true } },
);
// Return the signed URL to the client — they can PUT directly to R2
return Response.json({ url: signed.url });
},
} satisfies ExportedHandler;
```
For full presigned URL documentation including GET, PUT, and security best practices, refer to [Presigned URLs](https://developers.cloudflare.com/r2/api/s3/presigned-urls/).
## Upload via S3 API
Use S3-compatible SDKs to upload objects. You will need your [account ID](https://developers.cloudflare.com/fundamentals/account/find-account-and-zone-ids/) and [R2 API token](https://developers.cloudflare.com/r2/api/tokens/).
### Single upload
* TypeScript
```ts
import { S3Client, PutObjectCommand } from "@aws-sdk/client-s3";
import { readFile } from "node:fs/promises";
const S3 = new S3Client({
region: "auto",
endpoint: `https://.r2.cloudflarestorage.com`,
credentials: {
accessKeyId: "",
secretAccessKey: "",
},
});
const fileContent = await readFile("./image.png");
const response = await S3.send(
new PutObjectCommand({
Bucket: "my-bucket",
Key: "image.png",
Body: fileContent,
ContentType: "image/png",
}),
);
console.log(`Uploaded successfully. ETag: ${response.ETag}`);
```
* JavaScript
```js
import { S3Client, PutObjectCommand } from "@aws-sdk/client-s3";
import { readFile } from "node:fs/promises";
const S3 = new S3Client({
region: "auto",
endpoint: `https://.r2.cloudflarestorage.com`,
credentials: {
accessKeyId: "",
secretAccessKey: "",
},
});
const fileContent = await readFile("./image.png");
const response = await S3.send(
new PutObjectCommand({
Bucket: "my-bucket",
Key: "image.png",
Body: fileContent,
ContentType: "image/png",
}),
);
console.log(`Uploaded successfully. ETag: ${response.ETag}`);
```
* Python
```python
import boto3
s3 = boto3.client(
service_name="s3",
endpoint_url="https://.r2.cloudflarestorage.com",
aws_access_key_id="",
aws_secret_access_key="",
region_name="auto",
)
with open("./image.png", "rb") as f:
response = s3.put_object(
Bucket="my-bucket",
Key="image.png",
Body=f,
ContentType="image/png",
)
print(f"Uploaded successfully. ETag: {response['ETag']}")
```
### Multipart upload
Most S3 SDKs handle multipart uploads automatically when the file exceeds a configurable threshold. The examples below show both automatic (high-level) and manual (low-level) approaches.
#### Automatic multipart upload
The SDK splits the file and uploads parts in parallel.
* TypeScript
```ts
import { S3Client } from "@aws-sdk/client-s3";
import { Upload } from "@aws-sdk/lib-storage";
import { createReadStream } from "node:fs";
const S3 = new S3Client({
region: "auto",
endpoint: `https://.r2.cloudflarestorage.com`,
credentials: {
accessKeyId: "",
secretAccessKey: "",
},
});
const upload = new Upload({
client: S3,
params: {
Bucket: "my-bucket",
Key: "large-file.bin",
Body: createReadStream("./large-file.bin"),
},
// Upload parts in parallel (default: 4)
leavePartsOnError: false,
});
upload.on("httpUploadProgress", (progress) => {
console.log(`Uploaded ${progress.loaded ?? 0} bytes`);
});
const result = await upload.done();
console.log(`Upload complete. ETag: ${result.ETag}`);
```
* JavaScript
```js
import { S3Client } from "@aws-sdk/client-s3";
import { Upload } from "@aws-sdk/lib-storage";
import { createReadStream } from "node:fs";
const S3 = new S3Client({
region: "auto",
endpoint: `https://.r2.cloudflarestorage.com`,
credentials: {
accessKeyId: "",
secretAccessKey: "",
},
});
const upload = new Upload({
client: S3,
params: {
Bucket: "my-bucket",
Key: "large-file.bin",
Body: createReadStream("./large-file.bin"),
},
leavePartsOnError: false,
});
upload.on("httpUploadProgress", (progress) => {
console.log(`Uploaded ${progress.loaded ?? 0} bytes`);
});
const result = await upload.done();
console.log(`Upload complete. ETag: ${result.ETag}`);
```
* Python
```python
import boto3
s3 = boto3.client(
service_name="s3",
endpoint_url="https://.r2.cloudflarestorage.com",
aws_access_key_id="",
aws_secret_access_key="",
region_name="auto",
)
# upload_file automatically uses multipart for large files
s3.upload_file(
Filename="./large-file.bin",
Bucket="my-bucket",
Key="large-file.bin",
)
```
#### Manual multipart upload
Use the low-level API when you need full control over part sizes or upload order.
* TypeScript
```ts
import {
S3Client,
CreateMultipartUploadCommand,
UploadPartCommand,
CompleteMultipartUploadCommand,
AbortMultipartUploadCommand,
type CompletedPart,
} from "@aws-sdk/client-s3";
import { createReadStream, statSync } from "node:fs";
const S3 = new S3Client({
region: "auto",
endpoint: `https://.r2.cloudflarestorage.com`,
credentials: {
accessKeyId: "",
secretAccessKey: "",
},
});
const bucket = "my-bucket";
const key = "large-file.bin";
const partSize = 10 * 1024 * 1024; // 10 MiB per part
// Step 1: Create the multipart upload
const { UploadId } = await S3.send(
new CreateMultipartUploadCommand({ Bucket: bucket, Key: key }),
);
try {
const fileSize = statSync("./large-file.bin").size;
const partCount = Math.ceil(fileSize / partSize);
const parts: CompletedPart[] = [];
// Step 2: Upload each part
for (let i = 0; i < partCount; i++) {
const start = i * partSize;
const end = Math.min(start + partSize, fileSize);
const { ETag } = await S3.send(
new UploadPartCommand({
Bucket: bucket,
Key: key,
UploadId,
PartNumber: i + 1,
Body: createReadStream("./large-file.bin", { start, end: end - 1 }),
ContentLength: end - start,
}),
);
parts.push({ PartNumber: i + 1, ETag });
}
// Step 3: Complete the upload
await S3.send(
new CompleteMultipartUploadCommand({
Bucket: bucket,
Key: key,
UploadId,
MultipartUpload: { Parts: parts },
}),
);
console.log("Multipart upload complete.");
} catch (err) {
// Abort on failure to clean up incomplete parts
try {
await S3.send(
new AbortMultipartUploadCommand({ Bucket: bucket, Key: key, UploadId }),
);
} catch (_abortErr) {
// Best-effort cleanup — the original error is more important
}
throw err;
}
```
* JavaScript
```js
import {
S3Client,
CreateMultipartUploadCommand,
UploadPartCommand,
CompleteMultipartUploadCommand,
AbortMultipartUploadCommand,
} from "@aws-sdk/client-s3";
import { createReadStream, statSync } from "node:fs";
const S3 = new S3Client({
region: "auto",
endpoint: `https://.r2.cloudflarestorage.com`,
credentials: {
accessKeyId: "",
secretAccessKey: "",
},
});
const bucket = "my-bucket";
const key = "large-file.bin";
const partSize = 10 * 1024 * 1024; // 10 MiB per part
// Step 1: Create the multipart upload
const { UploadId } = await S3.send(
new CreateMultipartUploadCommand({ Bucket: bucket, Key: key }),
);
try {
const fileSize = statSync("./large-file.bin").size;
const partCount = Math.ceil(fileSize / partSize);
const parts = [];
// Step 2: Upload each part
for (let i = 0; i < partCount; i++) {
const start = i * partSize;
const end = Math.min(start + partSize, fileSize);
const { ETag } = await S3.send(
new UploadPartCommand({
Bucket: bucket,
Key: key,
UploadId,
PartNumber: i + 1,
Body: createReadStream("./large-file.bin", { start, end: end - 1 }),
ContentLength: end - start,
}),
);
parts.push({ PartNumber: i + 1, ETag });
}
// Step 3: Complete the upload
await S3.send(
new CompleteMultipartUploadCommand({
Bucket: bucket,
Key: key,
UploadId,
MultipartUpload: { Parts: parts },
}),
);
console.log("Multipart upload complete.");
} catch (err) {
// Abort on failure to clean up incomplete parts
try {
await S3.send(
new AbortMultipartUploadCommand({ Bucket: bucket, Key: key, UploadId }),
);
} catch (_abortErr) {
// Best-effort cleanup — the original error is more important
}
throw err;
}
```
* Python
```python
import boto3
import math
import os
s3 = boto3.client(
service_name="s3",
endpoint_url="https://.r2.cloudflarestorage.com",
aws_access_key_id="",
aws_secret_access_key="",
region_name="auto",
)
bucket = "my-bucket"
key = "large-file.bin"
file_path = "./large-file.bin"
part_size = 10 * 1024 * 1024 # 10 MiB per part
# Step 1: Create the multipart upload
mpu = s3.create_multipart_upload(Bucket=bucket, Key=key)
upload_id = mpu["UploadId"]
try:
file_size = os.path.getsize(file_path)
part_count = math.ceil(file_size / part_size)
parts = []
# Step 2: Upload each part
with open(file_path, "rb") as f:
for i in range(part_count):
data = f.read(part_size)
response = s3.upload_part(
Bucket=bucket,
Key=key,
UploadId=upload_id,
PartNumber=i + 1,
Body=data,
)
parts.append({"PartNumber": i + 1, "ETag": response["ETag"]})
# Step 3: Complete the upload
s3.complete_multipart_upload(
Bucket=bucket,
Key=key,
UploadId=upload_id,
MultipartUpload={"Parts": parts},
)
print("Multipart upload complete.")
except Exception:
# Abort on failure to clean up incomplete parts
try:
s3.abort_multipart_upload(Bucket=bucket, Key=key, UploadId=upload_id)
except Exception:
pass # Best-effort cleanup — the original error is more important
raise
```
### Presigned URLs (S3 API)
For client-side uploads where users upload directly to R2 without going through your server, generate a presigned PUT URL. Your server creates the URL and the client uploads to it — no API credentials are exposed to the client.
* TypeScript
```ts
import { S3Client, PutObjectCommand } from "@aws-sdk/client-s3";
import { getSignedUrl } from "@aws-sdk/s3-request-presigner";
const S3 = new S3Client({
region: "auto",
endpoint: `https://.r2.cloudflarestorage.com`,
credentials: {
accessKeyId: "",
secretAccessKey: "",
},
});
const presignedUrl = await getSignedUrl(
S3,
new PutObjectCommand({
Bucket: "my-bucket",
Key: "user-upload.png",
ContentType: "image/png",
}),
{ expiresIn: 3600 }, // Valid for 1 hour
);
console.log(presignedUrl);
// Return presignedUrl to the client
```
* JavaScript
```js
import { S3Client, PutObjectCommand } from "@aws-sdk/client-s3";
import { getSignedUrl } from "@aws-sdk/s3-request-presigner";
const S3 = new S3Client({
region: "auto",
endpoint: `https://.r2.cloudflarestorage.com`,
credentials: {
accessKeyId: "",
secretAccessKey: "",
},
});
const presignedUrl = await getSignedUrl(
S3,
new PutObjectCommand({
Bucket: "my-bucket",
Key: "user-upload.png",
ContentType: "image/png",
}),
{ expiresIn: 3600 }, // Valid for 1 hour
);
console.log(presignedUrl);
// Return presignedUrl to the client
```
* Python
```python
import boto3
s3 = boto3.client(
service_name="s3",
endpoint_url="https://.r2.cloudflarestorage.com",
aws_access_key_id="",
aws_secret_access_key="",
region_name="auto",
)
presigned_url = s3.generate_presigned_url(
"put_object",
Params={
"Bucket": "my-bucket",
"Key": "user-upload.png",
"ContentType": "image/png",
},
ExpiresIn=3600, # Valid for 1 hour
)
print(presigned_url)
# Return presigned_url to the client
```
For full presigned URL documentation, refer to [Presigned URLs](https://developers.cloudflare.com/r2/api/s3/presigned-urls/).
Refer to R2's [S3 API documentation](https://developers.cloudflare.com/r2/api/s3/api/) for all supported S3 API methods.
## Upload via CLI
### Rclone
[Rclone](https://rclone.org/) is a command-line tool for managing files on cloud storage. Rclone works well for uploading multiple files from your local machine or copying data from other cloud storage providers.
To use rclone, install it onto your machine using their official documentation - [Install rclone](https://rclone.org/install/).
Upload files with the `rclone copy` command:
```sh
# Upload a single file
rclone copy /path/to/local/image.png r2:bucket_name
# Upload everything in a directory
rclone copy /path/to/local/folder r2:bucket_name
```
Verify the upload with `rclone ls`:
```sh
rclone ls r2:bucket_name
```
For more information, refer to our [rclone example](https://developers.cloudflare.com/r2/examples/rclone/).
### Wrangler
Note
Wrangler supports uploading files up to 315 MB and only allows one object at a time. For large files or bulk uploads, use [rclone](https://developers.cloudflare.com/r2/examples/rclone/) or another [S3-compatible](https://developers.cloudflare.com/r2/api/s3/) tool.
Use [Wrangler](https://developers.cloudflare.com/workers/wrangler/install-and-update/) to upload objects. Run the [`r2 object put` command](https://developers.cloudflare.com/workers/wrangler/commands/#r2-object-put):
```sh
wrangler r2 object put test-bucket/image.png --file=image.png
```
You can set the `Content-Type` (MIME type), `Content-Disposition`, `Cache-Control` and other HTTP header metadata through optional flags.
## Multipart upload details
### Part size limits
* Minimum part size: 5 MiB (except for the last part)
* Maximum part size: 5 GiB
* Maximum number of parts: 10,000
* All parts except the last must be the same size
### Incomplete upload lifecycles
Incomplete multipart uploads are automatically aborted after 7 days by default. You can change this by [configuring a custom lifecycle policy](https://developers.cloudflare.com/r2/buckets/object-lifecycles/).
### ETags
ETags for objects uploaded via multipart differ from those uploaded with a single `PUT`. The ETag of each part is the MD5 hash of that part's contents. The ETag of the completed multipart object is the hash of the concatenated binary MD5 sums of all parts, followed by a hyphen and the number of parts.
For example, if a two-part upload has part ETags `bce6bf66aeb76c7040fdd5f4eccb78e6` and `8165449fc15bbf43d3b674595cbcc406`, the completed object's ETag will be `f77dc0eecdebcd774a2a22cb393ad2ff-2`.
## Related resources
[Workers API reference ](https://developers.cloudflare.com/r2/api/workers/workers-api-reference/)Full reference for the R2 Workers API including put(), createMultipartUpload(), and more.
[S3 API compatibility ](https://developers.cloudflare.com/r2/api/s3/api/)Supported S3 API operations and R2-specific behavior.
[Presigned URLs ](https://developers.cloudflare.com/r2/api/s3/presigned-urls/)Generate temporary upload and download URLs for client-side access.
[Object lifecycles ](https://developers.cloudflare.com/r2/buckets/object-lifecycles/)Configure automatic cleanup of incomplete multipart uploads.
---
title: Audit Logs · Cloudflare R2 docs
description: Audit logs provide a comprehensive summary of changes made within
your Cloudflare account, including those made to R2 buckets. This
functionality is available on all plan types, free of charge, and is always
enabled.
lastUpdated: 2025-09-03T16:40:54.000Z
chatbotDeprioritize: false
source_url:
html: https://developers.cloudflare.com/r2/platform/audit-logs/
md: https://developers.cloudflare.com/r2/platform/audit-logs/index.md
---
[Audit logs](https://developers.cloudflare.com/fundamentals/account/account-security/review-audit-logs/) provide a comprehensive summary of changes made within your Cloudflare account, including those made to R2 buckets. This functionality is available on all plan types, free of charge, and is always enabled.
## Viewing audit logs
To view audit logs for your R2 buckets, go to the **Audit logs** page.
[Go to **Audit logs**](https://dash.cloudflare.com/?to=/:account/audit-log)
For more information on how to access and use audit logs, refer to [Review audit logs](https://developers.cloudflare.com/fundamentals/account/account-security/review-audit-logs/).
## Logged operations
The following configuration actions are logged:
| Operation | Description |
| - | - |
| CreateBucket | Creation of a new bucket. |
| DeleteBucket | Deletion of an existing bucket. |
| AddCustomDomain | Addition of a custom domain to a bucket. |
| RemoveCustomDomain | Removal of a custom domain from a bucket. |
| ChangeBucketVisibility | Change to the managed public access (`r2.dev`) settings of a bucket. |
| PutBucketStorageClass | Change to the default storage class of a bucket. |
| PutBucketLifecycleConfiguration | Change to the object lifecycle configuration of a bucket. |
| DeleteBucketLifecycleConfiguration | Deletion of the object lifecycle configuration for a bucket. |
| PutBucketCors | Change to the CORS configuration for a bucket. |
| DeleteBucketCors | Deletion of the CORS configuration for a bucket. |
Note
Logs for data access operations, such as `GetObject` and `PutObject`, are not included in audit logs. To log HTTP requests made to public R2 buckets, use the [HTTP requests](https://developers.cloudflare.com/logs/logpush/logpush-job/datasets/zone/http_requests/) Logpush dataset.
## Example log entry
Below is an example of an audit log entry showing the creation of a new bucket:
```json
{
"action": { "info": "CreateBucket", "result": true, "type": "create" },
"actor": {
"email": "",
"id": "3f7b730e625b975bc1231234cfbec091",
"ip": "fe32:43ed:12b5:526::1d2:13",
"type": "user"
},
"id": "5eaeb6be-1234-406a-87ab-1971adc1234c",
"interface": "API",
"metadata": { "zone_name": "r2.cloudflarestorage.com" },
"newValue": "",
"newValueJson": {},
"oldValue": "",
"oldValueJson": {},
"owner": { "id": "1234d848c0b9e484dfc37ec392b5fa8a" },
"resource": { "id": "my-bucket", "type": "r2.bucket" },
"when": "2024-07-15T16:32:52.412Z"
}
```
---
title: Event subscriptions · Cloudflare R2 docs
description: Event subscriptions allow you to receive messages when events occur
across your Cloudflare account. Cloudflare products (e.g., KV, Workers AI,
Workers) can publish structured events to a queue, which you can then consume
with Workers or HTTP pull consumers to build custom workflows, integrations,
or logic.
lastUpdated: 2025-11-06T01:33:23.000Z
chatbotDeprioritize: false
source_url:
html: https://developers.cloudflare.com/r2/platform/event-subscriptions/
md: https://developers.cloudflare.com/r2/platform/event-subscriptions/index.md
---
[Event subscriptions](https://developers.cloudflare.com/queues/event-subscriptions/) allow you to receive messages when events occur across your Cloudflare account. Cloudflare products (e.g., [KV](https://developers.cloudflare.com/kv/), [Workers AI](https://developers.cloudflare.com/workers-ai/), [Workers](https://developers.cloudflare.com/workers/)) can publish structured events to a [queue](https://developers.cloudflare.com/queues/), which you can then consume with Workers or [HTTP pull consumers](https://developers.cloudflare.com/queues/configuration/pull-consumers/) to build custom workflows, integrations, or logic.
For more information on [Event Subscriptions](https://developers.cloudflare.com/queues/event-subscriptions/), refer to the [management guide](https://developers.cloudflare.com/queues/event-subscriptions/manage-event-subscriptions/).
## Available R2 events
#### `bucket.created`
Triggered when a bucket is created.
**Example:**
```json
{
"type": "cf.r2.bucket.created",
"source": {
"type": "r2"
},
"payload": {
"name": "my-bucket",
"jurisdiction": "default",
"location": "WNAM",
"storageClass": "Standard"
},
"metadata": {
"accountId": "f9f79265f388666de8122cfb508d7776",
"eventSubscriptionId": "1830c4bb612e43c3af7f4cada31fbf3f",
"eventSchemaVersion": 1,
"eventTimestamp": "2025-05-01T02:48:57.132Z"
}
}
```
#### `bucket.deleted`
Triggered when a bucket is deleted.
**Example:**
```json
{
"type": "cf.r2.bucket.deleted",
"source": {
"type": "r2"
},
"payload": {
"name": "my-bucket",
"jurisdiction": "default"
},
"metadata": {
"accountId": "f9f79265f388666de8122cfb508d7776",
"eventSubscriptionId": "1830c4bb612e43c3af7f4cada31fbf3f",
"eventSchemaVersion": 1,
"eventTimestamp": "2025-05-01T02:48:57.132Z"
}
}
```
## Available Super Slurper events
#### `job.started`
Triggered when a migration job starts.
**Example:**
```json
{
"type": "cf.superSlurper.job.started",
"source": {
"type": "superSlurper"
},
"payload": {
"id": "job-12345678-90ab-cdef-1234-567890abcdef",
"createdAt": "2025-05-01T02:48:57.132Z",
"overwrite": true,
"pathPrefix": "migrations/",
"source": {
"provider": "s3",
"bucket": "source-bucket",
"region": "us-east-1",
"endpoint": "s3.amazonaws.com"
},
"destination": {
"provider": "r2",
"bucket": "destination-bucket",
"jurisdiction": "default"
}
},
"metadata": {
"accountId": "f9f79265f388666de8122cfb508d7776",
"eventSubscriptionId": "1830c4bb612e43c3af7f4cada31fbf3f",
"eventSchemaVersion": 1,
"eventTimestamp": "2025-05-01T02:48:57.132Z"
}
}
```
#### `job.paused`
Triggered when a migration job pauses.
**Example:**
```json
{
"type": "cf.superSlurper.job.paused",
"source": {
"type": "superSlurper"
},
"payload": {
"id": "job-12345678-90ab-cdef-1234-567890abcdef"
},
"metadata": {
"accountId": "f9f79265f388666de8122cfb508d7776",
"eventSubscriptionId": "1830c4bb612e43c3af7f4cada31fbf3f",
"eventSchemaVersion": 1,
"eventTimestamp": "2025-05-01T02:48:57.132Z"
}
}
```
#### `job.resumed`
Triggered when a migration job resumes.
**Example:**
```json
{
"type": "cf.superSlurper.job.resumed",
"source": {
"type": "superSlurper"
},
"payload": {
"id": "job-12345678-90ab-cdef-1234-567890abcdef"
},
"metadata": {
"accountId": "f9f79265f388666de8122cfb508d7776",
"eventSubscriptionId": "1830c4bb612e43c3af7f4cada31fbf3f",
"eventSchemaVersion": 1,
"eventTimestamp": "2025-05-01T02:48:57.132Z"
}
}
```
#### `job.completed`
Triggered when a migration job finishes.
**Example:**
```json
{
"type": "cf.superSlurper.job.completed",
"source": {
"type": "superSlurper"
},
"payload": {
"id": "job-12345678-90ab-cdef-1234-567890abcdef",
"totalObjectsCount": 1000,
"skippedObjectsCount": 10,
"migratedObjectsCount": 980,
"failedObjectsCount": 10
},
"metadata": {
"accountId": "f9f79265f388666de8122cfb508d7776",
"eventSubscriptionId": "1830c4bb612e43c3af7f4cada31fbf3f",
"eventSchemaVersion": 1,
"eventTimestamp": "2025-05-01T02:48:57.132Z"
}
}
```
#### `job.aborted`
Triggered when a migration job is manually aborted.
**Example:**
```json
{
"type": "cf.superSlurper.job.aborted",
"source": {
"type": "superSlurper"
},
"payload": {
"id": "job-12345678-90ab-cdef-1234-567890abcdef",
"totalObjectsCount": 1000,
"skippedObjectsCount": 100,
"migratedObjectsCount": 500,
"failedObjectsCount": 50
},
"metadata": {
"accountId": "f9f79265f388666de8122cfb508d7776",
"eventSubscriptionId": "1830c4bb612e43c3af7f4cada31fbf3f",
"eventSchemaVersion": 1,
"eventTimestamp": "2025-05-01T02:48:57.132Z"
}
}
```
#### `job.object.migrated`
Triggered when an object is migrated.
**Example:**
```json
{
"type": "cf.superSlurper.job.object.migrated",
"source": {
"type": "superSlurper.job",
"jobId": "job-12345678-90ab-cdef-1234-567890abcdef"
},
"payload": {
"key": "migrations/file.txt"
},
"metadata": {
"accountId": "f9f79265f388666de8122cfb508d7776",
"eventSubscriptionId": "1830c4bb612e43c3af7f4cada31fbf3f",
"eventSchemaVersion": 1,
"eventTimestamp": "2025-05-01T02:48:57.132Z"
}
}
```
---
title: Limits · Cloudflare R2 docs
description: Limits specified in MiB (mebibyte), GiB (gibibyte), or TiB
(tebibyte) are storage units of measurement based on base-2. 1 GiB (gibibyte)
is equivalent to 230 bytes (or 10243 bytes). This is distinct from 1 GB
(gigabyte), which is 109 bytes (or 10003 bytes).
lastUpdated: 2026-02-08T13:47:49.000Z
chatbotDeprioritize: false
source_url:
html: https://developers.cloudflare.com/r2/platform/limits/
md: https://developers.cloudflare.com/r2/platform/limits/index.md
---
| Feature | Limit |
| - | - |
| Data storage per bucket | Unlimited |
| Maximum number of buckets per account | 1,000,000 |
| Maximum rate of bucket management operations per bucket [1](#user-content-fn-1) | 50 per second |
| Number of custom domains per bucket | 50 |
| Object key length | 1,024 bytes |
| Object metadata size | 8,192 bytes |
| Object size | 5 TiB per object [2](#user-content-fn-2) |
| Maximum upload size [3](#user-content-fn-3) | 5 GiB (single-part) / 4.995 TiB (multi-part) [4](#user-content-fn-4) |
| Maximum upload parts | 10,000 |
| Maximum concurrent writes to the same object name (key) | 1 per second [5](#user-content-fn-5) |
Limits specified in MiB (mebibyte), GiB (gibibyte), or TiB (tebibyte) are storage units of measurement based on base-2. 1 GiB (gibibyte) is equivalent to 230 bytes (or 10243 bytes). This is distinct from 1 GB (gigabyte), which is 109 bytes (or 10003 bytes).
Need a higher limit?
To request an adjustment to a limit, complete the [Limit Increase Request Form](https://forms.gle/ukpeZVLWLnKeixDu7). If the limit can be increased, Cloudflare will contact you with next steps.
## Rate limiting on managed public buckets through `r2.dev`
Managed public bucket access through an `r2.dev` subdomain is not intended for production usage and has a variable rate limit applied to it. The `r2.dev` endpoint for your bucket is designed to enable testing.
* If you exceed the rate limit (hundreds of requests/second), requests to your `r2.dev` endpoint will be temporarily throttled and you will receive a `429 Too Many Requests` response.
* Bandwidth (throughput) may also be throttled when using the `r2.dev` endpoint.
For production use cases, connect a [custom domain](https://developers.cloudflare.com/r2/buckets/public-buckets/#custom-domains) to your bucket. Custom domains allow you to serve content from a domain you control (for example, `assets.example.com`), configure fine-grained caching, set up redirect and rewrite rules, mutate content via [Cloudflare Workers](https://developers.cloudflare.com/workers/), and get detailed URL-level analytics for content served from your R2 bucket.
## Footnotes
1. Bucket management operations include creating, deleting, listing, and configuring buckets. This limit does *not* apply to reading or writing objects to a bucket. [↩](#user-content-fnref-1)
2. The object size limit is 5 GiB less than 5 TiB, so 4.995 TiB. [↩](#user-content-fnref-2)
3. Max upload size applies to uploading a file via one request, uploading a part of a multipart upload, or copying into a part of a multipart upload. If you have a Worker, its inbound request size is constrained by [Workers request limits](https://developers.cloudflare.com/workers/platform/limits#request-limits). The max upload size limit does not apply to subrequests. [↩](#user-content-fnref-3)
4. The max upload size is 5 MiB less than 5 GiB, so 4.995 GiB. [↩](#user-content-fnref-4)
5. Concurrent writes to the same object name (key) at a higher rate return HTTP 429 (rate limited) responses. [↩](#user-content-fnref-5)
---
title: Metrics and analytics · Cloudflare R2 docs
description: R2 exposes analytics that allow you to inspect the requests and
storage of the buckets in your account.
lastUpdated: 2025-11-24T20:04:17.000Z
chatbotDeprioritize: false
source_url:
html: https://developers.cloudflare.com/r2/platform/metrics-analytics/
md: https://developers.cloudflare.com/r2/platform/metrics-analytics/index.md
---
R2 exposes analytics that allow you to inspect the requests and storage of the buckets in your account.
The metrics displayed for a bucket in the [Cloudflare dashboard](https://dash.cloudflare.com/) are queried from Cloudflare's [GraphQL Analytics API](https://developers.cloudflare.com/analytics/graphql-api/). You can access the metrics [programmatically](#query-via-the-graphql-api) via GraphQL or HTTP client.
## Metrics
R2 currently has two datasets:
| Dataset | GraphQL Dataset Name | Description |
| - | - | - |
| Operations | `r2OperationsAdaptiveGroups` | This dataset consists of the operations taken on a bucket within an account. |
| Storage | `r2StorageAdaptiveGroups` | This dataset consists of the storage of a bucket within an account. |
### Operations Dataset
| Field | Description |
| - | - |
| actionType | The name of the operation performed. |
| actionStatus | The status of the operation. Can be `success`, `userError`, or `internalError`. |
| bucketName | The bucket this operation was performed on if applicable. For buckets with a jurisdiction specified, you must include the jurisdiction followed by an underscore before the bucket name. For example: `eu_your-bucket-name` |
| objectName | The object this operation was performed on if applicable. |
| responseStatusCode | The http status code returned by this operation. |
| datetime | The time of the request. |
### Storage Dataset
| Field | Description |
| - | - |
| bucketName | The bucket this storage value is for. For buckets with a jurisdiction specified, you must include the [jurisdiction](https://developers.cloudflare.com/r2/reference/data-location/#jurisdictional-restrictions) followed by an underscore before the bucket name. For example: `eu_your-bucket-name` |
| payloadSize | The size of the objects in the bucket. |
| metadataSize | The size of the metadata of the objects in the bucket. |
| objectCount | The number of objects in the bucket. |
| uploadCount | The number of pending multipart uploads in the bucket. |
| datetime | The time that this storage value represents. |
Metrics can be queried (and are retained) for the past 31 days. These datasets require an `accountTag` filter with your Cloudflare account ID.
Querying buckets with jurisdiction restriction
In your account, you may have two buckets of the same name, one with a specified jurisdiction, and one without.
Therefore, if you want to query metrics about a bucket which has a specified jurisdiction, you must include the [jurisdiction](https://developers.cloudflare.com/r2/reference/data-location/#jurisdictional-restrictions) followed by an underscore before the bucket name. For example: `eu_bucket-name`. This ensures you query the correct bucket.
## View via the dashboard
Per-bucket analytics for R2 are available in the Cloudflare dashboard. To view current and historical metrics for a bucket:
1. In the Cloudflare dashboard, go to the **R2 object storage** page.
[Go to **Overview**](https://dash.cloudflare.com/?to=/:account/r2/overview)
2. Select your bucket.
3. Select the **Metrics** tab.
You can optionally select a time window to query. This defaults to the last 24 hours.
## Query via the GraphQL API
You can programmatically query analytics for your R2 buckets via the [GraphQL Analytics API](https://developers.cloudflare.com/analytics/graphql-api/). This API queries the same dataset as the Cloudflare dashboard, and supports GraphQL [introspection](https://developers.cloudflare.com/analytics/graphql-api/features/discovery/introspection/).
## Examples
### Operations
To query the volume of each operation type on a bucket for a given time period you can run a query as such
```graphql
query R2VolumeExample(
$accountTag: string!
$startDate: Time
$endDate: Time
$bucketName: string
) {
viewer {
accounts(filter: { accountTag: $accountTag }) {
r2OperationsAdaptiveGroups(
limit: 10000
filter: {
datetime_geq: $startDate
datetime_leq: $endDate
bucketName: $bucketName
}
) {
sum {
requests
}
dimensions {
actionType
}
}
}
}
}
```
[Run in GraphQL API Explorer](https://graphql.cloudflare.com/explorer?query=I4VwpgTgngBASgJgGoHsA2IC2YCiAPAQ0wAc0wAKAKBhgBICBjBlEAOwBcAVAgcwC4YAZ3YQAlqx4BCanWEEI7ACIF2YAZ1HYZtMKwAmy1es1htAIxAMA1mHYA5ImqEjxPSgEoYAbxkA3UWAA7pDeMjSMzGzsguQAZqJoqhACXjARLBzc-HTpUVkwAL6ePjSlMBAIAPLEkCqiKKyCAIJ6BMTsor5gAOIQLMQxYWUwaJqi7AIAjAAMs9NDZfGJkCkLw62qHdgA+jxgwAK0cgqGpsPrKrYm22QHdLoGl2tlFta2DtiHrzb2js+Fa2K-0EWFC5zKEH24GEgn+BX+ehMjXqjTB4PCDA6DU4UBqcLW8LKhIBBSAA\&variables=N4IghgxhD2CuB2AXAKmA5iAXCAggYTwHkBVAOWQH0BJAERABoQBnRMAJ0RrEQFMsQATAAYBANgC0I8QEYALMmkBWTAIEqAnAC0GIHvAAmXXv2FjJAmfIHSVagVp0AjWBADWPRKTABbPtgBKAKIACgAy+IEUAOpUyAASFADKyP5UpADiIAC+QA)
The `bucketName` field can be removed to get an account level overview of operations. The volume of operations can be broken down even further by adding more dimensions to the query.
### Storage
To query the storage of a bucket over a given time period you can run a query as such.
```graphql
query R2StorageExample(
$accountTag: string!
$startDate: Time
$endDate: Time
$bucketName: string
) {
viewer {
accounts(filter: { accountTag: $accountTag }) {
r2StorageAdaptiveGroups(
limit: 10000
filter: {
datetime_geq: $startDate
datetime_leq: $endDate
bucketName: $bucketName
}
orderBy: [datetime_DESC]
) {
max {
objectCount
uploadCount
payloadSize
metadataSize
}
dimensions {
datetime
}
}
}
}
}
```
[Run in GraphQL API Explorer](https://graphql.cloudflare.com/explorer?query=I4VwpgTgngBASgJgMoBcD2ECGBzMBRAD0wFsAHAGzAAoAoGGAEkwGNm0QA7FAFRwC4YAZxQQAlh2wBCOo2GYIKACKYUYAd1HEwMhmA4ATZavWbt9BgCMQzANZgUAORJqhI8dhoBKGAG8ZAN1EwAHdIXxl6FjZOFEEqADNRclUIAR8YKPYuXmwBJlYsnhwYAF9vP3pKmAhkdCxcAEF9TFIUUX8wAHEIdlI4iKqYck1RFAEARgAGacmBqsTkyDS5webVNq0AfVxgPLkFIzNBqrX7U03KXcY9QxUj4-orW3snLTynu0dnFfoSn5gMPpIAAhKACADapw2YE2ijwSAAwgBdFblf7ETAEcIPSpoCwAKzAzBQCMK-3oIAoaEw+lJMXJMFImCg5Gp+iQogAXvcHloUDSVJgOdz-n8cfpTBxBKI0FLsTiYFDTKKVmLKmq-iUgA\&variables=N4IghgxhD2CuB2AXAKmA5iAXCAggYTwHkBVAOWQH0BJAERABoQBnRMAJ0RrEQFMsQATAAYBANgC0I8QEYALMmkBWTAIGYAzAHYAWgxA94AEy69+wsZIEz5A6SrVbdjAEawIAax6JSYALZ9sACUAUQAFABl8YIoAdSpkAAkKAGVkQKpSAHEQAF8gA)
---
title: Release notes · Cloudflare R2 docs
description: Subscribe to RSS
lastUpdated: 2025-09-22T21:23:58.000Z
chatbotDeprioritize: false
source_url:
html: https://developers.cloudflare.com/r2/platform/release-notes/
md: https://developers.cloudflare.com/r2/platform/release-notes/index.md
---
[Subscribe to RSS](https://developers.cloudflare.com/r2/platform/release-notes/index.xml)
## 2025-09-23
* Fixed a bug where you could attempt to delete objects even if they had a bucket lock rule applied on the dashboard. Previously, they would momentarily vanish from the table but reappear after a page refresh. Now, the delete action is disabled on locked objects in the dashboard.
## 2025-09-22
* We’ve updated the R2 dashboard with a cleaner look to make it easier to find what you need and take action. You can find instructions for how you can use R2 with the various API interfaces in the side panel, and easily access documentation at the bottom.
## 2025-07-03
* The CRC-64/NVME Checksum algorithm is now supported for both single and multipart objects. This also brings support for the `FULL_OBJECT` Checksum Type on Multipart Uploads. See Checksum Type Compatibility [here](https://developers.cloudflare.com/r2/api/s3/api/).
## 2024-12-03
* [Server-side Encryption with Customer-Provided Keys](https://developers.cloudflare.com/r2/examples/ssec/) is now available to all users via the Workers and S3-compatible APIs.
## 2024-11-21
* Sippy can now be enabled on buckets in [jurisdictions](https://developers.cloudflare.com/r2/reference/data-location/#jurisdictional-restrictions) (e.g., EU, FedRAMP).
* Fixed an issue with Sippy where GET/HEAD requests to objects with certain special characters would result in error responses.
## 2024-11-20
* Oceania (OC) is now available as an R2 region.
* The default maximum number of buckets per account is now 1 million. If you need more than 1 million buckets, contact [Cloudflare Support](https://developers.cloudflare.com/support/contacting-cloudflare-support/).
* Public buckets accessible via custom domain now support Smart [Tiered Cache](https://developers.cloudflare.com/r2/buckets/public-buckets/#caching).
## 2024-11-19
* R2 [`bucket lifecycle` command](https://developers.cloudflare.com/workers/wrangler/commands/#r2-bucket-lifecycle-add) added to Wrangler. Supports listing, adding, and removing object lifecycle rules.
## 2024-11-14
* R2 [`bucket info` command](https://developers.cloudflare.com/workers/wrangler/commands/r2-bucket-info) added to Wrangler. Displays location of bucket and common metrics.
## 2024-11-08
* R2 [`bucket dev-url` command](https://developers.cloudflare.com/workers/wrangler/commands/#r2-bucket-dev-url-enable) added to Wrangler. Supports enabling, disabling, and getting status of bucket's [r2.dev public access URL](https://developers.cloudflare.com/r2/buckets/public-buckets/#enable-managed-public-access).
## 2024-11-06
* R2 [`bucket domain` command](https://developers.cloudflare.com/workers/wrangler/commands/#r2-bucket-domain-add) added to Wrangler. Supports listing, adding, removing, and updating [R2 bucket custom domains](https://developers.cloudflare.com/r2/buckets/public-buckets/#custom-domains).
## 2024-11-01
* Add `minTLS` to response of [list custom domains](https://developers.cloudflare.com/api/resources/r2/subresources/buckets/subresources/domains/subresources/custom/methods/list/) endpoint.
## 2024-10-28
* Add [get custom domain](https://developers.cloudflare.com/api/resources/r2/subresources/buckets/subresources/domains/subresources/custom/methods/get/) endpoint.
## 2024-10-21
* Event notifications can now be configured for R2 buckets in [jurisdictions](https://developers.cloudflare.com/r2/reference/data-location/#jurisdictional-restrictions) (e.g., EU, FedRAMP).
## 2024-09-26
* [Event notifications for R2](https://blog.cloudflare.com/builder-day-2024-announcements/#event-notifications-for-r2-is-now-ga) is now generally available. Event notifications now support higher throughput (up to 5,000 messages per second per Queue), can be configured in the dashboard and Wrangler, and support for lifecycle deletes.
## 2024-09-18
* Add the ability to set and [update minimum TLS version](https://developers.cloudflare.com/r2/buckets/public-buckets/#minimum-tls-version) for R2 bucket custom domains.
## 2024-08-26
* Added support for configuring R2 bucket custom domains via [API](https://developers.cloudflare.com/api/resources/r2/subresources/buckets/subresources/domains/subresources/custom/methods/create/).
## 2024-08-21
* [Sippy](https://developers.cloudflare.com/r2/data-migration/sippy/) is now generally available. Metrics for ongoing migrations can now be found in the dashboard or via the GraphQL analytics API.
## 2024-07-08
* Added migration log for [Super Slurper](https://developers.cloudflare.com/r2/data-migration/super-slurper/) to the migration summary in the dashboard.
## 2024-06-12
* [Super Slurper](https://developers.cloudflare.com/r2/data-migration/super-slurper/) now supports migrating objects up to 1TB in size.
## 2024-06-07
* Fixed an issue that prevented Sippy from copying over objects from S3 buckets with SSE set up.
## 2024-06-06
* R2 will now ignore the `x-purpose` request parameter.
## 2024-05-29
* Added support for [Infrequent Access](https://developers.cloudflare.com/r2/buckets/storage-classes/) storage class (beta).
## 2024-05-24
* Added [create temporary access tokens](https://developers.cloudflare.com/api/resources/r2/subresources/temporary_credentials/methods/create/) endpoint.
## 2024-04-03
* [Event notifications](https://developers.cloudflare.com/r2/buckets/event-notifications/) for R2 is now available as an open beta.
* Super Slurper now supports migration from [Google Cloud Storage](https://developers.cloudflare.com/r2/data-migration/super-slurper/#supported-cloud-storage-providers).
## 2024-02-20
* When an `OPTIONS` request against the public entrypoint does not include an `origin` header, an `HTTP 400` instead of an `HTTP 401` is returned.
## 2024-02-06
* The response shape of `GET /buckets/:bucket/sippy` has changed.
* The `/buckets/:bucket/sippy/validate` endpoint is exposed over APIGW to validate Sippy's configuration.
* The shape of the configuration object when modifying Sippy's configuration has changed.
## 2024-02-02
* Updated [GetBucket](https://developers.cloudflare.com/api/resources/r2/subresources/buckets/methods/get/) endpoint: Now fetches by `bucket_name` instead of `bucket_id`.
## 2024-01-30
* Fixed a bug where the API would accept empty strings in the `AllowedHeaders` property of `PutBucketCors` actions.
## 2024-01-26
* Parts are now automatically sorted in ascending order regardless of input during `CompleteMultipartUpload`.
## 2024-01-11
* Sippy is available for Google Cloud Storage (GCS) beta.
## 2023-12-11
* The `x-id` query param for `S3 ListBuckets` action is now ignored.
* The `x-id` query param is now ignored for all S3 actions.
## 2023-10-23
* `PutBucketCors` now only accepts valid origins.
## 2023-09-01
* Fixed an issue with `ListBuckets` where the `name_contains` parameter would also search over the jurisdiction name.
## 2023-08-23
* Config Audit Logs GA.
## 2023-08-11
* Users can now complete conditional multipart publish operations. When a condition failure occurs when publishing an upload, the upload is no longer available and is treated as aborted.
## 2023-07-05
* Improved performance for ranged reads on very large files. Previously ranged reads near the end of very large files would be noticeably slower than ranged reads on smaller files. Performance should now be consistently good independent of filesize.
## 2023-06-21
* [Multipart ETags](https://developers.cloudflare.com/r2/objects/upload-objects/#etags) are now MD5 hashes.
## 2023-06-16
* Fixed a bug where calling [GetBucket](https://developers.cloudflare.com/api/resources/r2/subresources/buckets/methods/get/) on a non-existent bucket would return a 500 instead of a 404.
* Improved S3 compatibility for ListObjectsV1, now nextmarker is only set when truncated is true.
* The R2 worker bindings now support parsing conditional headers with multiple etags. These etags can now be strong, weak or a wildcard. Previously the bindings only accepted headers containing a single strong etag.
* S3 putObject now supports sha256 and sha1 checksums. These were already supported by the R2 worker bindings.
* CopyObject in the S3 compatible api now supports Cloudflare specific headers which allow the copy operation to be conditional on the state of the destination object.
## 2023-04-01
* [GetBucket](https://developers.cloudflare.com/api/resources/r2/subresources/buckets/methods/get/) is now available for use through the Cloudflare API.
* [Location hints](https://developers.cloudflare.com/r2/reference/data-location/) can now be set when creating a bucket, both through the S3 API, and the dashboard.
## 2023-03-16
* The ListParts API has been implemented and is available for use.
* HTTP2 is now enabled by default for new custom domains linked to R2 buckets.
* Object Lifecycles are now available for use.
* Bug fix: Requests to public buckets will now return the `Content-Encoding` header for gzip files when `Accept-Encoding: gzip` is used.
## 2023-01-27
* R2 authentication tokens created via the R2 token page are now scoped to a single account by default.
## 2022-12-07
* Fix CORS preflight requests for the S3 API, which allows using the S3 SDK in the browser.
* Passing a range header to the `get` operation in the R2 bindings API should now work as expected.
## 2022-11-30
* Requests with the header `x-amz-acl: public-read` are no longer rejected.
* Fixed issues with wildcard CORS rules and presigned URLs.
* Fixed an issue where `ListObjects` would time out during delimited listing of unicode-normalized keys.
* S3 API's `PutBucketCors` now rejects requests with unknown keys in the XML body.
* Signing additional headers no longer breaks CORS preflight requests for presigned URLs.
## 2022-11-21
* Fixed a bug in `ListObjects` where `startAfter` would skip over objects with keys that have numbers right after the `startAfter` prefix.
* Add worker bindings for multipart uploads.
## 2022-11-17
* Unconditionally return HTTP 206 on ranged requests to match behavior of other S3 compatible implementations.
* Fixed a CORS bug where `AllowedHeaders` in the CORS config were being treated case-sensitively.
## 2022-11-08
* Copying multipart objects via `CopyObject` is re-enabled.
* `UploadPartCopy` is re-enabled.
## 2022-10-28
* Multipart upload part sizes are always expected to be of the same size, but this enforcement is now done when you complete an upload instead of being done very time you upload a part.
* Fixed a performance issue where concurrent multipart part uploads would get rejected.
## 2022-10-26
* Fixed ranged reads for multipart objects with part sizes unaligned to 64KiB.
## 2022-10-19
* `HeadBucket` now sets `x-amz-bucket-region` to `auto` in the response.
## 2022-10-06
* Temporarily disabled `UploadPartCopy` while we investigate an issue.
## 2022-09-29
* Fixed a CORS issue where `Access-Control-Allow-Headers` was not being set for preflight requests.
## 2022-09-28
* Fixed a bug where CORS configuration was not being applied to S3 endpoint.
* No-longer render the `Access-Control-Expose-Headers` response header if `ExposeHeader` is not defined.
* Public buckets will no-longer return the `Content-Range` response header unless the response is partial.
* Fixed CORS rendering for the S3 `HeadObject` operation.
* Fixed a bug where no matching CORS configuration could result in a `403` response.
* Temporarily disable copying objects that were created with multipart uploads.
* Fixed a bug in the Workers bindings where an internal error was being returned for malformed ranged `.get` requests.
## 2022-09-27
* CORS preflight responses and adding CORS headers for other responses is now implemented for S3 and public buckets. Currently, the only way to configure CORS is via the S3 API.
* Fixup for bindings list truncation to work more correctly when listing keys with custom metadata that have `"` or when some keys/values contain certain multi-byte UTF-8 values.
* The S3 `GetObject` operation now only returns `Content-Range` in response to a ranged request.
## 2022-09-19
* The R2 `put()` binding options can now be given an `onlyIf` field, similar to `get()`, that performs a conditional upload.
* The R2 `delete()` binding now supports deleting multiple keys at once.
* The R2 `put()` binding now supports user-specified SHA-1, SHA-256, SHA-384, SHA-512 checksums in options.
* User-specified object checksums will now be available in the R2 `get()` and `head()` bindings response. MD5 is included by default for non-multipart uploaded objects.
## 2022-09-06
* The S3 `CopyObject` operation now includes `x-amz-version-id` and `x-amz-copy-source-version-id` in the response headers for consistency with other methods.
* The `ETag` for multipart files uploaded until shortly after Open Beta uploaded now include the number of parts as a suffix.
## 2022-08-17
* The S3 `DeleteObjects` operation no longer trims the space from around the keys before deleting. This would result in files with leading / trailing spaces not being able to be deleted. Additionally, if there was an object with the trimmed key that existed it would be deleted instead. The S3 `DeleteObject` operation was not affected by this.
* Fixed presigned URL support for the S3 `ListBuckets` and `ListObjects` operations.
## 2022-08-06
* Uploads will automatically infer the `Content-Type` based on file body if one is not explicitly set in the `PutObject` request. This functionality will come to multipart operations in the future.
## 2022-07-30
* Fixed S3 conditionals to work properly when provided the `LastModified` date of the last upload, bindings fixes will come in the next release.
* `If-Match` / `If-None-Match` headers now support arrays of ETags, Weak ETags and wildcard (`*`) as per the HTTP standard and undocumented AWS S3 behavior.
## 2022-07-21
* Added dummy implementation of the following operation that mimics the response that a basic AWS S3 bucket will return when first created: `GetBucketAcl`.
## 2022-07-20
* Added dummy implementations of the following operations that mimic the response that a basic AWS S3 bucket will return when first created:
* `GetBucketVersioning`
* `GetBucketLifecycleConfiguration`
* `GetBucketReplication`
* `GetBucketTagging`
* `GetObjectLockConfiguration`
## 2022-07-19
* Fixed an S3 compatibility issue for error responses with MinIO .NET SDK and any other tooling that expects no `xmlns` namespace attribute on the top-level `Error` tag.
* List continuation tokens prior to 2022-07-01 are no longer accepted and must be obtained again through a new `list` operation.
* The `list()` binding will now correctly return a smaller limit if too much data would otherwise be returned (previously would return an `Internal Error`).
## 2022-07-14
* Improvements to 500s: we now convert errors, so things that were previously concurrency problems for some operations should now be `TooMuchConcurrency` instead of `InternalError`. We've also reduced the rate of 500s through internal improvements.
* `ListMultipartUpload` correctly encodes the returned `Key` if the `encoding-type` is specified.
## 2022-07-13
* S3 XML documents sent to R2 that have an XML declaration are not rejected with `400 Bad Request` / `MalformedXML`.
* Minor S3 XML compatibility fix impacting Arq Backup on Windows only (not the Mac version). Response now contains XML declaration tag prefix and the xmlns attribute is present on all top-level tags in the response.
* Beta `ListMultipartUploads` support.
## 2022-07-06
* Support the `r2_list_honor_include` compat flag coming up in an upcoming runtime release (default behavior as of 2022-07-14 compat date). Without that compat flag/date, list will continue to function implicitly as `include: ['httpMetadata', 'customMetadata']` regardless of what you specify.
* `cf-create-bucket-if-missing` can be set on a `PutObject`/`CreateMultipartUpload` request to implicitly create the bucket if it does not exist.
* Fix S3 compatibility with MinIO client spec non-compliant XML for publishing multipart uploads. Any leading and trailing quotes in `CompleteMultipartUpload` are now optional and ignored as it seems to be the actual non-standard behavior AWS implements.
## 2022-07-01
* Unsupported search parameters to `ListObjects`/`ListObjectsV2` are now rejected with `501 Not Implemented`.
* Fixes for Listing:
* Fix listing behavior when the number of files within a folder exceeds the limit (you'd end up seeing a CommonPrefix for that large folder N times where N = number of children within the CommonPrefix / limit).
* Fix corner case where listing could cause objects with sharing the base name of a "folder" to be skipped.
* Fix listing over some files that shared a certain common prefix.
* `DeleteObjects` can now handle 1000 objects at a time.
* S3 `CreateBucket` request can specify `x-amz-bucket-object-lock-enabled` with a value of `false` and not have the requested rejected with a `NotImplemented` error. A value of `true` will continue to be rejected as R2 does not yet support object locks.
## 2022-06-17
* Fixed a regression for some clients when using an empty delimiter.
* Added support for S3 pre-signed URLs.
## 2022-06-16
* Fixed a regression in the S3 API `UploadPart` operation where `TooMuchConcurrency` & `NoSuchUpload` errors were being returned as `NoSuchBucket`.
## 2022-06-13
* Fixed a bug with the S3 API `ListObjectsV2` operation not returning empty folder/s as common prefixes when using delimiters.
* The S3 API `ListObjectsV2` `KeyCount` parameter now correctly returns the sum of keys and common prefixes rather than just the keys.
* Invalid cursors for list operations no longer fail with an `InternalError` and now return the appropriate error message.
## 2022-06-10
* The `ContinuationToken` field is now correctly returned in the response if provided in a S3 API `ListObjectsV2` request.
* Fixed a bug where the S3 API `AbortMultipartUpload` operation threw an error when called multiple times.
## 2022-05-27
* Fixed a bug where the S3 API's `PutObject` or the `.put()` binding could fail but still show the bucket upload as successful.
* If [conditional headers](https://datatracker.ietf.org/doc/html/rfc7232) are provided to S3 API `UploadObject` or `CreateMultipartUpload` operations, and the object exists, a `412 Precondition Failed` status code will be returned if these checks are not met.
## 2022-05-20
* Fixed a bug when `Accept-Encoding` was being used in `SignedHeaders` when sending requests to the S3 API would result in a `SignatureDoesNotMatch` response.
## 2022-05-17
* Fixed a bug where requests to the S3 API were not handling non-encoded parameters used for the authorization signature.
* Fixed a bug where requests to the S3 API where number-like keys were being parsed as numbers instead of strings.
## 2022-05-16
* Add support for S3 [virtual-hosted style paths](https://docs.aws.amazon.com/AmazonS3/latest/userguide/VirtualHosting.html), such as `..r2.cloudflarestorage.com` instead of path-based routing (`.r2.cloudflarestorage.com/`).
* Implemented `GetBucketLocation` for compatibility with external tools, this will always return a `LocationConstraint` of `auto`.
## 2022-05-06
* S3 API `GetObject` ranges are now inclusive (`bytes=0-0` will correctly return the first byte).
* S3 API `GetObject` partial reads return the proper `206 Partial Content` response code.
* Copying from a non-existent key (or from a non-existent bucket) to another bucket now returns the proper `NoSuchKey` / `NoSuchBucket` response.
* The S3 API now returns the proper `Content-Type: application/xml` response header on relevant endpoints.
* Multipart uploads now have a `-N` suffix on the etag representing the number of parts the file was published with.
* `UploadPart` and `UploadPartCopy` now return proper error messages, such as `TooMuchConcurrency` or `NoSuchUpload`, instead of 'internal error'.
* `UploadPart` can now be sent a 0-length part.
## 2022-05-05
* When using the S3 API, an empty string and `us-east-1` will now alias to the `auto` region for compatibility with external tools.
* `GetBucketEncryption`, `PutBucketEncryption` and `DeleteBucketEncrypotion` are now supported (the only supported value currently is `AES256`).
* Unsupported operations are explicitly rejected as unimplemented rather than implicitly converting them into `ListObjectsV2`/`PutBucket`/`DeleteBucket` respectively.
* S3 API `CompleteMultipartUploads` requests are now properly escaped.
## 2022-05-03
* Pagination cursors are no longer returned when the keys in a bucket is the same as the `MaxKeys` argument.
* The S3 API `ListBuckets` operation now accepts `cf-max-keys`, `cf-start-after` and `cf-continuation-token` headers behave the same as the respective URL parameters.
* The S3 API `ListBuckets` and `ListObjects` endpoints now allow `per_page` to be 0.
* The S3 API `CopyObject` source parameter now requires a leading slash.
* The S3 API `CopyObject` operation now returns a `NoSuchBucket` error when copying to a non-existent bucket instead of an internal error.
* Enforce the requirement for `auto` in SigV4 signing and the `CreateBucket` `LocationConstraint` parameter.
* The S3 API `CreateBucket` operation now returns the proper `location` response header.
## 2022-04-14
* The S3 API now supports unchunked signed payloads.
* Fixed `.put()` for the Workers R2 bindings.
* Fixed a regression where key names were not properly decoded when using the S3 API.
* Fixed a bug where deleting an object and then another object which is a prefix of the first could result in errors.
* The S3 API `DeleteObjects` operation no longer returns an error even though an object has been deleted in some cases.
* Fixed a bug where `startAfter` and `continuationToken` were not working in list operations.
* The S3 API `ListObjects` operation now correctly renders `Prefix`, `Delimiter`, `StartAfter` and `MaxKeys` in the response.
* The S3 API `ListObjectsV2` now correctly honors the `encoding-type` parameter.
* The S3 API `PutObject` operation now works with `POST` requests for `s3cmd` compatibility.
## 2022-04-04
* The S3 API `DeleteObjects` request now properly returns a `MalformedXML` error instead of `InternalError` when provided with more than 128 keys.
---
title: Choose a storage product · Cloudflare R2 docs
lastUpdated: 2024-08-13T19:56:56.000Z
chatbotDeprioritize: false
source_url:
html: https://developers.cloudflare.com/r2/platform/storage-options/
md: https://developers.cloudflare.com/r2/platform/storage-options/index.md
---
---
title: Troubleshooting · Cloudflare R2 docs
description: If you are encountering a CORS error despite setting up everything
correctly, you may follow this troubleshooting guide to help you.
lastUpdated: 2025-06-09T14:04:54.000Z
chatbotDeprioritize: false
source_url:
html: https://developers.cloudflare.com/r2/platform/troubleshooting/
md: https://developers.cloudflare.com/r2/platform/troubleshooting/index.md
---
## Troubleshooting 403 / CORS issues with R2
If you are encountering a CORS error despite setting up everything correctly, you may follow this troubleshooting guide to help you.
If you see a 401/403 error above the CORS error in your browser console, you are dealing with a different issue (not CORS related).
If you do have a CORS issue, refer to [Resolving CORS issues](#if-it-is-actually-cors).
### If you are using a custom domain
1. Open developer tools on your browser.
2. Go to the **Network** tab and find the failing request. You may need to reload the page, as requests are only logged after developer tools have been opened.
3. Check the response headers for the following two headers:
* `cf-cache-status`
* `cf-mitigated`
#### If you have a `cf-mitigated` header
Your request was blocked by one of your WAF rules. Inspect your [Security Events](https://developers.cloudflare.com/waf/analytics/security-events/) to identify the cause of the block.
#### If you do not have a `cf-cache-status` header
Your request was blocked by [Hotlink Protection](https://developers.cloudflare.com/waf/tools/scrape-shield/hotlink-protection/).
Edit your Hotlink Protection settings using a [Configuration Rule](https://developers.cloudflare.com/rules/configuration-rules/), or disable it completely.
### If you are using the S3 API
Your request may be incorrectly signed. You may obtain a better error message by trying the request over curl.
Refer to the working S3 signing examples on the [Examples](https://developers.cloudflare.com/r2/examples/aws/) page.
### If it is actually CORS
Here are some common issues with CORS configurations:
* `ExposeHeaders` is missing headers like `ETag`
* `AllowedHeaders` is missing headers like `Authorization` or `Content-Type`
* `AllowedMethods` is missing methods like `POST`/`PUT`
## HTTP 5XX Errors and capacity limitations of Cloudflare R2
When you encounter an HTTP 5XX error, it is usually a sign that your Cloudflare R2 bucket has been overwhelmed by too many concurrent requests. These errors can trigger bucket-wide read and write locks, affecting the performance of all ongoing operations.
To avoid these disruptions, it is important to implement strategies for managing request volume.
Here are some mitigations you can employ:
### Monitor concurrent requests
Track the number of concurrent requests to your bucket. If a client encounters a 5XX error, ensure that it retries the operation and communicates with other clients. By coordinating, clients can collectively slow down, reducing the request rate and maintaining a more stable flow of successful operations.
If your users are directly uploading to the bucket (for example, using the S3 or Workers API), you may not be able to monitor or enforce a concurrency limit. In that case, we recommend bucket sharding.
### Bucket sharding
For higher capacity at the cost of added complexity, consider bucket sharding. This approach distributes reads and writes across multiple buckets, reducing the load on any single bucket. While sharding cannot prevent a single hot object from exhausting capacity, it can mitigate the overall impact and improve system resilience.
## Objects named `This object is unnamed`
In the Cloudflare dashboard, you can choose to view objects with `/` in the name as folders by selecting **View prefixes as directories**.
For example, an object named `example/object` will be displayed as below.
Object names which end with `/` will cause the Cloudflare dashboard to render the object as a folder with an unnamed object inside.
For example, uploading an object named `example/` into an R2 bucket will be displayed as below.
---
title: Consistency model · Cloudflare R2 docs
description: This page details R2's consistency model, including where R2 is
strongly, globally consistent and which operations this applies to.
lastUpdated: 2026-01-12T15:08:24.000Z
chatbotDeprioritize: false
source_url:
html: https://developers.cloudflare.com/r2/reference/consistency/
md: https://developers.cloudflare.com/r2/reference/consistency/index.md
---
This page details R2's consistency model, including where R2 is strongly, globally consistent and which operations this applies to.
R2 can be described as "strongly consistent", especially in comparison to other distributed object storage systems. This strong consistency ensures that operations against R2 see the latest (accurate) state: clients should be able to observe the effects of any write, update and/or delete operation immediately, globally.
## Terminology
In the context of R2, *strong* consistency and *eventual* consistency have the following meanings:
* **Strongly consistent** - The effect of an operation will be observed globally, immediately, by all clients. Clients will not observe 'stale' (inconsistent) state.
* **Eventually consistent** - Clients may not see the effect of an operation immediately. The state may take a some time (typically seconds to a minute) to propagate globally.
## Operations and Consistency
Operations against R2 buckets and objects adhere to the following consistency guarantees:
Additional notes:
* In the event two clients are writing (`PUT` or `DELETE`) to the same key, the last writer to complete "wins".
* When performing a multipart upload, read-after-write consistency continues to apply once all parts have been successfully uploaded. In the case the same part is uploaded (in error) from multiple writers, the last write will win.
* Copying an object within the same bucket also follows the same read-after-write consistency that writing a new object would. The "copied" object is immediately readable by all clients once the copy operation completes.
* To delete an R2 bucket, it must be completely empty before deletion is allowed. If you attempt to delete a bucket that still contains objects, you will receive an error such as: `The bucket you tried to delete (X) is not empty (account Y)` or `Bucket X cannot be deleted because it isn’t empty.`"
## Caching
Note
By default, Cloudflare's cache will cache common, cacheable status codes automatically [per our cache documentation](https://developers.cloudflare.com/cache/how-to/configure-cache-status-code/#edge-ttl).
When connecting a [custom domain](https://developers.cloudflare.com/r2/buckets/public-buckets/#custom-domains) to an R2 bucket and enabling caching for objects served from that bucket, the consistency model is necessarily relaxed when accessing content via a domain with caching enabled.
Specifically, you should expect:
* An object you delete from R2, but that is still cached, will still be available. You should [purge the cache](https://developers.cloudflare.com/cache/how-to/purge-cache/) after deleting objects if you need that delete to be reflected.
* By default, Cloudflare’s cache will [cache HTTP 404 (Not Found) responses](https://developers.cloudflare.com/cache/how-to/configure-cache-status-code/#edge-ttl) automatically. If you upload an object to that same path, the cache may continue to return HTTP 404s until the cache TTL (Time to Live) expires and the new object is fetched from R2 or the [cache is purged](https://developers.cloudflare.com/cache/how-to/purge-cache/).
* An object for a given key is overwritten with a new object: the old (previous) object will continue to be served to clients until the cache TTL expires (or the object is evicted) or the cache is purged.
The cache does not affect access via [Worker API bindings](https://developers.cloudflare.com/r2/api/workers/) or the [S3 API](https://developers.cloudflare.com/r2/api/s3/), as these operations are made directly against the bucket and do not transit through the cache.
---
title: Data location · Cloudflare R2 docs
description: Learn how the location of data stored in R2 is determined and about
the different available inputs that control the physical location where
objects in your buckets are stored.
lastUpdated: 2026-01-29T10:38:24.000Z
chatbotDeprioritize: false
source_url:
html: https://developers.cloudflare.com/r2/reference/data-location/
md: https://developers.cloudflare.com/r2/reference/data-location/index.md
---
Learn how the location of data stored in R2 is determined and about the different available inputs that control the physical location where objects in your buckets are stored.
## Automatic (recommended)
When you create a new bucket, the data location is set to Automatic by default. Currently, this option chooses a bucket location in the closest available region to the create bucket request based on the location of the caller.
## Location Hints
Location Hints are optional parameters you can provide during bucket creation to indicate the primary geographical location you expect data will be accessed from.
Using Location Hints can be a good choice when you expect the majority of access to data in a bucket to come from a different location than where the create bucket request originates. Keep in mind Location Hints are a best effort and not a guarantee, and they should only be used as a way to optimize performance by placing regularly updated content closer to users.
### Set hints via the Cloudflare dashboard
You can choose to automatically create your bucket in the closest available region based on your location or choose a specific location from the list.
1. In the Cloudflare dashboard, go to the **R2 object storage** page.
[Go to **Overview**](https://dash.cloudflare.com/?to=/:account/r2/overview)
2. Select **Create bucket**.
3. Enter a name for the bucket.
4. Under **Location**, leave *None* selected for automatic selection or choose a region from the list.
5. Select **Create bucket** to complete the bucket creation process.
### Set hints via the S3 API
You can set the Location Hint via the `LocationConstraint` parameter using the S3 API:
```js
await S3.send(
new CreateBucketCommand({
Bucket: "YOUR_BUCKET_NAME",
CreateBucketConfiguration: {
LocationConstraint: "WNAM",
},
}),
);
```
Refer to [Examples](https://developers.cloudflare.com/r2/examples/) for additional examples from other S3 SDKs.
### Available hints
The following hint locations are supported:
| Hint | Hint description |
| - | - |
| wnam | Western North America |
| enam | Eastern North America |
| weur | Western Europe |
| eeur | Eastern Europe |
| apac | Asia-Pacific |
| oc | Oceania |
### Additional considerations
Location Hints are only honored the first time a bucket with a given name is created. If you delete and recreate a bucket with the same name, the original bucket’s location will be used.
## Jurisdictional Restrictions
Jurisdictional Restrictions guarantee objects in a bucket are stored within a specific jurisdiction.
Use Jurisdictional Restrictions when you need to ensure data is stored and processed within a jurisdiction to meet data residency requirements, including local regulations such as the [GDPR](https://gdpr-info.eu/) or [FedRAMP](https://blog.cloudflare.com/cloudflare-achieves-fedramp-authorization/).
### Set jurisdiction via the Cloudflare dashboard
1. In the Cloudflare dashboard, go to the **R2 object storage** page.
[Go to **Overview**](https://dash.cloudflare.com/?to=/:account/r2/overview)
2. Select **Create bucket**.
3. Enter a name for the bucket.
4. Under **Location**, select **Specify jurisdiction** and choose a jurisdiction from the list.
5. Select **Create bucket** to complete the bucket creation process.
### Using jurisdictions from Workers
To access R2 buckets that belong to a jurisdiction from [Workers](https://developers.cloudflare.com/workers/), you will need to specify the jurisdiction as well as the bucket name as part of your [bindings](https://developers.cloudflare.com/r2/api/workers/workers-api-usage/#3-bind-your-bucket-to-a-worker) in your [Wrangler configuration file](https://developers.cloudflare.com/workers/wrangler/configuration/):
* wrangler.jsonc
```jsonc
{
"r2_buckets": [
{
"bindings": [
{
"binding": "MY_BUCKET",
"bucket_name": "",
"jurisdiction": ""
}
]
}
]
}
```
* wrangler.toml
```toml
[[r2_buckets]]
[[r2_buckets.bindings]]
binding = "MY_BUCKET"
bucket_name = ""
jurisdiction = ""
```
For more information on getting started, refer to [Use R2 from Workers](https://developers.cloudflare.com/r2/api/workers/workers-api-usage/).
### Using jurisdictions with the S3 API
When interacting with R2 resources that belong to a defined jurisdiction with the S3 API or existing S3-compatible SDKs, you must specify the [jurisdiction](#available-jurisdictions) in your S3 endpoint:
`https://..r2.cloudflarestorage.com`
You can use your jurisdiction-specific endpoint for any [supported S3 API operations](https://developers.cloudflare.com/r2/api/s3/api/). When using a jurisdiction endpoint, you will not be able to access R2 resources outside of that jurisdiction.
The example below shows how to create an R2 bucket in the `eu` jurisdiction using the [`@aws-sdk/client-s3`](https://www.npmjs.com/package/@aws-sdk/client-s3) package for JavaScript.
```js
import { S3Client, CreateBucketCommand } from "@aws-sdk/client-s3";
const S3 = new S3Client({
endpoint: "https://.eu.r2.cloudflarestorage.com",
credentials: {
accessKeyId: "",
},
region: "auto",
});
await S3.send(
new CreateBucketCommand({
Bucket: "YOUR_BUCKET_NAME",
}),
);
```
Refer to [Examples](https://developers.cloudflare.com/r2/examples/) for additional examples from other S3 SDKs.
### Available jurisdictions
The following jurisdictions are supported:
| Jurisdiction | Jurisdiction description |
| - | - |
| eu | European Union |
| fedramp | FedRAMP |
Note
Cloudflare Enterprise customers may contact their account team or [Cloudflare Support](https://developers.cloudflare.com/support/contacting-cloudflare-support/) to get access to the FedRAMP jurisdiction.
### Limitations
The following services do not interact with R2 resources with assigned jurisdictions:
* [Super Slurper](https://developers.cloudflare.com/r2/data-migration/) (*coming soon*)
* [Logpush](https://developers.cloudflare.com/logs/logpush/logpush-job/enable-destinations/r2/). As a workaround to this limitation, you can set up a [Logpush job using an S3-compatible endpoint](https://developers.cloudflare.com/data-localization/how-to/r2/#send-logs-to-r2-via-s3-compatible-endpoint) to store logs in an R2 bucket in the jurisdiction of your choice.
### Additional considerations
Once an R2 bucket is created, the jurisdiction cannot be changed.
---
title: Data security · Cloudflare R2 docs
description: This page details the data security properties of R2, including
encryption-at-rest (EAR), encryption-in-transit (EIT), and Cloudflare's
compliance certifications.
lastUpdated: 2024-08-13T19:56:56.000Z
chatbotDeprioritize: false
source_url:
html: https://developers.cloudflare.com/r2/reference/data-security/
md: https://developers.cloudflare.com/r2/reference/data-security/index.md
---
This page details the data security properties of R2, including encryption-at-rest (EAR), encryption-in-transit (EIT), and Cloudflare's compliance certifications.
## Encryption at Rest
All objects stored in R2, including their metadata, are encrypted at rest. Encryption and decryption are automatic, do not require user configuration to enable, and do not impact the effective performance of R2.
Encryption keys are managed by Cloudflare and securely stored in the same key management systems we use for managing encrypted data across Cloudflare internally.
Objects are encrypted using [AES-256](https://www.cloudflare.com/learning/ssl/what-is-encryption/), a widely tested, highly performant and industry-standard encryption algorithm. R2 uses GCM (Galois/Counter Mode) as its preferred mode.
## Encryption in Transit
Data transfer between a client and R2 is secured using the same [Transport Layer Security](https://www.cloudflare.com/learning/ssl/transport-layer-security-tls/) (TLS/SSL) supported on all Cloudflare domains.
Access over plaintext HTTP (without TLS/SSL) can be disabled by connecting a [custom domain](https://developers.cloudflare.com/r2/buckets/public-buckets/#custom-domains) to your R2 bucket and enabling [Always Use HTTPS](https://developers.cloudflare.com/ssl/edge-certificates/additional-options/always-use-https/).
Note
R2 custom domains use Cloudflare for SaaS certificates and cannot be customized. Even if you have [Advanced Certificate Manager](https://developers.cloudflare.com/ssl/edge-certificates/advanced-certificate-manager/), the advanced certificate will not be used due to [certificate prioritization](https://developers.cloudflare.com/ssl/reference/certificate-and-hostname-priority/).
## Compliance
To learn more about Cloudflare's adherence to industry-standard security compliance certifications, visit the Cloudflare [Trust Hub](https://www.cloudflare.com/trust-hub/compliance-resources/).
---
title: Durability · Cloudflare R2 docs
description: R2 is designed to provide 99.999999999% (eleven 9s) of annual
durability. This means that if you store 10,000,000 objects on R2, you can
expect to lose an object once every 10,000 years on average.
lastUpdated: 2025-11-13T10:50:22.000Z
chatbotDeprioritize: false
source_url:
html: https://developers.cloudflare.com/r2/reference/durability/
md: https://developers.cloudflare.com/r2/reference/durability/index.md
---
R2 is designed to provide 99.999999999% (eleven 9s) of annual durability. This means that if you store 10,000,000 objects on R2, you can expect to lose an object once every 10,000 years on average.
## How R2 achieves eleven-nines durability
R2's durability is built on multiple layers of redundancy and data protection:
* **Replication**: When you upload an object, R2 stores multiple "copies" of that object through either full replication and/or erasure coding. This ensures that the full or partial failure of any individual disk does not result in data loss. Erasure coding distributes parts of the object across multiple disks, ensuring that even if some disks fail, the object can still be reconstructed from a subset of the available parts, preventing hardware failure or physical impacts to data centers (such as fire or floods) from causing data loss.
* **Hardware redundancy**: Storage clusters are comprised of hardware distributed across several data centers within a geographic region. This physical distribution ensures that localized failures—such as power outages, network disruptions, or hardware malfunctions at a single facility—do not result in data loss.
* **Synchronous writes**: R2 returns an `HTTP 200 (OK)` for a write via API or otherwise indicates success only when data has been persisted to disk. We do not rely on asynchronous replication to support underlying durability guarantees. This is critical to R2’s consistency guarantees and mitigates the chance of a client receiving a successful API response without the underlying metadata and storage infrastructure having persisted the change.
### Considerations
* Durability is not a guarantee of data availability. It is a measure of the likelihood of data loss.
* R2 provides an availability [SLA of 99.9%](https://www.cloudflare.com/r2-service-level-agreement/)
* Durability does not prevent intentional or accidental deletion of data. Use [bucket locks](https://developers.cloudflare.com/r2/buckets/bucket-locks/) and/or bucket-scoped [API tokens](https://developers.cloudflare.com/r2/api/tokens/) to limit access to data.
* Durability is also distinct from [consistency](https://developers.cloudflare.com/r2/reference/consistency/), which describes how reads and writes are reflected in the system's state (e.g. eventual consistency vs. strong consistency).
---
title: Partners · Cloudflare R2 docs
lastUpdated: 2025-01-29T16:47:18.000Z
chatbotDeprioritize: true
source_url:
html: https://developers.cloudflare.com/r2/reference/partners/
md: https://developers.cloudflare.com/r2/reference/partners/index.md
---
---
title: Unicode interoperability · Cloudflare R2 docs
description: R2 is built on top of Workers and supports Unicode natively. One
nuance of Unicode that is often overlooked is the issue of filename
interoperability due to Unicode equivalence.
lastUpdated: 2024-08-13T19:56:56.000Z
chatbotDeprioritize: false
source_url:
html: https://developers.cloudflare.com/r2/reference/unicode-interoperability/
md: https://developers.cloudflare.com/r2/reference/unicode-interoperability/index.md
---
R2 is built on top of Workers and supports Unicode natively. One nuance of Unicode that is often overlooked is the issue of [filename interoperability](https://en.wikipedia.org/wiki/Filename#Encoding_indication_interoperability) due to [Unicode equivalence](https://en.wikipedia.org/wiki/Unicode_equivalence).
Based on feedback from our users, we have chosen to NFC-normalize key names before storing by default. This means that `Héllo` and `HeÌllo`, for example, are the same object in R2 but different objects in other storage providers. Although `Héllo` and `HeÌllo` may be different character byte sequences, they are rendered the same.
R2 preserves the encoding for display though. When you list the objects, you will get back the last encoding you uploaded with.
There are still some platform-specific differences to consider:
* Windows and macOS filenames are case-insensitive while R2 and Linux are not.
* Windows console support for Unicode can be error-prone. Make sure to run `chcp 65001` before using command-line tools or use Cygwin if your object names appear to be incorrect.
* Linux allows distinct files that are unicode-equivalent because filenames are byte streams. Unicode-equivalent filenames on Linux will point to the same R2 object.
If it is important for you to be able to bypass the unicode equivalence and use byte-oriented key names, contact your Cloudflare account team.
---
title: Wrangler commands · Cloudflare R2 docs
description: Interact with buckets in an R2 store.
lastUpdated: 2025-11-18T09:49:05.000Z
chatbotDeprioritize: false
source_url:
html: https://developers.cloudflare.com/r2/reference/wrangler-commands/
md: https://developers.cloudflare.com/r2/reference/wrangler-commands/index.md
---
## `r2 bucket`
Interact with buckets in an R2 store.
Note
The `r2 bucket` commands allow you to manage application data in the Cloudflare network to be accessed from Workers using [the R2 API](https://developers.cloudflare.com/r2/api/workers/workers-api-reference/).
### `r2 bucket create`
Create a new R2 bucket
* npm
```sh
npx wrangler r2 bucket create [NAME]
```
* pnpm
```sh
pnpm wrangler r2 bucket create [NAME]
```
* yarn
```sh
yarn wrangler r2 bucket create [NAME]
```
- `[NAME]` string required
The name of the new bucket
- `--location` string
The optional location hint that determines geographic placement of the R2 bucket
- `--storage-class` string alias: --s
The default storage class for objects uploaded to this bucket
- `--jurisdiction` string alias: --J
The jurisdiction where the new bucket will be created
- `--use-remote` boolean
Use a remote binding when adding the newly created resource to your config
- `--update-config` boolean
Automatically update your config file with the newly added resource
- `--binding` string
The binding name of this resource in your Worker
Global flags
* `--v` boolean alias: --version
Show version number
* `--cwd` string
Run as if Wrangler was started in the specified directory instead of the current working directory
* `--config` string alias: --c
Path to Wrangler configuration file
* `--env` string alias: --e
Environment to use for operations, and for selecting .env and .dev.vars files
* `--env-file` string
Path to an .env file to load - can be specified multiple times - values from earlier files are overridden by values in later files
* `--experimental-provision` boolean aliases: --x-provision default: true
Experimental: Enable automatic resource provisioning
* `--experimental-auto-create` boolean alias: --x-auto-create default: true
Automatically provision draft bindings with new resources
### `r2 bucket info`
Get information about an R2 bucket
* npm
```sh
npx wrangler r2 bucket info [BUCKET]
```
* pnpm
```sh
pnpm wrangler r2 bucket info [BUCKET]
```
* yarn
```sh
yarn wrangler r2 bucket info [BUCKET]
```
- `[BUCKET]` string required
The name of the bucket to retrieve info for
- `--jurisdiction` string alias: --J
The jurisdiction where the bucket exists
- `--json` boolean default: false
Return the bucket information as JSON
Global flags
* `--v` boolean alias: --version
Show version number
* `--cwd` string
Run as if Wrangler was started in the specified directory instead of the current working directory
* `--config` string alias: --c
Path to Wrangler configuration file
* `--env` string alias: --e
Environment to use for operations, and for selecting .env and .dev.vars files
* `--env-file` string
Path to an .env file to load - can be specified multiple times - values from earlier files are overridden by values in later files
* `--experimental-provision` boolean aliases: --x-provision default: true
Experimental: Enable automatic resource provisioning
* `--experimental-auto-create` boolean alias: --x-auto-create default: true
Automatically provision draft bindings with new resources
### `r2 bucket delete`
Delete an R2 bucket
* npm
```sh
npx wrangler r2 bucket delete [BUCKET]
```
* pnpm
```sh
pnpm wrangler r2 bucket delete [BUCKET]
```
* yarn
```sh
yarn wrangler r2 bucket delete [BUCKET]
```
- `[BUCKET]` string required
The name of the bucket to delete
- `--jurisdiction` string alias: --J
The jurisdiction where the bucket exists
Global flags
* `--v` boolean alias: --version
Show version number
* `--cwd` string
Run as if Wrangler was started in the specified directory instead of the current working directory
* `--config` string alias: --c
Path to Wrangler configuration file
* `--env` string alias: --e
Environment to use for operations, and for selecting .env and .dev.vars files
* `--env-file` string
Path to an .env file to load - can be specified multiple times - values from earlier files are overridden by values in later files
* `--experimental-provision` boolean aliases: --x-provision default: true
Experimental: Enable automatic resource provisioning
* `--experimental-auto-create` boolean alias: --x-auto-create default: true
Automatically provision draft bindings with new resources
### `r2 bucket list`
List R2 buckets
* npm
```sh
npx wrangler r2 bucket list
```
* pnpm
```sh
pnpm wrangler r2 bucket list
```
* yarn
```sh
yarn wrangler r2 bucket list
```
- `--jurisdiction` string alias: --J
The jurisdiction to list
Global flags
* `--v` boolean alias: --version
Show version number
* `--cwd` string
Run as if Wrangler was started in the specified directory instead of the current working directory
* `--config` string alias: --c
Path to Wrangler configuration file
* `--env` string alias: --e
Environment to use for operations, and for selecting .env and .dev.vars files
* `--env-file` string
Path to an .env file to load - can be specified multiple times - values from earlier files are overridden by values in later files
* `--experimental-provision` boolean aliases: --x-provision default: true
Experimental: Enable automatic resource provisioning
* `--experimental-auto-create` boolean alias: --x-auto-create default: true
Automatically provision draft bindings with new resources
### `r2 bucket catalog enable`
Enable the data catalog on an R2 bucket
* npm
```sh
npx wrangler r2 bucket catalog enable [BUCKET]
```
* pnpm
```sh
pnpm wrangler r2 bucket catalog enable [BUCKET]
```
* yarn
```sh
yarn wrangler r2 bucket catalog enable [BUCKET]
```
- `[BUCKET]` string required
The name of the bucket to enable
Global flags
* `--v` boolean alias: --version
Show version number
* `--cwd` string
Run as if Wrangler was started in the specified directory instead of the current working directory
* `--config` string alias: --c
Path to Wrangler configuration file
* `--env` string alias: --e
Environment to use for operations, and for selecting .env and .dev.vars files
* `--env-file` string
Path to an .env file to load - can be specified multiple times - values from earlier files are overridden by values in later files
* `--experimental-provision` boolean aliases: --x-provision default: true
Experimental: Enable automatic resource provisioning
* `--experimental-auto-create` boolean alias: --x-auto-create default: true
Automatically provision draft bindings with new resources
### `r2 bucket catalog disable`
Disable the data catalog for an R2 bucket
* npm
```sh
npx wrangler r2 bucket catalog disable [BUCKET]
```
* pnpm
```sh
pnpm wrangler r2 bucket catalog disable [BUCKET]
```
* yarn
```sh
yarn wrangler r2 bucket catalog disable [BUCKET]
```
- `[BUCKET]` string required
The name of the bucket to disable the data catalog for
Global flags
* `--v` boolean alias: --version
Show version number
* `--cwd` string
Run as if Wrangler was started in the specified directory instead of the current working directory
* `--config` string alias: --c
Path to Wrangler configuration file
* `--env` string alias: --e
Environment to use for operations, and for selecting .env and .dev.vars files
* `--env-file` string
Path to an .env file to load - can be specified multiple times - values from earlier files are overridden by values in later files
* `--experimental-provision` boolean aliases: --x-provision default: true
Experimental: Enable automatic resource provisioning
* `--experimental-auto-create` boolean alias: --x-auto-create default: true
Automatically provision draft bindings with new resources
### `r2 bucket catalog get`
Get the status of the data catalog for an R2 bucket
* npm
```sh
npx wrangler r2 bucket catalog get [BUCKET]
```
* pnpm
```sh
pnpm wrangler r2 bucket catalog get [BUCKET]
```
* yarn
```sh
yarn wrangler r2 bucket catalog get [BUCKET]
```
- `[BUCKET]` string required
The name of the R2 bucket whose data catalog status to retrieve
Global flags
* `--v` boolean alias: --version
Show version number
* `--cwd` string
Run as if Wrangler was started in the specified directory instead of the current working directory
* `--config` string alias: --c
Path to Wrangler configuration file
* `--env` string alias: --e
Environment to use for operations, and for selecting .env and .dev.vars files
* `--env-file` string
Path to an .env file to load - can be specified multiple times - values from earlier files are overridden by values in later files
* `--experimental-provision` boolean aliases: --x-provision default: true
Experimental: Enable automatic resource provisioning
* `--experimental-auto-create` boolean alias: --x-auto-create default: true
Automatically provision draft bindings with new resources
### `r2 bucket catalog compaction enable`
Enable automatic file compaction for your R2 data catalog or a specific table
* npm
```sh
npx wrangler r2 bucket catalog compaction enable [BUCKET] [NAMESPACE] [TABLE]
```
* pnpm
```sh
pnpm wrangler r2 bucket catalog compaction enable [BUCKET] [NAMESPACE] [TABLE]
```
* yarn
```sh
yarn wrangler r2 bucket catalog compaction enable [BUCKET] [NAMESPACE] [TABLE]
```
- `[BUCKET]` string required
The name of the bucket which contains the catalog
- `[NAMESPACE]` string
The namespace containing the table (optional, for table-level compaction)
- `[TABLE]` string
The name of the table (optional, for table-level compaction)
- `--target-size` number default: 128
The target size for compacted files in MB (allowed values: 64, 128, 256, 512)
- `--token` string
A cloudflare api token with access to R2 and R2 Data Catalog (required for catalog-level compaction settings only)
Global flags
* `--v` boolean alias: --version
Show version number
* `--cwd` string
Run as if Wrangler was started in the specified directory instead of the current working directory
* `--config` string alias: --c
Path to Wrangler configuration file
* `--env` string alias: --e
Environment to use for operations, and for selecting .env and .dev.vars files
* `--env-file` string
Path to an .env file to load - can be specified multiple times - values from earlier files are overridden by values in later files
* `--experimental-provision` boolean aliases: --x-provision default: true
Experimental: Enable automatic resource provisioning
* `--experimental-auto-create` boolean alias: --x-auto-create default: true
Automatically provision draft bindings with new resources
Examples:
```bash
# Enable catalog-level compaction (requires token)
npx wrangler r2 bucket catalog compaction enable my-bucket --token
# Enable table-level compaction
npx wrangler r2 bucket catalog compaction enable my-bucket my-namespace my-table --target-size 256
```
### `r2 bucket catalog compaction disable`
Disable automatic file compaction for your R2 data catalog or a specific table
* npm
```sh
npx wrangler r2 bucket catalog compaction disable [BUCKET] [NAMESPACE] [TABLE]
```
* pnpm
```sh
pnpm wrangler r2 bucket catalog compaction disable [BUCKET] [NAMESPACE] [TABLE]
```
* yarn
```sh
yarn wrangler r2 bucket catalog compaction disable [BUCKET] [NAMESPACE] [TABLE]
```
- `[BUCKET]` string required
The name of the bucket which contains the catalog
- `[NAMESPACE]` string
The namespace containing the table (optional, for table-level compaction)
- `[TABLE]` string
The name of the table (optional, for table-level compaction)
Global flags
* `--v` boolean alias: --version
Show version number
* `--cwd` string
Run as if Wrangler was started in the specified directory instead of the current working directory
* `--config` string alias: --c
Path to Wrangler configuration file
* `--env` string alias: --e
Environment to use for operations, and for selecting .env and .dev.vars files
* `--env-file` string
Path to an .env file to load - can be specified multiple times - values from earlier files are overridden by values in later files
* `--experimental-provision` boolean aliases: --x-provision default: true
Experimental: Enable automatic resource provisioning
* `--experimental-auto-create` boolean alias: --x-auto-create default: true
Automatically provision draft bindings with new resources
Examples:
```bash
# Disable catalog-level compaction
npx wrangler r2 bucket catalog compaction disable my-bucket
# Disable table-level compaction
npx wrangler r2 bucket catalog compaction disable my-bucket my-namespace my-table
```
### `r2 bucket catalog snapshot-expiration enable`
Enable automatic snapshot expiration for your R2 data catalog or a specific table
* npm
```sh
npx wrangler r2 bucket catalog snapshot-expiration enable [BUCKET] [NAMESPACE] [TABLE]
```
* pnpm
```sh
pnpm wrangler r2 bucket catalog snapshot-expiration enable [BUCKET] [NAMESPACE] [TABLE]
```
* yarn
```sh
yarn wrangler r2 bucket catalog snapshot-expiration enable [BUCKET] [NAMESPACE] [TABLE]
```
- `[BUCKET]` string required
The name of the bucket which contains the catalog
- `[NAMESPACE]` string
The namespace containing the table (optional, for table-level snapshot expiration)
- `[TABLE]` string
The name of the table (optional, for table-level snapshot expiration)
- `--older-than-days` number
Delete snapshots older than this many days, defaults to 30
- `--retain-last` number
The minimum number of snapshots to retain, defaults to 5
- `--token` string
A cloudflare api token with access to R2 and R2 Data Catalog (required for catalog-level snapshot expiration settings only)
Global flags
* `--v` boolean alias: --version
Show version number
* `--cwd` string
Run as if Wrangler was started in the specified directory instead of the current working directory
* `--config` string alias: --c
Path to Wrangler configuration file
* `--env` string alias: --e
Environment to use for operations, and for selecting .env and .dev.vars files
* `--env-file` string
Path to an .env file to load - can be specified multiple times - values from earlier files are overridden by values in later files
* `--experimental-provision` boolean aliases: --x-provision default: true
Experimental: Enable automatic resource provisioning
* `--experimental-auto-create` boolean alias: --x-auto-create default: true
Automatically provision draft bindings with new resources
### `r2 bucket catalog snapshot-expiration disable`
Disable automatic snapshot expiration for your R2 data catalog or a specific table
* npm
```sh
npx wrangler r2 bucket catalog snapshot-expiration disable [BUCKET] [NAMESPACE] [TABLE]
```
* pnpm
```sh
pnpm wrangler r2 bucket catalog snapshot-expiration disable [BUCKET] [NAMESPACE] [TABLE]
```
* yarn
```sh
yarn wrangler r2 bucket catalog snapshot-expiration disable [BUCKET] [NAMESPACE] [TABLE]
```
- `[BUCKET]` string required
The name of the bucket which contains the catalog
- `[NAMESPACE]` string
The namespace containing the table (optional, for table-level snapshot expiration)
- `[TABLE]` string
The name of the table (optional, for table-level snapshot expiration)
- `--force` boolean default: false
Skip confirmation prompt
Global flags
* `--v` boolean alias: --version
Show version number
* `--cwd` string
Run as if Wrangler was started in the specified directory instead of the current working directory
* `--config` string alias: --c
Path to Wrangler configuration file
* `--env` string alias: --e
Environment to use for operations, and for selecting .env and .dev.vars files
* `--env-file` string
Path to an .env file to load - can be specified multiple times - values from earlier files are overridden by values in later files
* `--experimental-provision` boolean aliases: --x-provision default: true
Experimental: Enable automatic resource provisioning
* `--experimental-auto-create` boolean alias: --x-auto-create default: true
Automatically provision draft bindings with new resources
### `r2 bucket cors set`
Set the CORS configuration for an R2 bucket from a JSON file
* npm
```sh
npx wrangler r2 bucket cors set [BUCKET]
```
* pnpm
```sh
pnpm wrangler r2 bucket cors set [BUCKET]
```
* yarn
```sh
yarn wrangler r2 bucket cors set [BUCKET]
```
- `[BUCKET]` string required
The name of the R2 bucket to set the CORS configuration for
- `--file` string required
Path to the JSON file containing the CORS configuration
- `--jurisdiction` string alias: --J
The jurisdiction where the bucket exists
- `--force` boolean alias: --y default: false
Skip confirmation
Global flags
* `--v` boolean alias: --version
Show version number
* `--cwd` string
Run as if Wrangler was started in the specified directory instead of the current working directory
* `--config` string alias: --c
Path to Wrangler configuration file
* `--env` string alias: --e
Environment to use for operations, and for selecting .env and .dev.vars files
* `--env-file` string
Path to an .env file to load - can be specified multiple times - values from earlier files are overridden by values in later files
* `--experimental-provision` boolean aliases: --x-provision default: true
Experimental: Enable automatic resource provisioning
* `--experimental-auto-create` boolean alias: --x-auto-create default: true
Automatically provision draft bindings with new resources
### `r2 bucket cors delete`
Clear the CORS configuration for an R2 bucket
* npm
```sh
npx wrangler r2 bucket cors delete [BUCKET]
```
* pnpm
```sh
pnpm wrangler r2 bucket cors delete [BUCKET]
```
* yarn
```sh
yarn wrangler r2 bucket cors delete [BUCKET]
```
- `[BUCKET]` string required
The name of the R2 bucket to delete the CORS configuration for
- `--jurisdiction` string alias: --J
The jurisdiction where the bucket exists
- `--force` boolean alias: --y default: false
Skip confirmation
Global flags
* `--v` boolean alias: --version
Show version number
* `--cwd` string
Run as if Wrangler was started in the specified directory instead of the current working directory
* `--config` string alias: --c
Path to Wrangler configuration file
* `--env` string alias: --e
Environment to use for operations, and for selecting .env and .dev.vars files
* `--env-file` string
Path to an .env file to load - can be specified multiple times - values from earlier files are overridden by values in later files
* `--experimental-provision` boolean aliases: --x-provision default: true
Experimental: Enable automatic resource provisioning
* `--experimental-auto-create` boolean alias: --x-auto-create default: true
Automatically provision draft bindings with new resources
### `r2 bucket cors list`
List the CORS rules for an R2 bucket
* npm
```sh
npx wrangler r2 bucket cors list [BUCKET]
```
* pnpm
```sh
pnpm wrangler r2 bucket cors list [BUCKET]
```
* yarn
```sh
yarn wrangler r2 bucket cors list [BUCKET]
```
- `[BUCKET]` string required
The name of the R2 bucket to list the CORS rules for
- `--jurisdiction` string alias: --J
The jurisdiction where the bucket exists
Global flags
* `--v` boolean alias: --version
Show version number
* `--cwd` string
Run as if Wrangler was started in the specified directory instead of the current working directory
* `--config` string alias: --c
Path to Wrangler configuration file
* `--env` string alias: --e
Environment to use for operations, and for selecting .env and .dev.vars files
* `--env-file` string
Path to an .env file to load - can be specified multiple times - values from earlier files are overridden by values in later files
* `--experimental-provision` boolean aliases: --x-provision default: true
Experimental: Enable automatic resource provisioning
* `--experimental-auto-create` boolean alias: --x-auto-create default: true
Automatically provision draft bindings with new resources
### `r2 bucket dev-url enable`
Enable public access via the r2.dev URL for an R2 bucket
* npm
```sh
npx wrangler r2 bucket dev-url enable [BUCKET]
```
* pnpm
```sh
pnpm wrangler r2 bucket dev-url enable [BUCKET]
```
* yarn
```sh
yarn wrangler r2 bucket dev-url enable [BUCKET]
```
- `[BUCKET]` string required
The name of the R2 bucket to enable public access via its r2.dev URL
- `--jurisdiction` string alias: --J
The jurisdiction where the bucket exists
- `--force` boolean alias: --y default: false
Skip confirmation
Global flags
* `--v` boolean alias: --version
Show version number
* `--cwd` string
Run as if Wrangler was started in the specified directory instead of the current working directory
* `--config` string alias: --c
Path to Wrangler configuration file
* `--env` string alias: --e
Environment to use for operations, and for selecting .env and .dev.vars files
* `--env-file` string
Path to an .env file to load - can be specified multiple times - values from earlier files are overridden by values in later files
* `--experimental-provision` boolean aliases: --x-provision default: true
Experimental: Enable automatic resource provisioning
* `--experimental-auto-create` boolean alias: --x-auto-create default: true
Automatically provision draft bindings with new resources
### `r2 bucket dev-url disable`
Disable public access via the r2.dev URL for an R2 bucket
* npm
```sh
npx wrangler r2 bucket dev-url disable [BUCKET]
```
* pnpm
```sh
pnpm wrangler r2 bucket dev-url disable [BUCKET]
```
* yarn
```sh
yarn wrangler r2 bucket dev-url disable [BUCKET]
```
- `[BUCKET]` string required
The name of the R2 bucket to disable public access via its r2.dev URL
- `--jurisdiction` string alias: --J
The jurisdiction where the bucket exists
- `--force` boolean alias: --y default: false
Skip confirmation
Global flags
* `--v` boolean alias: --version
Show version number
* `--cwd` string
Run as if Wrangler was started in the specified directory instead of the current working directory
* `--config` string alias: --c
Path to Wrangler configuration file
* `--env` string alias: --e
Environment to use for operations, and for selecting .env and .dev.vars files
* `--env-file` string
Path to an .env file to load - can be specified multiple times - values from earlier files are overridden by values in later files
* `--experimental-provision` boolean aliases: --x-provision default: true
Experimental: Enable automatic resource provisioning
* `--experimental-auto-create` boolean alias: --x-auto-create default: true
Automatically provision draft bindings with new resources
### `r2 bucket dev-url get`
Get the r2.dev URL and status for an R2 bucket
* npm
```sh
npx wrangler r2 bucket dev-url get [BUCKET]
```
* pnpm
```sh
pnpm wrangler r2 bucket dev-url get [BUCKET]
```
* yarn
```sh
yarn wrangler r2 bucket dev-url get [BUCKET]
```
- `[BUCKET]` string required
The name of the R2 bucket whose r2.dev URL status to retrieve
- `--jurisdiction` string alias: --J
The jurisdiction where the bucket exists
Global flags
* `--v` boolean alias: --version
Show version number
* `--cwd` string
Run as if Wrangler was started in the specified directory instead of the current working directory
* `--config` string alias: --c
Path to Wrangler configuration file
* `--env` string alias: --e
Environment to use for operations, and for selecting .env and .dev.vars files
* `--env-file` string
Path to an .env file to load - can be specified multiple times - values from earlier files are overridden by values in later files
* `--experimental-provision` boolean aliases: --x-provision default: true
Experimental: Enable automatic resource provisioning
* `--experimental-auto-create` boolean alias: --x-auto-create default: true
Automatically provision draft bindings with new resources
### `r2 bucket domain add`
Connect a custom domain to an R2 bucket
* npm
```sh
npx wrangler r2 bucket domain add [BUCKET]
```
* pnpm
```sh
pnpm wrangler r2 bucket domain add [BUCKET]
```
* yarn
```sh
yarn wrangler r2 bucket domain add [BUCKET]
```
- `[BUCKET]` string required
The name of the R2 bucket to connect a custom domain to
- `--domain` string required
The custom domain to connect to the R2 bucket
- `--zone-id` string required
The zone ID associated with the custom domain
- `--min-tls` string
Set the minimum TLS version for the custom domain (defaults to 1.0 if not set)
- `--jurisdiction` string alias: --J
The jurisdiction where the bucket exists
- `--force` boolean alias: --y default: false
Skip confirmation
Global flags
* `--v` boolean alias: --version
Show version number
* `--cwd` string
Run as if Wrangler was started in the specified directory instead of the current working directory
* `--config` string alias: --c
Path to Wrangler configuration file
* `--env` string alias: --e
Environment to use for operations, and for selecting .env and .dev.vars files
* `--env-file` string
Path to an .env file to load - can be specified multiple times - values from earlier files are overridden by values in later files
* `--experimental-provision` boolean aliases: --x-provision default: true
Experimental: Enable automatic resource provisioning
* `--experimental-auto-create` boolean alias: --x-auto-create default: true
Automatically provision draft bindings with new resources
### `r2 bucket domain remove`
Remove a custom domain from an R2 bucket
* npm
```sh
npx wrangler r2 bucket domain remove [BUCKET]
```
* pnpm
```sh
pnpm wrangler r2 bucket domain remove [BUCKET]
```
* yarn
```sh
yarn wrangler r2 bucket domain remove [BUCKET]
```
- `[BUCKET]` string required
The name of the R2 bucket to remove the custom domain from
- `--domain` string required
The custom domain to remove from the R2 bucket
- `--jurisdiction` string alias: --J
The jurisdiction where the bucket exists
- `--force` boolean alias: --y default: false
Skip confirmation
Global flags
* `--v` boolean alias: --version
Show version number
* `--cwd` string
Run as if Wrangler was started in the specified directory instead of the current working directory
* `--config` string alias: --c
Path to Wrangler configuration file
* `--env` string alias: --e
Environment to use for operations, and for selecting .env and .dev.vars files
* `--env-file` string
Path to an .env file to load - can be specified multiple times - values from earlier files are overridden by values in later files
* `--experimental-provision` boolean aliases: --x-provision default: true
Experimental: Enable automatic resource provisioning
* `--experimental-auto-create` boolean alias: --x-auto-create default: true
Automatically provision draft bindings with new resources
### `r2 bucket domain update`
Update settings for a custom domain connected to an R2 bucket
* npm
```sh
npx wrangler r2 bucket domain update [BUCKET]
```
* pnpm
```sh
pnpm wrangler r2 bucket domain update [BUCKET]
```
* yarn
```sh
yarn wrangler r2 bucket domain update [BUCKET]
```
- `[BUCKET]` string required
The name of the R2 bucket associated with the custom domain to update
- `--domain` string required
The custom domain whose settings will be updated
- `--min-tls` string
Update the minimum TLS version for the custom domain
- `--jurisdiction` string alias: --J
The jurisdiction where the bucket exists
Global flags
* `--v` boolean alias: --version
Show version number
* `--cwd` string
Run as if Wrangler was started in the specified directory instead of the current working directory
* `--config` string alias: --c
Path to Wrangler configuration file
* `--env` string alias: --e
Environment to use for operations, and for selecting .env and .dev.vars files
* `--env-file` string
Path to an .env file to load - can be specified multiple times - values from earlier files are overridden by values in later files
* `--experimental-provision` boolean aliases: --x-provision default: true
Experimental: Enable automatic resource provisioning
* `--experimental-auto-create` boolean alias: --x-auto-create default: true
Automatically provision draft bindings with new resources
### `r2 bucket domain get`
Get custom domain connected to an R2 bucket
* npm
```sh
npx wrangler r2 bucket domain get [BUCKET]
```
* pnpm
```sh
pnpm wrangler r2 bucket domain get [BUCKET]
```
* yarn
```sh
yarn wrangler r2 bucket domain get [BUCKET]
```
- `[BUCKET]` string required
The name of the R2 bucket whose custom domain to retrieve
- `--domain` string required
The custom domain to get information for
- `--jurisdiction` string alias: --J
The jurisdiction where the bucket exists
Global flags
* `--v` boolean alias: --version
Show version number
* `--cwd` string
Run as if Wrangler was started in the specified directory instead of the current working directory
* `--config` string alias: --c
Path to Wrangler configuration file
* `--env` string alias: --e
Environment to use for operations, and for selecting .env and .dev.vars files
* `--env-file` string
Path to an .env file to load - can be specified multiple times - values from earlier files are overridden by values in later files
* `--experimental-provision` boolean aliases: --x-provision default: true
Experimental: Enable automatic resource provisioning
* `--experimental-auto-create` boolean alias: --x-auto-create default: true
Automatically provision draft bindings with new resources
### `r2 bucket domain list`
List custom domains for an R2 bucket
* npm
```sh
npx wrangler r2 bucket domain list [BUCKET]
```
* pnpm
```sh
pnpm wrangler r2 bucket domain list [BUCKET]
```
* yarn
```sh
yarn wrangler r2 bucket domain list [BUCKET]
```
- `[BUCKET]` string required
The name of the R2 bucket whose connected custom domains will be listed
- `--jurisdiction` string alias: --J
The jurisdiction where the bucket exists
Global flags
* `--v` boolean alias: --version
Show version number
* `--cwd` string
Run as if Wrangler was started in the specified directory instead of the current working directory
* `--config` string alias: --c
Path to Wrangler configuration file
* `--env` string alias: --e
Environment to use for operations, and for selecting .env and .dev.vars files
* `--env-file` string
Path to an .env file to load - can be specified multiple times - values from earlier files are overridden by values in later files
* `--experimental-provision` boolean aliases: --x-provision default: true
Experimental: Enable automatic resource provisioning
* `--experimental-auto-create` boolean alias: --x-auto-create default: true
Automatically provision draft bindings with new resources
### `r2 bucket lifecycle add`
Add a lifecycle rule to an R2 bucket
* npm
```sh
npx wrangler r2 bucket lifecycle add [BUCKET] [NAME] [PREFIX]
```
* pnpm
```sh
pnpm wrangler r2 bucket lifecycle add [BUCKET] [NAME] [PREFIX]
```
* yarn
```sh
yarn wrangler r2 bucket lifecycle add [BUCKET] [NAME] [PREFIX]
```
- `[BUCKET]` string required
The name of the R2 bucket to add a lifecycle rule to
- `[NAME]` string alias: --id
A unique name for the lifecycle rule, used to identify and manage it.
- `[PREFIX]` string
Prefix condition for the lifecycle rule (leave empty for all prefixes)
- `--expire-days` number
Number of days after which objects expire
- `--expire-date` string
Date after which objects expire (YYYY-MM-DD)
- `--ia-transition-days` number
Number of days after which objects transition to Infrequent Access storage
- `--ia-transition-date` string
Date after which objects transition to Infrequent Access storage (YYYY-MM-DD)
- `--abort-multipart-days` number
Number of days after which incomplete multipart uploads are aborted
- `--jurisdiction` string alias: --J
The jurisdiction where the bucket exists
- `--force` boolean alias: --y default: false
Skip confirmation
Global flags
* `--v` boolean alias: --version
Show version number
* `--cwd` string
Run as if Wrangler was started in the specified directory instead of the current working directory
* `--config` string alias: --c
Path to Wrangler configuration file
* `--env` string alias: --e
Environment to use for operations, and for selecting .env and .dev.vars files
* `--env-file` string
Path to an .env file to load - can be specified multiple times - values from earlier files are overridden by values in later files
* `--experimental-provision` boolean aliases: --x-provision default: true
Experimental: Enable automatic resource provisioning
* `--experimental-auto-create` boolean alias: --x-auto-create default: true
Automatically provision draft bindings with new resources
### `r2 bucket lifecycle remove`
Remove a lifecycle rule from an R2 bucket
* npm
```sh
npx wrangler r2 bucket lifecycle remove [BUCKET]
```
* pnpm
```sh
pnpm wrangler r2 bucket lifecycle remove [BUCKET]
```
* yarn
```sh
yarn wrangler r2 bucket lifecycle remove [BUCKET]
```
- `[BUCKET]` string required
The name of the R2 bucket to remove a lifecycle rule from
- `--name` string alias: --id required
The unique name of the lifecycle rule to remove
- `--jurisdiction` string alias: --J
The jurisdiction where the bucket exists
Global flags
* `--v` boolean alias: --version
Show version number
* `--cwd` string
Run as if Wrangler was started in the specified directory instead of the current working directory
* `--config` string alias: --c
Path to Wrangler configuration file
* `--env` string alias: --e
Environment to use for operations, and for selecting .env and .dev.vars files
* `--env-file` string
Path to an .env file to load - can be specified multiple times - values from earlier files are overridden by values in later files
* `--experimental-provision` boolean aliases: --x-provision default: true
Experimental: Enable automatic resource provisioning
* `--experimental-auto-create` boolean alias: --x-auto-create default: true
Automatically provision draft bindings with new resources
### `r2 bucket lifecycle list`
List lifecycle rules for an R2 bucket
* npm
```sh
npx wrangler r2 bucket lifecycle list [BUCKET]
```
* pnpm
```sh
pnpm wrangler r2 bucket lifecycle list [BUCKET]
```
* yarn
```sh
yarn wrangler r2 bucket lifecycle list [BUCKET]
```
- `[BUCKET]` string required
The name of the R2 bucket to list lifecycle rules for
- `--jurisdiction` string alias: --J
The jurisdiction where the bucket exists
Global flags
* `--v` boolean alias: --version
Show version number
* `--cwd` string
Run as if Wrangler was started in the specified directory instead of the current working directory
* `--config` string alias: --c
Path to Wrangler configuration file
* `--env` string alias: --e
Environment to use for operations, and for selecting .env and .dev.vars files
* `--env-file` string
Path to an .env file to load - can be specified multiple times - values from earlier files are overridden by values in later files
* `--experimental-provision` boolean aliases: --x-provision default: true
Experimental: Enable automatic resource provisioning
* `--experimental-auto-create` boolean alias: --x-auto-create default: true
Automatically provision draft bindings with new resources
### `r2 bucket lifecycle set`
Set the lifecycle configuration for an R2 bucket from a JSON file
* npm
```sh
npx wrangler r2 bucket lifecycle set [BUCKET]
```
* pnpm
```sh
pnpm wrangler r2 bucket lifecycle set [BUCKET]
```
* yarn
```sh
yarn wrangler r2 bucket lifecycle set [BUCKET]
```
- `[BUCKET]` string required
The name of the R2 bucket to set lifecycle configuration for
- `--file` string required
Path to the JSON file containing lifecycle configuration
- `--jurisdiction` string alias: --J
The jurisdiction where the bucket exists
- `--force` boolean alias: --y default: false
Skip confirmation
Global flags
* `--v` boolean alias: --version
Show version number
* `--cwd` string
Run as if Wrangler was started in the specified directory instead of the current working directory
* `--config` string alias: --c
Path to Wrangler configuration file
* `--env` string alias: --e
Environment to use for operations, and for selecting .env and .dev.vars files
* `--env-file` string
Path to an .env file to load - can be specified multiple times - values from earlier files are overridden by values in later files
* `--experimental-provision` boolean aliases: --x-provision default: true
Experimental: Enable automatic resource provisioning
* `--experimental-auto-create` boolean alias: --x-auto-create default: true
Automatically provision draft bindings with new resources
### `r2 bucket lock add`
Add a lock rule to an R2 bucket
* npm
```sh
npx wrangler r2 bucket lock add [BUCKET] [NAME] [PREFIX]
```
* pnpm
```sh
pnpm wrangler r2 bucket lock add [BUCKET] [NAME] [PREFIX]
```
* yarn
```sh
yarn wrangler r2 bucket lock add [BUCKET] [NAME] [PREFIX]
```
- `[BUCKET]` string required
The name of the R2 bucket to add a bucket lock rule to
- `[NAME]` string alias: --id
A unique name for the bucket lock rule, used to identify and manage it.
- `[PREFIX]` string
Prefix condition for the bucket lock rule (set to "" for all prefixes)
- `--retention-days` number
Number of days which objects will be retained for
- `--retention-date` string
Date after which objects will be retained until (YYYY-MM-DD)
- `--retention-indefinite` boolean
Retain objects indefinitely
- `--jurisdiction` string alias: --J
The jurisdiction where the bucket exists
- `--force` boolean alias: --y default: false
Skip confirmation
Global flags
* `--v` boolean alias: --version
Show version number
* `--cwd` string
Run as if Wrangler was started in the specified directory instead of the current working directory
* `--config` string alias: --c
Path to Wrangler configuration file
* `--env` string alias: --e
Environment to use for operations, and for selecting .env and .dev.vars files
* `--env-file` string
Path to an .env file to load - can be specified multiple times - values from earlier files are overridden by values in later files
* `--experimental-provision` boolean aliases: --x-provision default: true
Experimental: Enable automatic resource provisioning
* `--experimental-auto-create` boolean alias: --x-auto-create default: true
Automatically provision draft bindings with new resources
### `r2 bucket lock remove`
Remove a bucket lock rule from an R2 bucket
* npm
```sh
npx wrangler r2 bucket lock remove [BUCKET]
```
* pnpm
```sh
pnpm wrangler r2 bucket lock remove [BUCKET]
```
* yarn
```sh
yarn wrangler r2 bucket lock remove [BUCKET]
```
- `[BUCKET]` string required
The name of the R2 bucket to remove a bucket lock rule from
- `--name` string alias: --id required
The unique name of the bucket lock rule to remove
- `--jurisdiction` string alias: --J
The jurisdiction where the bucket exists
Global flags
* `--v` boolean alias: --version
Show version number
* `--cwd` string
Run as if Wrangler was started in the specified directory instead of the current working directory
* `--config` string alias: --c
Path to Wrangler configuration file
* `--env` string alias: --e
Environment to use for operations, and for selecting .env and .dev.vars files
* `--env-file` string
Path to an .env file to load - can be specified multiple times - values from earlier files are overridden by values in later files
* `--experimental-provision` boolean aliases: --x-provision default: true
Experimental: Enable automatic resource provisioning
* `--experimental-auto-create` boolean alias: --x-auto-create default: true
Automatically provision draft bindings with new resources
### `r2 bucket lock list`
List lock rules for an R2 bucket
* npm
```sh
npx wrangler r2 bucket lock list [BUCKET]
```
* pnpm
```sh
pnpm wrangler r2 bucket lock list [BUCKET]
```
* yarn
```sh
yarn wrangler r2 bucket lock list [BUCKET]
```
- `[BUCKET]` string required
The name of the R2 bucket to list lock rules for
- `--jurisdiction` string alias: --J
The jurisdiction where the bucket exists
Global flags
* `--v` boolean alias: --version
Show version number
* `--cwd` string
Run as if Wrangler was started in the specified directory instead of the current working directory
* `--config` string alias: --c
Path to Wrangler configuration file
* `--env` string alias: --e
Environment to use for operations, and for selecting .env and .dev.vars files
* `--env-file` string
Path to an .env file to load - can be specified multiple times - values from earlier files are overridden by values in later files
* `--experimental-provision` boolean aliases: --x-provision default: true
Experimental: Enable automatic resource provisioning
* `--experimental-auto-create` boolean alias: --x-auto-create default: true
Automatically provision draft bindings with new resources
### `r2 bucket lock set`
Set the lock configuration for an R2 bucket from a JSON file
* npm
```sh
npx wrangler r2 bucket lock set [BUCKET]
```
* pnpm
```sh
pnpm wrangler r2 bucket lock set [BUCKET]
```
* yarn
```sh
yarn wrangler r2 bucket lock set [BUCKET]
```
- `[BUCKET]` string required
The name of the R2 bucket to set lock configuration for
- `--file` string required
Path to the JSON file containing lock configuration
- `--jurisdiction` string alias: --J
The jurisdiction where the bucket exists
- `--force` boolean alias: --y default: false
Skip confirmation
Global flags
* `--v` boolean alias: --version
Show version number
* `--cwd` string
Run as if Wrangler was started in the specified directory instead of the current working directory
* `--config` string alias: --c
Path to Wrangler configuration file
* `--env` string alias: --e
Environment to use for operations, and for selecting .env and .dev.vars files
* `--env-file` string
Path to an .env file to load - can be specified multiple times - values from earlier files are overridden by values in later files
* `--experimental-provision` boolean aliases: --x-provision default: true
Experimental: Enable automatic resource provisioning
* `--experimental-auto-create` boolean alias: --x-auto-create default: true
Automatically provision draft bindings with new resources
### `r2 bucket notification create`
Create an event notification rule for an R2 bucket
* npm
```sh
npx wrangler r2 bucket notification create [BUCKET]
```
* pnpm
```sh
pnpm wrangler r2 bucket notification create [BUCKET]
```
* yarn
```sh
yarn wrangler r2 bucket notification create [BUCKET]
```
- `[BUCKET]` string required
The name of the R2 bucket to create an event notification rule for
- `--event-types` "object-create" | "object-delete" alias: --event-type required
The type of event(s) that will emit event notifications
- `--prefix` string
The prefix that an object must match to emit event notifications (note: regular expressions not supported)
- `--suffix` string
The suffix that an object must match to emit event notifications (note: regular expressions not supported)
- `--queue` string required
The name of the queue that will receive event notification messages
- `--jurisdiction` string alias: --J
The jurisdiction where the bucket exists
- `--description` string
A description that can be used to identify the event notification rule after creation
Global flags
* `--v` boolean alias: --version
Show version number
* `--cwd` string
Run as if Wrangler was started in the specified directory instead of the current working directory
* `--config` string alias: --c
Path to Wrangler configuration file
* `--env` string alias: --e
Environment to use for operations, and for selecting .env and .dev.vars files
* `--env-file` string
Path to an .env file to load - can be specified multiple times - values from earlier files are overridden by values in later files
* `--experimental-provision` boolean aliases: --x-provision default: true
Experimental: Enable automatic resource provisioning
* `--experimental-auto-create` boolean alias: --x-auto-create default: true
Automatically provision draft bindings with new resources
### `r2 bucket notification delete`
Delete an event notification rule from an R2 bucket
* npm
```sh
npx wrangler r2 bucket notification delete [BUCKET]
```
* pnpm
```sh
pnpm wrangler r2 bucket notification delete [BUCKET]
```
* yarn
```sh
yarn wrangler r2 bucket notification delete [BUCKET]
```
- `[BUCKET]` string required
The name of the R2 bucket to delete an event notification rule for
- `--queue` string required
The name of the queue that corresponds to the event notification rule. If no rule is provided, all event notification rules associated with the bucket and queue will be deleted
- `--rule` string
The ID of the event notification rule to delete
- `--jurisdiction` string alias: --J
The jurisdiction where the bucket exists
Global flags
* `--v` boolean alias: --version
Show version number
* `--cwd` string
Run as if Wrangler was started in the specified directory instead of the current working directory
* `--config` string alias: --c
Path to Wrangler configuration file
* `--env` string alias: --e
Environment to use for operations, and for selecting .env and .dev.vars files
* `--env-file` string
Path to an .env file to load - can be specified multiple times - values from earlier files are overridden by values in later files
* `--experimental-provision` boolean aliases: --x-provision default: true
Experimental: Enable automatic resource provisioning
* `--experimental-auto-create` boolean alias: --x-auto-create default: true
Automatically provision draft bindings with new resources
### `r2 bucket notification list`
List event notification rules for an R2 bucket
* npm
```sh
npx wrangler r2 bucket notification list [BUCKET]
```
* pnpm
```sh
pnpm wrangler r2 bucket notification list [BUCKET]
```
* yarn
```sh
yarn wrangler r2 bucket notification list [BUCKET]
```
- `[BUCKET]` string required
The name of the R2 bucket to get event notification rules for
- `--jurisdiction` string alias: --J
The jurisdiction where the bucket exists
Global flags
* `--v` boolean alias: --version
Show version number
* `--cwd` string
Run as if Wrangler was started in the specified directory instead of the current working directory
* `--config` string alias: --c
Path to Wrangler configuration file
* `--env` string alias: --e
Environment to use for operations, and for selecting .env and .dev.vars files
* `--env-file` string
Path to an .env file to load - can be specified multiple times - values from earlier files are overridden by values in later files
* `--experimental-provision` boolean aliases: --x-provision default: true
Experimental: Enable automatic resource provisioning
* `--experimental-auto-create` boolean alias: --x-auto-create default: true
Automatically provision draft bindings with new resources
### `r2 bucket sippy enable`
Enable Sippy on an R2 bucket
* npm
```sh
npx wrangler r2 bucket sippy enable [NAME]
```
* pnpm
```sh
pnpm wrangler r2 bucket sippy enable [NAME]
```
* yarn
```sh
yarn wrangler r2 bucket sippy enable [NAME]
```
- `[NAME]` string required
The name of the bucket
- `--jurisdiction` string alias: --J
The jurisdiction where the bucket exists
- `--provider` "AWS" | "GCS"
- `--bucket` string
The name of the upstream bucket
- `--region` string
(AWS provider only) The region of the upstream bucket
- `--access-key-id` string
(AWS provider only) The secret access key id for the upstream bucket
- `--secret-access-key` string
(AWS provider only) The secret access key for the upstream bucket
- `--service-account-key-file` string
(GCS provider only) The path to your Google Cloud service account key JSON file
- `--client-email` string
(GCS provider only) The client email for your Google Cloud service account key
- `--private-key` string
(GCS provider only) The private key for your Google Cloud service account key
- `--r2-access-key-id` string
The secret access key id for this R2 bucket
- `--r2-secret-access-key` string
The secret access key for this R2 bucket
Global flags
* `--v` boolean alias: --version
Show version number
* `--cwd` string
Run as if Wrangler was started in the specified directory instead of the current working directory
* `--config` string alias: --c
Path to Wrangler configuration file
* `--env` string alias: --e
Environment to use for operations, and for selecting .env and .dev.vars files
* `--env-file` string
Path to an .env file to load - can be specified multiple times - values from earlier files are overridden by values in later files
* `--experimental-provision` boolean aliases: --x-provision default: true
Experimental: Enable automatic resource provisioning
* `--experimental-auto-create` boolean alias: --x-auto-create default: true
Automatically provision draft bindings with new resources
### `r2 bucket sippy disable`
Disable Sippy on an R2 bucket
* npm
```sh
npx wrangler r2 bucket sippy disable [NAME]
```
* pnpm
```sh
pnpm wrangler r2 bucket sippy disable [NAME]
```
* yarn
```sh
yarn wrangler r2 bucket sippy disable [NAME]
```
- `[NAME]` string required
The name of the bucket
- `--jurisdiction` string alias: --J
The jurisdiction where the bucket exists
Global flags
* `--v` boolean alias: --version
Show version number
* `--cwd` string
Run as if Wrangler was started in the specified directory instead of the current working directory
* `--config` string alias: --c
Path to Wrangler configuration file
* `--env` string alias: --e
Environment to use for operations, and for selecting .env and .dev.vars files
* `--env-file` string
Path to an .env file to load - can be specified multiple times - values from earlier files are overridden by values in later files
* `--experimental-provision` boolean aliases: --x-provision default: true
Experimental: Enable automatic resource provisioning
* `--experimental-auto-create` boolean alias: --x-auto-create default: true
Automatically provision draft bindings with new resources
### `r2 bucket sippy get`
Check the status of Sippy on an R2 bucket
* npm
```sh
npx wrangler r2 bucket sippy get [NAME]
```
* pnpm
```sh
pnpm wrangler r2 bucket sippy get [NAME]
```
* yarn
```sh
yarn wrangler r2 bucket sippy get [NAME]
```
- `[NAME]` string required
The name of the bucket
- `--jurisdiction` string alias: --J
The jurisdiction where the bucket exists
Global flags
* `--v` boolean alias: --version
Show version number
* `--cwd` string
Run as if Wrangler was started in the specified directory instead of the current working directory
* `--config` string alias: --c
Path to Wrangler configuration file
* `--env` string alias: --e
Environment to use for operations, and for selecting .env and .dev.vars files
* `--env-file` string
Path to an .env file to load - can be specified multiple times - values from earlier files are overridden by values in later files
* `--experimental-provision` boolean aliases: --x-provision default: true
Experimental: Enable automatic resource provisioning
* `--experimental-auto-create` boolean alias: --x-auto-create default: true
Automatically provision draft bindings with new resources
## `r2 object`
Interact with R2 objects.
Note
The `r2 object` commands allow you to manage application data in the Cloudflare network to be accessed from Workers using [the R2 API](https://developers.cloudflare.com/r2/api/workers/workers-api-reference/).
### `r2 object get`
Fetch an object from an R2 bucket
* npm
```sh
npx wrangler r2 object get [OBJECTPATH]
```
* pnpm
```sh
pnpm wrangler r2 object get [OBJECTPATH]
```
* yarn
```sh
yarn wrangler r2 object get [OBJECTPATH]
```
- `[OBJECTPATH]` string required
The source object path in the form of {bucket}/{key}
- `--file` string alias: --f
The destination file to create
- `--pipe` boolean alias: --p
Enables the file to be piped to a destination, rather than specified with the --file option
- `--local` boolean
Interact with local storage
- `--remote` boolean
Interact with remote storage
- `--persist-to` string
Directory for local persistence
- `--jurisdiction` string alias: --J
The jurisdiction where the object exists
Global flags
* `--v` boolean alias: --version
Show version number
* `--cwd` string
Run as if Wrangler was started in the specified directory instead of the current working directory
* `--config` string alias: --c
Path to Wrangler configuration file
* `--env` string alias: --e
Environment to use for operations, and for selecting .env and .dev.vars files
* `--env-file` string
Path to an .env file to load - can be specified multiple times - values from earlier files are overridden by values in later files
* `--experimental-provision` boolean aliases: --x-provision default: true
Experimental: Enable automatic resource provisioning
* `--experimental-auto-create` boolean alias: --x-auto-create default: true
Automatically provision draft bindings with new resources
### `r2 object put`
Create an object in an R2 bucket
* npm
```sh
npx wrangler r2 object put [OBJECTPATH]
```
* pnpm
```sh
pnpm wrangler r2 object put [OBJECTPATH]
```
* yarn
```sh
yarn wrangler r2 object put [OBJECTPATH]
```
- `[OBJECTPATH]` string required
The destination object path in the form of {bucket}/{key}
- `--content-type` string alias: --ct
A standard MIME type describing the format of the object data
- `--content-disposition` string alias: --cd
Specifies presentational information for the object
- `--content-encoding` string alias: --ce
Specifies what content encodings have been applied to the object and thus what decoding mechanisms must be applied to obtain the media-type referenced by the Content-Type header field
- `--content-language` string alias: --cl
The language the content is in
- `--cache-control` string alias: --cc
Specifies caching behavior along the request/reply chain
- `--expires` string
The date and time at which the object is no longer cacheable
- `--local` boolean
Interact with local storage
- `--remote` boolean
Interact with remote storage
- `--persist-to` string
Directory for local persistence
- `--jurisdiction` string alias: --J
The jurisdiction where the object will be created
- `--storage-class` string alias: --s
The storage class of the object to be created
- `--file` string alias: --f
The path of the file to upload
- `--pipe` boolean alias: --p
Enables the file to be piped in, rather than specified with the --file option
Global flags
* `--v` boolean alias: --version
Show version number
* `--cwd` string
Run as if Wrangler was started in the specified directory instead of the current working directory
* `--config` string alias: --c
Path to Wrangler configuration file
* `--env` string alias: --e
Environment to use for operations, and for selecting .env and .dev.vars files
* `--env-file` string
Path to an .env file to load - can be specified multiple times - values from earlier files are overridden by values in later files
* `--experimental-provision` boolean aliases: --x-provision default: true
Experimental: Enable automatic resource provisioning
* `--experimental-auto-create` boolean alias: --x-auto-create default: true
Automatically provision draft bindings with new resources
### `r2 object delete`
Delete an object in an R2 bucket
* npm
```sh
npx wrangler r2 object delete [OBJECTPATH]
```
* pnpm
```sh
pnpm wrangler r2 object delete [OBJECTPATH]
```
* yarn
```sh
yarn wrangler r2 object delete [OBJECTPATH]
```
- `[OBJECTPATH]` string required
The destination object path in the form of {bucket}/{key}
- `--local` boolean
Interact with local storage
- `--remote` boolean
Interact with remote storage
- `--persist-to` string
Directory for local persistence
- `--jurisdiction` string alias: --J
The jurisdiction where the object exists
Global flags
* `--v` boolean alias: --version
Show version number
* `--cwd` string
Run as if Wrangler was started in the specified directory instead of the current working directory
* `--config` string alias: --c
Path to Wrangler configuration file
* `--env` string alias: --e
Environment to use for operations, and for selecting .env and .dev.vars files
* `--env-file` string
Path to an .env file to load - can be specified multiple times - values from earlier files are overridden by values in later files
* `--experimental-provision` boolean aliases: --x-provision default: true
Experimental: Enable automatic resource provisioning
* `--experimental-auto-create` boolean alias: --x-auto-create default: true
Automatically provision draft bindings with new resources
---
title: Protect an R2 Bucket with Cloudflare Access · Cloudflare R2 docs
description: You can secure access to R2 buckets using Cloudflare Access, which
allows you to only allow specific users, groups or applications within your
organization to access objects within a bucket.
lastUpdated: 2025-10-24T20:47:24.000Z
chatbotDeprioritize: false
source_url:
html: https://developers.cloudflare.com/r2/tutorials/cloudflare-access/
md: https://developers.cloudflare.com/r2/tutorials/cloudflare-access/index.md
---
You can secure access to R2 buckets using [Cloudflare Access](https://developers.cloudflare.com/cloudflare-one/access-controls/applications/http-apps/).
Access allows you to only allow specific users, groups or applications within your organization to access objects within a bucket, or specific sub-paths, based on policies you define.
Note
For providing secure access to bucket objects for anonymous users, we recommend using [pre-signed URLs](https://developers.cloudflare.com/r2/api/s3/presigned-urls/) instead.
Pre-signed URLs do not require users to be a member of your organization and enable programmatic application directly.
## 1. Create a bucket
*If you have an existing R2 bucket, you can skip this step.*
You will need to create an R2 bucket. Follow the [R2 get started guide](https://developers.cloudflare.com/r2/get-started/) to create a bucket before returning to this guide.
## 2. Create an Access application
Within the **Zero Trust** section of the Cloudflare Dashboard, you will need to create an Access application and a policy to restrict access to your R2 bucket.
If you have not configured Cloudflare Access before, we recommend:
* Configuring an [identity provider](https://developers.cloudflare.com/cloudflare-one/integrations/identity-providers/) first to enable Access to use your organization's single-sign on (SSO) provider as an authentication method.
To create an Access application for your R2 bucket:
1. Go to [**Access**](https://one.dash.cloudflare.com/?to=/:account/access/apps) and select **Add an application**
2. Select **Self-hosted**.
3. Enter an **Application name**.
4. Select **Add a public hostname** and enter the application domain. The **Domain** must be a domain hosted on Cloudflare, and the **Subdomain** part of the custom domain you will connect to your R2 bucket. For example, if you want to serve files from `behind-access.example.com` and `example.com` is a domain within your Cloudflare account, then enter `behind-access` in the subdomain field and select `example.com` from the **Domain** list.
5. Add [Access policies](https://developers.cloudflare.com/cloudflare-one/access-controls/policies/) to control who can connect to your application. This should be an **Allow** policy so that users can access objects within the bucket behind this Access application.
Note
Ensure that your policies only allow the users within your organization that need access to this R2 bucket.
6. Follow the remaining [self-hosted application creation steps](https://developers.cloudflare.com/cloudflare-one/access-controls/applications/http-apps/self-hosted-public-app/) to publish the application.
## 3. Connect a custom domain
Warning
You should create an Access application before connecting a custom domain to your bucket, as connecting a custom domain will otherwise make your bucket public by default.
You will need to [connect a custom domain](https://developers.cloudflare.com/r2/buckets/public-buckets/#connect-a-bucket-to-a-custom-domain) to your bucket in order to configure it as an Access application. Make sure the custom domain **is the same domain** you entered when configuring your Access policy.
1. In the Cloudflare dashboard, go to the **R2 object storage** page.
[Go to **Overview**](https://dash.cloudflare.com/?to=/:account/r2/overview)
2. Select your bucket.
3. Select **Settings**.
4. Under **Custom Domains**, select **Add**.
5. Enter the domain name you want to connect to and select **Continue**.
6. Review the new record that will be added to the DNS table and select **Connect Domain**.
Your domain is now connected. The status takes a few minutes to change from **Initializing** to **Active**, and you may need to refresh to review the status update. If the status has not changed, select the *...* next to your bucket and select **Retry connection**.
## 4. Test your Access policy
Visit the custom domain you connected to your R2 bucket, which should present a Cloudflare Access authentication page with your selected identity provider(s) and/or authentication methods.
For example, if you connected Google and/or GitHub identity providers, you can log in with those providers. If the login is successful and you pass the Access policies configured in this guide, you will be able to access (read/download) objects within the R2 bucket.
If you cannot authenticate or receive a block page after authenticating, check that you have an [Access policy](https://developers.cloudflare.com/cloudflare-one/access-controls/applications/http-apps/self-hosted-public-app/#1-add-your-application-to-access) configured within your Access application that explicitly allows the group your user account is associated with.
## Next steps
* Learn more about [Access applications](https://developers.cloudflare.com/cloudflare-one/access-controls/applications/http-apps/) and how to configure them.
* Understand how to use [pre-signed URLs](https://developers.cloudflare.com/r2/api/s3/presigned-urls/) to issue time-limited and prefix-restricted access to objects for users not within your organization.
* Review the [documentation on using API tokens to authenticate](https://developers.cloudflare.com/r2/api/tokens/) against R2 buckets.
---
title: Mastodon · Cloudflare R2 docs
description: This guide explains how to configure R2 to be the object storage
for a self hosted Mastodon instance. You can set up a self-hosted instance in
multiple ways.
lastUpdated: 2025-10-09T15:47:46.000Z
chatbotDeprioritize: false
source_url:
html: https://developers.cloudflare.com/r2/tutorials/mastodon/
md: https://developers.cloudflare.com/r2/tutorials/mastodon/index.md
---
[Mastodon](https://joinmastodon.org/) is a popular [fediverse](https://en.wikipedia.org/wiki/Fediverse) software. This guide will explain how to configure R2 to be the object storage for a self hosted Mastodon instance, for either [a new instance](#set-up-a-new-instance) or [an existing instance](#migrate-to-r2).
## Set up a new instance
You can set up a self hosted Mastodon instance in multiple ways. Refer to the [official documentation](https://docs.joinmastodon.org/) for more details. When you reach the [Configuring your environment](https://docs.joinmastodon.org/admin/config/#files) step in the Mastodon documentation after installation, refer to the procedures below for the next steps.
### 1. Determine the hostname to access files
Different from the default hostname of your Mastodon instance, object storage for files requires a unique hostname. As an example, if you set up your Mastodon's hostname to be `mastodon.example.com`, you can use `mastodon-files.example.com` or `files.example.com` for accessing files. This means that when visiting your instance on `mastodon.example.com`, whenever there are media attached to a post such as an image or a video, the file will be served under the hostname determined at this step, such as `mastodon-files.example.com`.
Note
If you move from R2 to another S3 compatible service later on, you can continue using the same hostname determined in this step. We do not recommend changing the hostname after the instance has been running to avoid breaking historical file references. In such a scenario, [Bulk Redirects](https://developers.cloudflare.com/rules/url-forwarding/bulk-redirects/) can be used to instruct requests reaching the previous hostname to refer to the new hostname.
### 2. Create and set up an R2 bucket
1. In the Cloudflare dashboard, go to the **R2 object storage** page.
[Go to **Overview**](https://dash.cloudflare.com/?to=/:account/r2/overview)
2. Select **Create bucket**.
3. Enter your bucket name and then select **Create bucket**. This name is internal when setting up your Mastodon instance and is not publicly accessible.
4. Once the bucket is created, navigate to the **Settings** tab of this bucket and copy the value of **S3 API**.
5. From the **Settings** tab, select **Connect Domain** and enter the hostname from step 1.
6. Navigate back to the R2's overview page and select **Manage R2 API Tokens**.
7. Select **Create API token**.
8. Name your token `Mastodon` by selecting the pencil icon next to the API name and grant it the **Edit** permission. Select **Create API Token** to finalize token creation.
9. Copy the values of **Access Key ID** and **Secret Access Key**.
### 3. Configure R2 for Mastodon
While configuring your Mastodon instance based on the official [configuration file](https://github.com/mastodon/mastodon/blob/main/.env.production.sample), replace the **File storage** section with the following details.
```plaintext
S3_ENABLED=true
S3_ALIAS_HOST={{mastodon-files.example.com}} # Change to the hostname determined in step 1
S3_BUCKET={{your-bucket-name}} # Change to the bucket name set in step 2
S3_ENDPOINT=https://{{unique-id}}.r2.cloudflarestorage.com/ # Change the {{unique-id}} to the part of S3 API retrieved in step 2
AWS_ACCESS_KEY_ID={{your-access-key-id}} # Change to the Access Key ID retrieved in step 2
AWS_SECRET_ACCESS_KEY={{your-secret-access-key}} # Change to the Secret Access Key retrieved in step 2
S3_PROTOCOL=https
S3_PERMISSION=private
```
After configuration, you can run your instance. After the instance is running, upload a media attachment and verify the attachment is retrieved from the hostname set above. When navigating back to the bucket's page in R2, you should see the following structure.

## Migrate to R2
If you already have an instance running, you can migrate the media files to R2 and benefit from [no egress cost](https://developers.cloudflare.com/r2/pricing/).
### 1. Set up an R2 bucket and start file migration
1. (Optional) To minimize the number of migrated files, you can use the [Mastodon admin CLI](https://docs.joinmastodon.org/admin/tootctl/#media) to clean up unused files.
2. Set up an R2 bucket ready for file migration by following steps 1 and 2 from [Setting up a new instance](#set-up-a-new-instance) section above.
3. Migrate all the media files to R2. Refer to the [examples](https://developers.cloudflare.com/r2/examples/) provided to connect various providers together. If you currently host these media files locally, you can use [`rclone`](https://developers.cloudflare.com/r2/examples/rclone/) to upload these local files to R2.
### 2. (Optional) Set up file path redirects
While the file migration is in progress, which may take a while, you can prepare file path redirect settings.
If you had the media files hosted locally, you will likely need to set up redirects. By default, media files hosted locally would have a path similar to `https://mastodon.example.com/cache/...`, which needs to be redirected to a path similar to `https://mastodon-files.example.com/cache/...` after the R2 bucket is up and running alongside your Mastodon instance. If you already use another S3 compatible object storage service and would like to keep the same hostname, you do not need to set up redirects.
[Bulk Redirects](https://developers.cloudflare.com/rules/url-forwarding/bulk-redirects/) are available for all plans. Refer to [Create Bulk Redirects in the dashboard](https://developers.cloudflare.com/rules/url-forwarding/bulk-redirects/create-dashboard/) for more information.

### 3. Verify bucket and redirects
Depending on your migration plan, you can verify if the bucket is accessible publicly and the redirects work correctly. To verify, open an existing uploaded media file with a path like `https://mastodon.example.com/cache/...` and replace the hostname from `mastodon.example.com` to `mastocon-files.example.com` and visit the new path. If the file opened correctly, proceed to the final step.
### 4. Finalize migration
Your instance may be still running during migration, and during migration, you likely have new media files created either through direct uploads or fetched from other federated instances. To upload only the newly created files, you can use a program like [`rclone`](https://developers.cloudflare.com/r2/examples/rclone/). Note that when re-running the sync program, all existing files will be checked using at least [Class B operations](https://developers.cloudflare.com/r2/pricing/#class-b-operations).
Once all the files are synced, you can restart your Mastodon instance with the new object storage configuration as mentioned in [step 3](#3-configure-r2-for-mastodon) of Set up a new instance.
---
title: Postman · Cloudflare R2 docs
description: Learn how to configure Postman to interact with R2.
lastUpdated: 2025-09-03T16:40:54.000Z
chatbotDeprioritize: false
source_url:
html: https://developers.cloudflare.com/r2/tutorials/postman/
md: https://developers.cloudflare.com/r2/tutorials/postman/index.md
---
Postman is an API platform that makes interacting with APIs easier. This guide will explain how to use Postman to make authenticated R2 requests to create a bucket, upload a new object, and then retrieve the object. The R2 [Postman collection](https://www.postman.com/cloudflare-r2/workspace/cloudflare-r2/collection/20913290-14ddd8d8-3212-490d-8647-88c9dc557659?action=share\&creator=20913290) includes a complete list of operations supported by the platform.
## 1. Purchase R2
This guide assumes that you have made a Cloudflare account and purchased R2.
## 2. Explore R2 in Postman
Explore R2's publicly available [Postman collection](https://www.postman.com/cloudflare-r2/workspace/cloudflare-r2/collection/20913290-14ddd8d8-3212-490d-8647-88c9dc557659?action=share\&creator=20913290). The collection is organized into a `Buckets` folder for bucket-level operations and an `Objects` folder for object-level operations. Operations in the `Objects > Upload` folder allow for adding new objects to R2.
## 3. Configure your R2 credentials
In the [Postman dashboard](https://www.postman.com/cloudflare-r2/workspace/cloudflare-r2/collection/20913290-14ddd8d8-3212-490d-8647-88c9dc557659?action=share\&creator=20913290\&ctx=documentation), select the **Cloudflare R2** collection and navigate to the **Variables** tab. In **Variables**, you can set variables within the R2 collection. They will be used to authenticate and interact with the R2 platform. Remember to always select **Save** after updating a variable.
To execute basic operations, you must set the `account-id`, `r2-access-key-id`, and `r2-secret-access-key` variables in the Postman dashboard > **Variables**.
To do this:
1. In the Cloudflare dashboard, go to the **R2 object storage** page.
[Go to **Overview**](https://dash.cloudflare.com/?to=/:account/r2/overview)
2. In **R2**, under **Manage R2 API Tokens** on the right side of the dashboard, copy your Cloudflare account ID.
3. Go back to the [Postman dashboard](https://www.postman.com/cloudflare-r2/workspace/cloudflare-r2/collection/20913290-14ddd8d8-3212-490d-8647-88c9dc557659?action=share\&creator=20913290\&ctx=documentation).
4. Set the **CURRENT VALUE** of `account-id` to your Cloudflare account ID and select **Save**.
Next, generate an R2 API token:
1. In the Cloudflare dashboard, go to the **R2 object storage** page.
[Go to **Overview**](https://dash.cloudflare.com/?to=/:account/r2/overview)
2. On the right hand sidebar, select **Manage R2 API Tokens**.
3. Select **Create API token**.
4. Name your token **Postman** by selecting the pencil icon next to the API name and grant it the **Edit** permission.
Guard this token and the **Access Key ID** and **Secret Access Key** closely. You will not be able to review these values again after finishing this step. Anyone with this information can fully interact with all of your buckets.
After you have created your API token in the Cloudflare dashboard:
1. Go to the [Postman dashboard](https://www.postman.com/cloudflare-r2/workspace/cloudflare-r2/collection/20913290-14ddd8d8-3212-490d-8647-88c9dc557659?action=share\&creator=20913290\&ctx=documentation) > **Variables**.
2. Copy `Access Key ID` value from the Cloudflare dashboard and paste it into Postman’s `r2-access-key-id` variable value and select **Save**.
3. Copy the `Secret Access Key` value from the Cloudflare dashboard and paste it into Postman’s `r2-secret-access-key` variable value and select **Save**.
By now, you should have `account-id`, `r2-secret-access-key`, and `r2-access-key-id` set in Postman.
To verify the token:
1. In the Postman dashboard, select the **Cloudflare R2** folder dropdown arrow > **Buckets** folder dropdown arrow > **`GET`ListBuckets**.
2. Select **Send**.
The Postman collection uses AWS SigV4 authentication to complete the handshake.
You should see a `200 OK` response with a list of existing buckets. If you receive an error, ensure your R2 subscription is active and Postman variables are saved correctly.
## 4. Create a bucket
In the Postman dashboard:
1. Go to **Variables**.
2. Set the `r2-bucket` variable value as the name of your R2 bucket and select **Save**.
3. Select the **Cloudflare R2** folder dropdown arrow > **Buckets** folder dropdown arrow > **`PUT`CreateBucket** and select **Send**.
You should see a `200 OK` response. If you run the `ListBuckets` request again, your bucket will appear in the list of results.
## 5. Add an object
You will now add an object to your bucket:
1. Go to **Variables** in the Postman dashboard.
2. Set `r2-object` to `cat-pic.jpg` and select **Save**.
3. Select **Cloudflare R2** folder dropdown arrow > **Objects** folder dropdown arrow > **Multipart** folder dropdown arrow > **`PUT`PutObject** and select **Send**.
4. Go to **Body** and choose **binary** before attaching your cat picture.
5. Select **Send** to add the cat picture to your R2 bucket.
After a few seconds, you should receive a `200 OK` response.
## 6. Get an object
It only takes a few more more clicks to download our cat friend using the `GetObject` request.
1. Select the **Cloudflare R2** folder dropdown arrow > **Objects** folder dropdown arrow > **`GET`GetObject**.
2. Select **Send**.
The R2 team will keep this collection up to date as we expand R2 features set. You can explore the rest of the R2 Postman collection by experimenting with other operations.
---
title: Use event notification to summarize PDF files on upload · Cloudflare R2 docs
description: Use event notification to summarize PDF files on upload. Use
Workers AI to summarize the PDF and store the summary as a text file.
lastUpdated: 2026-02-04T18:31:25.000Z
chatbotDeprioritize: false
tags: TypeScript
source_url:
html: https://developers.cloudflare.com/r2/tutorials/summarize-pdf/
md: https://developers.cloudflare.com/r2/tutorials/summarize-pdf/index.md
---
In this tutorial, you will learn how to use [event notifications](https://developers.cloudflare.com/r2/buckets/event-notifications/) to process a PDF file when it is uploaded to an R2 bucket. You will use [Workers AI](https://developers.cloudflare.com/workers-ai/) to summarize the PDF and store the summary as a text file in the same bucket.
## Prerequisites
To continue, you will need:
* A [Cloudflare account](https://dash.cloudflare.com/sign-up/workers-and-pages) with access to R2.
* Have an existing R2 bucket. Refer to [Get started tutorial for R2](https://developers.cloudflare.com/r2/get-started/#2-create-a-bucket).
* Install [`Node.js`](https://docs.npmjs.com/downloading-and-installing-node-js-and-npm).
Node.js version manager
Use a Node version manager like [Volta](https://volta.sh/) or [nvm](https://github.com/nvm-sh/nvm) to avoid permission issues and change Node.js versions. [Wrangler](https://developers.cloudflare.com/workers/wrangler/install-and-update/), discussed later in this guide, requires a Node version of `16.17.0` or later.
## 1. Create a new project
You will create a new Worker project that will use [Static Assets](https://developers.cloudflare.com/workers/static-assets/) to serve the front-end of your application. A user can upload a PDF file using this front-end, which will then be processed by your Worker.
Create a new Worker project by running the following commands:
* npm
```sh
npm create cloudflare@latest -- pdf-summarizer
```
* yarn
```sh
yarn create cloudflare pdf-summarizer
```
* pnpm
```sh
pnpm create cloudflare@latest pdf-summarizer
```
For setup, select the following options:
* For *What would you like to start with?*, choose `Hello World example`.
* For *Which template would you like to use?*, choose `Worker only`.
* For *Which language do you want to use?*, choose `TypeScript`.
* For *Do you want to use git for version control?*, choose `Yes`.
* For *Do you want to deploy your application?*, choose `No` (we will be making some changes before deploying).
Navigate to the `pdf-summarizer` directory:
```sh
cd pdf-summarizer
```
## 2. Create the front-end
Using Static Assets, you can serve the front-end of your application from your Worker. To use Static Assets, you need to add the required bindings to your Wrangler file.
* wrangler.jsonc
```jsonc
{
"assets": {
"directory": "public"
}
}
```
* wrangler.toml
```toml
[assets]
directory = "public"
```
Next, create a `public` directory and add an `index.html` file. The `index.html` file should contain the following HTML code:
Select to view the HTML code
```html
PDF Summarizer
```
To view the front-end of your application, run the following command and navigate to the URL displayed in the terminal:
```sh
npm run dev
```
```txt
â›…ï¸ wrangler 3.80.2
-------------------
⎔ Starting local server...
[wrangler:inf] Ready on http://localhost:8787
â•â”€â”€â”€â”€â”€â”€â”€â”€â”€â”€â”€â”€â”€â”€â”€â”€â”€â”€â”€â”€â”€â”€â”€â”€â”€â”€â”€â•®
│ [b] open a browser │
│ [d] open devtools │
│ [l] turn off local mode │
│ [c] clear console │
│ [x] to exit │
╰───────────────────────────╯
```
When you open the URL in your browser, you will see that there is a file upload form. If you try uploading a file, you will notice that the file is not uploaded to the server. This is because the front-end is not connected to the back-end. In the next step, you will update your Worker that will handle the file upload.
## 3. Handle file upload
To handle the file upload, you will first need to add the R2 binding. In the Wrangler file, add the following code:
* wrangler.jsonc
```jsonc
{
"r2_buckets": [
{
"binding": "MY_BUCKET",
"bucket_name": ""
}
]
}
```
* wrangler.toml
```toml
[[r2_buckets]]
binding = "MY_BUCKET"
bucket_name = ""
```
Replace `` with the name of your R2 bucket.
Next, update the `src/index.ts` file. The `src/index.ts` file should contain the following code:
```ts
export default {
async fetch(request, env, ctx): Promise {
// Get the pathname from the request
const pathname = new URL(request.url).pathname;
if (pathname === "/api/upload" && request.method === "POST") {
// Get the file from the request
const formData = await request.formData();
const file = formData.get("pdfFile") as File;
// Upload the file to Cloudflare R2
const upload = await env.MY_BUCKET.put(file.name, file);
return new Response("File uploaded successfully", { status: 200 });
}
return new Response("incorrect route", { status: 404 });
},
} satisfies ExportedHandler;
```
The above code does the following:
* Check if the request is a POST request to the `/api/upload` endpoint. If it is, it gets the file from the request and uploads it to Cloudflare R2 using the [Workers API](https://developers.cloudflare.com/r2/api/workers/).
* If the request is not a POST request to the `/api/upload` endpoint, it returns a 404 response.
Since the Worker code is written in TypeScript, you should run the following command to add the necessary type definitions. While this is not required, it will help you avoid errors.
Prevent potential errors when accessing request.body
The body of a [Request](https://developer.mozilla.org/en-US/docs/Web/API/Request) can only be accessed once. If you previously used `request.formData()` in the same request, you may encounter a TypeError when attempting to access `request.body`.
To avoid errors, create a clone of the Request object with `request.clone()` for each subsequent attempt to access a Request's body. Keep in mind that Workers have a [memory limit of 128 MB per Worker](https://developers.cloudflare.com/workers/platform/limits#worker-limits) and loading particularly large files into a Worker's memory multiple times may reach this limit. To ensure memory usage does not reach this limit, consider using [Streams](https://developers.cloudflare.com/workers/runtime-apis/streams/).
```sh
npm run cf-typegen
```
You can restart the developer server to test the changes:
```sh
npm run dev
```
## 4. Create a queue
Event notifications capture changes to data in your R2 bucket. You will need to create a new queue `pdf-summarize` to receive notifications:
```sh
npx wrangler queues create pdf-summarizer
```
Add the binding to the Wrangler file:
* wrangler.jsonc
```jsonc
{
"queues": {
"consumers": [
{
"queue": "pdf-summarizer"
}
]
}
}
```
* wrangler.toml
```toml
[[queues.consumers]]
queue = "pdf-summarizer"
```
## 5. Handle event notifications
Now that you have a queue to receive event notifications, you need to update the Worker to handle the event notifications. You will need to add a Queue handler that will extract the textual content from the PDF, use Workers AI to summarize the content, and then save it in the R2 bucket.
Update the `src/index.ts` file to add the Queue handler:
```ts
export default {
async fetch(request, env, ctx): Promise {
// No changes in the fetch handler
},
async queue(batch, env) {
for (let message of batch.messages) {
console.log(`Processing the file: ${message.body.object.key}`);
}
},
} satisfies ExportedHandler;
```
The above code does the following:
* The `queue` handler is called when a new message is added to the queue. It loops through the messages in the batch and logs the name of the file.
For now the `queue` handler is not doing anything. In the next steps, you will update the `queue` handler to extract the textual content from the PDF, use Workers AI to summarize the content, and then add it to the bucket.
## 6. Extract the textual content from the PDF
To extract the textual content from the PDF, the Worker will use the [unpdf](https://github.com/unjs/unpdf) library. The `unpdf` library provides utilities to work with PDF files.
Install the `unpdf` library by running the following command:
* npm
```sh
npm i unpdf
```
* yarn
```sh
yarn add unpdf
```
* pnpm
```sh
pnpm add unpdf
```
Update the `src/index.ts` file to import the required modules from the `unpdf` library:
```ts
import { extractText, getDocumentProxy } from "unpdf";
```
Next, update the `queue` handler to extract the textual content from the PDF:
```ts
async queue(batch, env) {
for(let message of batch.messages) {
console.log(`Processing file: ${message.body.object.key}`);
// Get the file from the R2 bucket
const file = await env.MY_BUCKET.get(message.body.object.key);
if (!file) {
console.error(`File not found: ${message.body.object.key}`);
continue;
}
// Extract the textual content from the PDF
const buffer = await file.arrayBuffer();
const document = await getDocumentProxy(new Uint8Array(buffer));
const {text} = await extractText(document, {mergePages: true});
console.log(`Extracted text: ${text.substring(0, 100)}...`);
}
}
```
The above code does the following:
* The `queue` handler gets the file from the R2 bucket.
* The `queue` handler extracts the textual content from the PDF using the `unpdf` library.
* The `queue` handler logs the textual content.
## 7. Use Workers AI to summarize the content
To use Workers AI, you will need to add the Workers AI binding to the Wrangler file. The Wrangler file should contain the following code:
* wrangler.jsonc
```jsonc
{
"ai": {
"binding": "AI"
}
}
```
* wrangler.toml
```toml
[ai]
binding = "AI"
```
Execute the following command to add the AI type definition:
```sh
npm run cf-typegen
```
Update the `src/index.ts` file to use Workers AI to summarize the content:
```ts
async queue(batch, env) {
for(let message of batch.messages) {
// Extract the textual content from the PDF
const {text} = await extractText(document, {mergePages: true});
console.log(`Extracted text: ${text.substring(0, 100)}...`);
// Use Workers AI to summarize the content
const result: AiSummarizationOutput = await env.AI.run(
"@cf/facebook/bart-large-cnn",
{
input_text: text,
}
);
const summary = result.summary;
console.log(`Summary: ${summary.substring(0, 100)}...`);
}
}
```
The `queue` handler now uses Workers AI to summarize the content.
## 8. Add the summary to the R2 bucket
Now that you have the summary, you need to add it to the R2 bucket. Update the `src/index.ts` file to add the summary to the R2 bucket:
```ts
async queue(batch, env) {
for(let message of batch.messages) {
// Extract the textual content from the PDF
// ...
// Use Workers AI to summarize the content
// ...
// Add the summary to the R2 bucket
const upload = await env.MY_BUCKET.put(`${message.body.object.key}-summary.txt`, summary, {
httpMetadata: {
contentType: 'text/plain',
},
});
console.log(`Summary added to the R2 bucket: ${upload.key}`);
}
}
```
The queue handler now adds the summary to the R2 bucket as a text file.
## 9. Enable event notifications
Your `queue` handler is ready to handle incoming event notification messages. You need to enable event notifications with the [`wrangler r2 bucket notification create` command](https://developers.cloudflare.com/workers/wrangler/commands/#r2-bucket-notification-create) for your bucket. The following command creates an event notification for the `object-create` event type for the `pdf` suffix:
```sh
npx wrangler r2 bucket notification create --event-type object-create --queue pdf-summarizer --suffix "pdf"
```
Replace `` with the name of your R2 bucket.
An event notification is created for the `pdf` suffix. When a new file with the `pdf` suffix is uploaded to the R2 bucket, the `pdf-summarizer` queue is triggered.
## 10. Deploy your Worker
To deploy your Worker, run the [`wrangler deploy`](https://developers.cloudflare.com/workers/wrangler/commands/#deploy) command:
```sh
npx wrangler deploy
```
In the output of the `wrangler deploy` command, copy the URL. This is the URL of your deployed application.
## 11. Test
To test the application, navigate to the URL of your deployed application and upload a PDF file. Alternatively, you can use the [Cloudflare dashboard](https://dash.cloudflare.com/) to upload a PDF file.
To view the logs, you can use the [`wrangler tail`](https://developers.cloudflare.com/workers/wrangler/commands/#tail) command.
```sh
npx wrangler tail
```
You will see the logs in your terminal. You can also navigate to the Cloudflare dashboard and view the logs in the Workers Logs section.
If you check your R2 bucket, you will see the summary file.
## Conclusion
In this tutorial, you learned how to use R2 event notifications to process an object on upload. You created an application to upload a PDF file, and created a consumer Worker that creates a summary of the PDF file. You also learned how to use Workers AI to summarize the content of the PDF file, and upload the summary to the R2 bucket.
You can use the same approach to process other types of files, such as images, videos, and audio files. You can also use the same approach to process other types of events, such as object deletion, and object update.
If you want to view the code for this tutorial, you can find it on [GitHub](https://github.com/harshil1712/pdf-summarizer-r2-event-notification).
---
title: Log and store upload events in R2 with event notifications · Cloudflare R2 docs
description: This example provides a step-by-step guide on using event
notifications to capture and store R2 upload logs in a separate bucket.
lastUpdated: 2026-02-04T18:31:25.000Z
chatbotDeprioritize: false
tags: TypeScript
source_url:
html: https://developers.cloudflare.com/r2/tutorials/upload-logs-event-notifications/
md: https://developers.cloudflare.com/r2/tutorials/upload-logs-event-notifications/index.md
---
This example provides a step-by-step guide on using [event notifications](https://developers.cloudflare.com/r2/buckets/event-notifications/) to capture and store R2 upload logs in a separate bucket.

## 1. Install Wrangler
To begin, refer to [Install/Update Wrangler](https://developers.cloudflare.com/workers/wrangler/install-and-update/#install-wrangler) to install Wrangler, the Cloudflare Developer Platform CLI.
## 2. Create R2 buckets
You will need to create two R2 buckets:
* `example-upload-bucket`: When new objects are uploaded to this bucket, your [consumer Worker](https://developers.cloudflare.com/queues/get-started/#4-create-your-consumer-worker) will write logs.
* `example-log-sink-bucket`: Upload logs from `example-upload-bucket` will be written to this bucket.
To create the buckets, run the following Wrangler commands:
```sh
npx wrangler r2 bucket create example-upload-bucket
npx wrangler r2 bucket create example-log-sink-bucket
```
## 3. Create a queue
Event notifications capture changes to data in `example-upload-bucket`. You will need to create a new queue to receive notifications:
```sh
npx wrangler queues create example-event-notification-queue
```
## 4. Create a Worker
Before you enable event notifications for `example-upload-bucket`, you need to create a [consumer Worker](https://developers.cloudflare.com/queues/reference/how-queues-works/#create-a-consumer-worker) to receive the notifications.
Create a new Worker with C3 (`create-cloudflare` CLI). [C3](https://developers.cloudflare.com/pages/get-started/c3/) is a command-line tool designed to help you set up and deploy new applications, including Workers, to Cloudflare.
* npm
```sh
npm create cloudflare@latest -- consumer-worker
```
* yarn
```sh
yarn create cloudflare consumer-worker
```
* pnpm
```sh
pnpm create cloudflare@latest consumer-worker
```
For setup, select the following options:
* For *What would you like to start with?*, choose `Hello World example`.
* For *Which template would you like to use?*, choose `Worker only`.
* For *Which language do you want to use?*, choose `TypeScript`.
* For *Do you want to use git for version control?*, choose `Yes`.
* For *Do you want to deploy your application?*, choose `No` (we will be making some changes before deploying).
Then, move into your newly created directory:
```sh
cd consumer-worker
```
## 5. Configure your Worker
In your Worker project's \[[Wrangler configuration file](https://developers.cloudflare.com/workers/wrangler/configuration/)]\(/workers/wrangler/configuration/), add a [queue consumer](https://developers.cloudflare.com/workers/wrangler/configuration/#queues) and [R2 bucket binding](https://developers.cloudflare.com/workers/wrangler/configuration/#r2-buckets). The queues consumer bindings will register your Worker as a consumer of your future event notifications and the R2 bucket bindings will allow your Worker to access your R2 bucket.
* wrangler.jsonc
```jsonc
{
"$schema": "./node_modules/wrangler/config-schema.json",
"name": "event-notification-writer",
"main": "src/index.ts",
"compatibility_date": "2026-02-14",
"compatibility_flags": [
"nodejs_compat"
],
"queues": {
"consumers": [
{
"queue": "example-event-notification-queue",
"max_batch_size": 100,
"max_batch_timeout": 5
}
]
},
"r2_buckets": [
{
"binding": "LOG_SINK",
"bucket_name": "example-log-sink-bucket"
}
]
}
```
* wrangler.toml
```toml
"$schema" = "./node_modules/wrangler/config-schema.json"
name = "event-notification-writer"
main = "src/index.ts"
compatibility_date = "2026-02-14"
compatibility_flags = [ "nodejs_compat" ]
[[queues.consumers]]
queue = "example-event-notification-queue"
max_batch_size = 100
max_batch_timeout = 5
[[r2_buckets]]
binding = "LOG_SINK"
bucket_name = "example-log-sink-bucket"
```
## 6. Write event notification messages to R2
Add a [`queue` handler](https://developers.cloudflare.com/queues/configuration/javascript-apis/#consumer) to `src/index.ts` to handle writing batches of notifications to our log sink bucket (you do not need a [fetch handler](https://developers.cloudflare.com/workers/runtime-apis/handlers/fetch/)):
```ts
export interface Env {
LOG_SINK: R2Bucket;
}
export default {
async queue(batch, env): Promise {
const batchId = new Date().toISOString().replace(/[:.]/g, "-");
const fileName = `upload-logs-${batchId}.json`;
// Serialize the entire batch of messages to JSON
const fileContent = new TextEncoder().encode(
JSON.stringify(batch.messages),
);
// Write the batch of messages to R2
await env.LOG_SINK.put(fileName, fileContent, {
httpMetadata: {
contentType: "application/json",
},
});
},
} satisfies ExportedHandler;
```
## 7. Deploy your Worker
To deploy your consumer Worker, run the [`wrangler deploy`](https://developers.cloudflare.com/workers/wrangler/commands/#deploy) command:
```sh
npx wrangler deploy
```
## 8. Enable event notifications
Now that you have your consumer Worker ready to handle incoming event notification messages, you need to enable event notifications with the [`wrangler r2 bucket notification create` command](https://developers.cloudflare.com/workers/wrangler/commands/#r2-bucket-notification-create) for `example-upload-bucket`:
```sh
npx wrangler r2 bucket notification create example-upload-bucket --event-type object-create --queue example-event-notification-queue
```
## 9. Test
Now you can test the full end-to-end flow by uploading an object to `example-upload-bucket` in the Cloudflare dashboard. After you have uploaded an object, logs will appear in `example-log-sink-bucket` in a few seconds.
---
title: S3 API compatibility · Cloudflare R2 docs
description: >-
R2 implements the S3 API to allow users and their applications to migrate with
ease. When comparing to AWS S3, Cloudflare has removed some API operations'
features and added others. The S3 API operations are listed below with their
current implementation status. Feature implementation is currently in
progress. Refer back to this page for updates.
The API is available via the https://.r2.cloudflarestorage.com
endpoint. Find your account ID in the Cloudflare dashboard.
lastUpdated: 2025-07-07T17:37:12.000Z
chatbotDeprioritize: false
source_url:
html: https://developers.cloudflare.com/r2/api/s3/api/
md: https://developers.cloudflare.com/r2/api/s3/api/index.md
---
R2 implements the S3 API to allow users and their applications to migrate with ease. When comparing to AWS S3, Cloudflare has removed some API operations' features and added others. The S3 API operations are listed below with their current implementation status. Feature implementation is currently in progress. Refer back to this page for updates. The API is available via the `https://.r2.cloudflarestorage.com` endpoint. Find your [account ID in the Cloudflare dashboard](https://developers.cloudflare.com/fundamentals/account/find-account-and-zone-ids/).
## How to read this page
This page has two sections: bucket-level operations and object-level operations.
Each section will have two tables: a table of implemented APIs and a table of unimplemented APIs.
Refer the feature column of each table to review which features of an API have been implemented and which have not.
✅ Feature Implemented\
🚧 Feature Implemented (Experimental)\
⌠Feature Not Implemented
## Bucket region
When using the S3 API, the region for an R2 bucket is `auto`. For compatibility with tools that do not allow you to specify a region, an empty value and `us-east-1` will alias to the `auto` region.
This also applies to the `LocationConstraint` for the `CreateBucket` API.
## Checksum Types
Checksums have an algorithm and a [type](https://docs.aws.amazon.com/AmazonS3/latest/userguide/checking-object-integrity.html#ChecksumTypes). Refer to the table below.
| Checksum Algorithm | `FULL_OBJECT` | `COMPOSITE` |
| - | - | - |
| CRC-64/NVME (`CRC64NVME`) | ✅ | ⌠|
| CRC-32 (`CRC32`) | ⌠| ✅ |
| CRC-32C (`CRC32C`) | ⌠| ✅ |
| SHA-1 (`SHA1`) | ⌠| ✅ |
| SHA-256 (`SHA256`) | ⌠| ✅ |
## Bucket-level operations
The following tables are related to bucket-level operations.
### Implemented bucket-level operations
Below is a list of implemented bucket-level operations. Refer to the Feature column to review which features have been implemented (✅) and have not been implemented (âŒ).
| API Name | Feature |
| - | - |
| ✅ [ListBuckets](https://docs.aws.amazon.com/AmazonS3/latest/API/API_ListBuckets.html) | |
| ✅ [HeadBucket](https://docs.aws.amazon.com/AmazonS3/latest/API/API_HeadBucket.html) | ⌠Bucket Owner:   ⌠x-amz-expected-bucket-owner |
| ✅ [CreateBucket](https://docs.aws.amazon.com/AmazonS3/latest/API/API_CreateBucket.html) | ⌠ACL:   ⌠x-amz-acl   ⌠x-amz-grant-full-control   ⌠x-amz-grant-read   ⌠x-amz-grant-read-acp   ⌠x-amz-grant-write   ⌠x-amz-grant-write-acp ⌠Object Locking:   ⌠x-amz-bucket-object-lock-enabled ⌠Bucket Owner:   ⌠x-amz-expected-bucket-owner |
| ✅ [DeleteBucket](https://docs.aws.amazon.com/AmazonS3/latest/API/API_DeleteBucket.html) | ⌠Bucket Owner:   ⌠x-amz-expected-bucket-owner |
| ✅ [DeleteBucketCors](https://docs.aws.amazon.com/AmazonS3/latest/API/API_DeleteBucketCors.html) | ⌠Bucket Owner:   ⌠x-amz-expected-bucket-owner |
| ✅ [GetBucketCors](https://docs.aws.amazon.com/AmazonS3/latest/API/API_GetBucketCors.html) | ⌠Bucket Owner:   ⌠x-amz-expected-bucket-owner |
| ✅ [GetBucketLifecycleConfiguration](https://docs.aws.amazon.com/AmazonS3/latest/API/API_GetBucketLifecycleConfiguration.html) | ⌠Bucket Owner:   ⌠x-amz-expected-bucket-owner |
| ✅ [GetBucketLocation](https://docs.aws.amazon.com/AmazonS3/latest/API/API_GetBucketLocation.html) | ⌠Bucket Owner:   ⌠x-amz-expected-bucket-owner |
| ✅ [GetBucketEncryption](https://docs.aws.amazon.com/AmazonS3/latest/API/API_GetBucketEncryption.html) | ⌠Bucket Owner: ⌠x-amz-expected-bucket-owner |
| ✅ [PutBucketCors](https://docs.aws.amazon.com/AmazonS3/latest/API/API_PutBucketCors.html) | ⌠Checksums:   ⌠x-amz-sdk-checksum-algorithm   ⌠x-amz-checksum-algorithm ⌠Bucket Owner:   ⌠x-amz-expected-bucket-owner |
| ✅ [PutBucketLifecycleConfiguration](https://docs.aws.amazon.com/AmazonS3/latest/API/API_PutBucketLifecycleConfiguration.html) | ⌠Checksums:   ⌠x-amz-sdk-checksum-algorithm   ⌠x-amz-checksum-algorithm ⌠Bucket Owner:   ⌠x-amz-expected-bucket-owner |
### Unimplemented bucket-level operations
Unimplemented bucket-level operations
| API Name | Feature |
| - | - |
| ⌠[GetBucketAccelerateConfiguration](https://docs.aws.amazon.com/AmazonS3/latest/API/API_GetBucketAccelerateConfiguration.html) | ⌠Bucket Owner:   ⌠x-amz-expected-bucket-owner |
| ⌠[GetBucketAcl](https://docs.aws.amazon.com/AmazonS3/latest/API/API_GetBucketAcl.html) | ⌠Bucket Owner:   ⌠x-amz-expected-bucket-owner |
| ⌠[GetBucketAnalyticsConfiguration](https://docs.aws.amazon.com/AmazonS3/latest/API/API_GetBucketAnalyticsConfiguration.html) | ⌠id ⌠Bucket Owner:   ⌠x-amz-expected-bucket-owner |
| ⌠[GetBucketIntelligentTieringConfiguration](https://docs.aws.amazon.com/AmazonS3/latest/API/API_GetBucketIntelligentTieringConfiguration.html) | ⌠id |
| ⌠[GetBucketInventoryConfiguration](https://docs.aws.amazon.com/AmazonS3/latest/API/API_GetBucketInventoryConfiguration.html) | ⌠id ⌠Bucket Owner:   ⌠x-amz-expected-bucket-owner |
| ⌠[GetBucketLifecycle](https://docs.aws.amazon.com/AmazonS3/latest/API/API_GetBucketLifecycle.html) | ⌠Bucket Owner:   ⌠x-amz-expected-bucket-owner |
| ⌠[GetBucketLogging](https://docs.aws.amazon.com/AmazonS3/latest/API/API_GetBucketLogging.html) | ⌠Bucket Owner:   ⌠x-amz-expected-bucket-owner |
| ⌠[GetBucketMetricsConfiguration](https://docs.aws.amazon.com/AmazonS3/latest/API/API_GetBucketMetricsConfiguration.html) | ⌠id ⌠Bucket Owner:   ⌠x-amz-expected-bucket-owner |
| ⌠[GetBucketNotification](https://docs.aws.amazon.com/AmazonS3/latest/API/API_GetBucketNotification.html) | ⌠Bucket Owner:   ⌠x-amz-expected-bucket-owner |
| ⌠[GetBucketNotificationConfiguration](https://docs.aws.amazon.com/AmazonS3/latest/API/API_GetBucketNotificationConfiguration.html) | ⌠Bucket Owner:   ⌠x-amz-expected-bucket-owner |
| ⌠[GetBucketOwnershipControls](https://docs.aws.amazon.com/AmazonS3/latest/API/API_GetBucketOwnershipControls.html) | ⌠Bucket Owner:   ⌠x-amz-expected-bucket-owner |
| ⌠[GetBucketPolicy](https://docs.aws.amazon.com/AmazonS3/latest/API/API_GetBucketPolicy.html) | ⌠Bucket Owner:   ⌠x-amz-expected-bucket-owner |
| ⌠[GetBucketPolicyStatus](https://docs.aws.amazon.com/AmazonS3/latest/API/API_GetBucketPolicyStatus.html) | ⌠Bucket Owner:   ⌠x-amz-expected-bucket-owner |
| ⌠[GetBucketReplication](https://docs.aws.amazon.com/AmazonS3/latest/API/API_GetBucketReplication.html) | ⌠Bucket Owner:   ⌠x-amz-expected-bucket-owner |
| ⌠[GetBucketRequestPayment](https://docs.aws.amazon.com/AmazonS3/latest/API/API_GetBucketRequestPayment.html) | ⌠Bucket Owner:   ⌠x-amz-expected-bucket-owner |
| ⌠[GetBucketTagging](https://docs.aws.amazon.com/AmazonS3/latest/API/API_GetBucketTagging.html) | ⌠Bucket Owner:   ⌠x-amz-expected-bucket-owner |
| ⌠[GetBucketVersioning](https://docs.aws.amazon.com/AmazonS3/latest/API/API_GetBucketVersioning.html) | ⌠Bucket Owner:   ⌠x-amz-expected-bucket-owner |
| ⌠[GetBucketWebsite](https://docs.aws.amazon.com/AmazonS3/latest/API/API_GetBucketWebsite.html) | ⌠Bucket Owner:   ⌠x-amz-expected-bucket-owner |
| ⌠[GetObjectLockConfiguration](https://docs.aws.amazon.com/AmazonS3/latest/API/API_GetObjectLockConfiguration.html) | ⌠Bucket Owner:   ⌠x-amz-expected-bucket-owner |
| ⌠[GetPublicAccessBlock](https://docs.aws.amazon.com/AmazonS3/latest/API/API_GetPublicAccessBlock.html) | ⌠Bucket Owner:   ⌠x-amz-expected-bucket-owner |
| ⌠[ListBucketAnalyticsConfigurations](https://docs.aws.amazon.com/AmazonS3/latest/API/API_ListBucketAnalyticsConfigurations.html) | ⌠Query Parameters:   ⌠continuation-token ⌠Bucket Owner:   ⌠x-amz-expected-bucket-owner |
| ⌠[ListBucketIntelligentTieringConfigurations](https://docs.aws.amazon.com/AmazonS3/latest/API/API_ListBucketIntelligentTieringConfigurations.html) | ⌠Query Parameters:   ⌠continuation-token ⌠Bucket Owner:   ⌠x-amz-expected-bucket-owner |
| ⌠[ListBucketInventoryConfigurations](https://docs.aws.amazon.com/AmazonS3/latest/API/API_ListBucketInventoryConfigurations.html) | ⌠Query Parameters:   ⌠continuation-token ⌠Bucket Owner:   ⌠x-amz-expected-bucket-owner |
| ⌠[ListBucketMetricsConfigurations](https://docs.aws.amazon.com/AmazonS3/latest/API/API_ListBucketMetricsConfigurations.html) | ⌠Query Parameters:   ⌠continuation-token ⌠Bucket Owner:   ⌠x-amz-expected-bucket-owner |
| ⌠[PutBucketAccelerateConfiguration](https://docs.aws.amazon.com/AmazonS3/latest/API/API_PutBucketAccelerateConfiguration.html) | ⌠Checksums:   ⌠x-amz-checksum-algorithm ⌠Bucket Owner:   ⌠x-amz-expected-bucket-owner |
| ⌠[PutBucketAcl](https://docs.aws.amazon.com/AmazonS3/latest/API/API_PutBucketAcl.html) | ⌠Permissions:   ⌠x-amz-grant-full-control   ⌠x-amz-grant-read   ⌠x-amz-grant-read-acp   ⌠x-amz-grant-write   ⌠x-amz-grant-write-acp ⌠Checksums:   ⌠x-amz-sdk-checksum-algorithm   ⌠x-amz-checksum-algorithm ⌠Bucket Owner:   ⌠x-amz-expected-bucket-owner |
| ⌠[PutBucketAnalyticsConfiguration](https://docs.aws.amazon.com/AmazonS3/latest/API/API_PutBucketAnalyticsConfiguration.html) | ⌠id ⌠Bucket Owner:   ⌠x-amz-expected-bucket-owner |
| ⌠[PutBucketEncryption](https://docs.aws.amazon.com/AmazonS3/latest/API/API_PutBucketEncryption.html) | ⌠Checksums:   ⌠x-amz-sdk-checksum-algorithm   ⌠x-amz-checksum-algorithm ⌠Bucket Owner:   ⌠x-amz-expected-bucket-owner |
| ⌠[PutBucketIntelligentTieringConfiguration](https://docs.aws.amazon.com/AmazonS3/latest/API/API_PutBucketIntelligentTieringConfiguration.html) | ⌠id ⌠Bucket Owner:   ⌠x-amz-expected-bucket-owner |
| ⌠[PutBucketInventoryConfiguration](https://docs.aws.amazon.com/AmazonS3/latest/API/API_PutBucketInventoryConfiguration.html) | ⌠id ⌠Bucket Owner:   ⌠x-amz-expected-bucket-owner |
| ⌠[PutBucketLifecycle](https://docs.aws.amazon.com/AmazonS3/latest/API/API_PutBucketLifecycle.html) | ⌠Checksums:   ⌠x-amz-sdk-checksum-algorithm   ⌠x-amz-checksum-algorithm ⌠Bucket Owner:   ⌠x-amz-expected-bucket-owner |
| ⌠[PutBucketLogging](https://docs.aws.amazon.com/AmazonS3/latest/API/API_PutBucketLifecycle.html) | ⌠Checksums:   ⌠Content-MD5   ⌠x-amz-sdk-checksum-algorithm   ⌠x-amz-checksum-algorithm ⌠Bucket Owner:   ⌠x-amz-expected-bucket-owner |
| ⌠[PutBucketMetricsConfiguration](https://docs.aws.amazon.com/AmazonS3/latest/API/API_PutBucketMetricsConfiguration.html) | ⌠id ⌠Bucket Owner:   ⌠x-amz-expected-bucket-owner |
| ⌠[PutBucketNotification](https://docs.aws.amazon.com/AmazonS3/latest/API/API_PutBucketNotification.html) | ⌠Checksums:   ⌠Content-MD5   ⌠x-amz-sdk-checksum-algorithm   ⌠x-amz-checksum-algorithm ⌠Bucket Owner:   ⌠x-amz-expected-bucket-owner |
| ⌠[PutBucketNotificationConfiguration](https://docs.aws.amazon.com/AmazonS3/latest/API/API_PutBucketNotificationConfiguration.html) | ⌠Validation:   ⌠x-amz-skip-destination-validation ⌠Bucket Owner:   ⌠x-amz-expected-bucket-owner |
| ⌠[PutBucketOwnershipControls](https://docs.aws.amazon.com/AmazonS3/latest/API/API_PutBucketOwnershipControls.html) | ⌠Checksums:   ⌠Content-MD5 ⌠Bucket Owner:   ⌠x-amz-expected-bucket-owner |
| ⌠[PutBucketPolicy](https://docs.aws.amazon.com/AmazonS3/latest/API/API_PutBucketPolicy.html) | ⌠Validation:   ⌠x-amz-confirm-remove-self-bucket-access ⌠Checksums:   ⌠Content-MD5   ⌠x-amz-sdk-checksum-algorithm   ⌠x-amz-checksum-algorithm ⌠Bucket Owner:   ⌠x-amz-expected-bucket-owner |
| ⌠[PutBucketReplication](https://docs.aws.amazon.com/AmazonS3/latest/API/API_PutBucketReplication.html) | ⌠Object Locking:   ⌠x-amz-bucket-object-lock-token ⌠Checksums:   ⌠Content-MD5   ⌠x-amz-sdk-checksum-algorithm   ⌠x-amz-checksum-algorithm ⌠Bucket Owner:   ⌠x-amz-expected-bucket-owner |
| ⌠[PutBucketRequestPayment](https://docs.aws.amazon.com/AmazonS3/latest/API/API_PutBucketRequestPayment.html) | ⌠Checksums:   ⌠Content-MD5   ⌠x-amz-sdk-checksum-algorithm   ⌠x-amz-checksum-algorithm ⌠Bucket Owner:   ⌠x-amz-expected-bucket-owner |
| ⌠[PutBucketTagging](https://docs.aws.amazon.com/AmazonS3/latest/API/API_PutBucketTagging.html) | ⌠Checksums:   ⌠Content-MD5   ⌠x-amz-sdk-checksum-algorithm   ⌠x-amz-checksum-algorithm ⌠Bucket Owner:   ⌠x-amz-expected-bucket-owner |
| ⌠[PutBucketVersioning](https://docs.aws.amazon.com/AmazonS3/latest/API/API_PutBucketVersioning.html) | ⌠Multi-factor authentication:   ⌠x-amz-mfa ⌠Checksums:   ⌠Content-MD5   ⌠x-amz-sdk-checksum-algorithm   ⌠x-amz-checksum-algorithm ⌠Bucket Owner:   ⌠x-amz-expected-bucket-owner |
| ⌠[PutBucketWebsite](https://docs.aws.amazon.com/AmazonS3/latest/API/API_PutBucketWebsite.html) | ⌠Checksums:   ⌠Content-MD5 ⌠Bucket Owner: ⌠x-amz-expected-bucket-owner |
| ⌠[PutObjectLockConfiguration](https://docs.aws.amazon.com/AmazonS3/latest/API/API_PutObjectLockConfiguration.html) | ⌠Object Locking:   ⌠x-amz-bucket-object-lock-token ⌠Checksums:   ⌠Content-MD5 ⌠Request Payer:   ⌠x-amz-request-payer ⌠Bucket Owner:   ⌠x-amz-expected-bucket-owner |
| ⌠[PutPublicAccessBlock](https://docs.aws.amazon.com/AmazonS3/latest/API/API_PutPublicAccessBlock.html) | ⌠Checksums:   ⌠Content-MD5   ⌠x-amz-sdk-checksum-algorithm   ⌠x-amz-checksum-algorithm ⌠Bucket Owner:   ⌠x-amz-expected-bucket-owner |
## Object-level operations
The following tables are related to object-level operations.
### Implemented object-level operations
Below is a list of implemented object-level operations. Refer to the Feature column to review which features have been implemented (✅) and have not been implemented (âŒ).
| API Name | Feature |
| - | - |
| ✅ [HeadObject](https://docs.aws.amazon.com/AmazonS3/latest/API/API_HeadObject.html) | ✅ Conditional Operations:   ✅ If-Match   ✅ If-Modified-Since   ✅ If-None-Match   ✅ If-Unmodified-Since ✅ Range:   ✅ Range (has no effect in HeadObject)   ✅ partNumber ✅ SSE-C:   ✅ x-amz-server-side-encryption-customer-algorithm   ✅ x-amz-server-side-encryption-customer-key   ✅ x-amz-server-side-encryption-customer-key-MD5 ⌠Request Payer:   ⌠x-amz-request-payer ⌠Bucket Owner:   ⌠x-amz-expected-bucket-owner |
| ✅ [ListObjects](https://docs.aws.amazon.com/AmazonS3/latest/API/API_ListObjects.html) | Query Parameters:   ✅ delimiter   ✅ encoding-type   ✅ marker   ✅ max-keys   ✅ prefix ⌠Request Payer:   ⌠x-amz-request-payer ⌠Bucket Owner:   ⌠x-amz-expected-bucket-owner |
| ✅ [ListObjectsV2](https://docs.aws.amazon.com/AmazonS3/latest/API/API_ListObjectsV2.html) | Query Parameters:   ✅ list-type   ✅ continuation-token   ✅ delimiter   ✅ encoding-type   ✅ fetch-owner   ✅ max-keys   ✅ prefix   ✅ start-after ⌠Request Payer:   ⌠x-amz-request-payer ⌠Bucket Owner:   ⌠x-amz-expected-bucket-owner |
| ✅ [GetObject](https://docs.aws.amazon.com/AmazonS3/latest/API/API_GetObject.html) | ✅ Conditional Operations:   ✅ If-Match   ✅ If-Modified-Since   ✅ If-None-Match   ✅ If-Unmodified-Since ✅ Range:   ✅ Range   ✅ PartNumber ✅ SSE-C:   ✅ x-amz-server-side-encryption-customer-algorithm   ✅ x-amz-server-side-encryption-customer-key   ✅ x-amz-server-side-encryption-customer-key-MD5 ⌠Request Payer:   ⌠x-amz-request-payer ⌠Bucket Owner:   ⌠x-amz-expected-bucket-owner |
| ✅ [PutObject](https://docs.aws.amazon.com/AmazonS3/latest/API/API_PutObject.html) | ✅ System Metadata:   ✅ Content-Type   ✅ Cache-Control   ✅ Content-Disposition   ✅ Content-Encoding   ✅ Content-Language   ✅ Expires   ✅ Content-MD5 ✅ Storage Class:   ✅ x-amz-storage-class     ✅ STANDARD     ✅ STANDARD\_IA ⌠Object Lifecycle ⌠Website:   ⌠x-amz-website-redirect-location ⌠SSE:   ⌠x-amz-server-side-encryption-aws-kms-key-id   ⌠x-amz-server-side-encryption   ⌠x-amz-server-side-encryption-context   ⌠x-amz-server-side-encryption-bucket-key-enabled ✅ SSE-C:   ✅ x-amz-server-side-encryption-customer-algorithm   ✅ x-amz-server-side-encryption-customer-key   ✅ x-amz-server-side-encryption-customer-key-MD5 ⌠Request Payer:   ⌠x-amz-request-payer ⌠Tagging:   ⌠x-amz-tagging ⌠Object Locking:   ⌠x-amz-object-lock-mode   ⌠x-amz-object-lock-retain-until-date   ⌠x-amz-object-lock-legal-hold ⌠ACL:   ⌠x-amz-acl   ⌠x-amz-grant-full-control   ⌠x-amz-grant-read   ⌠x-amz-grant-read-acp   ⌠x-amz-grant-write-acp ⌠Bucket Owner:   ⌠x-amz-expected-bucket-owner |
| ✅ [DeleteObject](https://docs.aws.amazon.com/AmazonS3/latest/API/API_DeleteObject.html) | ⌠Multi-factor authentication:   ⌠x-amz-mfa ⌠Object Locking:   ⌠x-amz-bypass-governance-retention ⌠Request Payer:   ⌠x-amz-request-payer ⌠Bucket Owner:   ⌠x-amz-expected-bucket-owner |
| ✅ [DeleteObjects](https://docs.aws.amazon.com/AmazonS3/latest/API/API_DeleteObjects.html) | ⌠Multi-factor authentication:   ⌠x-amz-mfa ⌠Object Locking:   ⌠x-amz-bypass-governance-retention ⌠Request Payer:   ⌠x-amz-request-payer ⌠Bucket Owner:   ⌠x-amz-expected-bucket-owner |
| ✅ [ListMultipartUploads](https://docs.aws.amazon.com/AmazonS3/latest/API/API_ListMultipartUploads.html) | ✅ Query Parameters:   ✅ delimiter   ✅ encoding-type   ✅ key-marker   âœ…ï¸ max-uploads   ✅ prefix   ✅ upload-id-marker |
| ✅ [CreateMultipartUpload](https://docs.aws.amazon.com/AmazonS3/latest/API/API_CreateMultipartUpload.html) | ✅ System Metadata:   ✅ Content-Type   ✅ Cache-Control   ✅ Content-Disposition   ✅ Content-Encoding   ✅ Content-Language   ✅ Expires   ✅ Content-MD5 ✅ Storage Class:   ✅ x-amz-storage-class     ✅ STANDARD     ✅ STANDARD\_IA ⌠Website:   ⌠x-amz-website-redirect-location ⌠SSE:   ⌠x-amz-server-side-encryption-aws-kms-key-id   ⌠x-amz-server-side-encryption   ⌠x-amz-server-side-encryption-context   ⌠x-amz-server-side-encryption-bucket-key-enabled ✅ SSE-C:   ✅ x-amz-server-side-encryption-customer-algorithm   ✅ x-amz-server-side-encryption-customer-key   ✅ x-amz-server-side-encryption-customer-key-MD5 ⌠Request Payer:   ⌠x-amz-request-payer ⌠Tagging:   ⌠x-amz-tagging ⌠Object Locking:   ⌠x-amz-object-lock-mode   ⌠x-amz-object-lock-retain-until-date   ⌠x-amz-object-lock-legal-hold ⌠ACL:   ⌠x-amz-acl   ⌠x-amz-grant-full-control   ⌠x-amz-grant-read   ⌠x-amz-grant-read-acp   ⌠x-amz-grant-write-acp ⌠Bucket Owner:   ⌠x-amz-expected-bucket-owner |
| ✅ [CompleteMultipartUpload](https://docs.aws.amazon.com/AmazonS3/latest/API/API_CompleteMultipartUpload.html) | ⌠Bucket Owner:   ⌠x-amz-expected-bucket-owner ⌠Request Payer:   ⌠x-amz-request-payer |
| ✅ [AbortMultipartUpload](https://docs.aws.amazon.com/AmazonS3/latest/API/API_AbortMultipartUpload.html) | ⌠Request Payer:   ⌠x-amz-request-payer |
| ✅ [CopyObject](https://docs.aws.amazon.com/AmazonS3/latest/API/API_CopyObject.html) | ✅ Operation Metadata:   ✅ x-amz-metadata-directive ✅ System Metadata:   ✅ Content-Type   ✅ Cache-Control   ✅ Content-Disposition   ✅ Content-Encoding   ✅ Content-Language   ✅ Expires ✅ Conditional Operations:   ✅ x-amz-copy-source   ✅ x-amz-copy-source-if-match   ✅ x-amz-copy-source-if-modified-since   ✅ x-amz-copy-source-if-none-match   ✅ x-amz-copy-source-if-unmodified-since ✅ Storage Class:   ✅ x-amz-storage-class     ✅ STANDARD     ✅ STANDARD\_IA ⌠ACL:   ⌠x-amz-acl   ⌠x-amz-grant-full-control   ⌠x-amz-grant-read   ⌠x-amz-grant-read-acp   ⌠x-amz-grant-write-acp ⌠Website:   ⌠x-amz-website-redirect-location ⌠SSE:   ⌠x-amz-server-side-encryption   ⌠x-amz-server-side-encryption-aws-kms-key-id   ⌠x-amz-server-side-encryption-context   ⌠x-amz-server-side-encryption-bucket-key-enabled ✅ SSE-C:   ✅ x-amz-server-side-encryption-customer-algorithm   ✅ x-amz-server-side-encryption-customer-key   ✅ x-amz-server-side-encryption-customer-key-MD5   ✅ x-amz-copy-source-server-side-encryption-customer-algorithm   ✅ x-amz-copy-source-server-side-encryption-customer-key   ✅ x-amz-copy-source-server-side-encryption-customer-key-MD5 ⌠Request Payer:   ⌠x-amz-request-payer ⌠Tagging:   ⌠x-amz-tagging   ⌠x-amz-tagging-directive ⌠Object Locking:   ⌠x-amz-object-lock-mode   ⌠x-amz-object-lock-retain-until-date   ⌠x-amz-object-lock-legal-hold ⌠Bucket Owner:   ⌠x-amz-expected-bucket-owner   ⌠x-amz-source-expected-bucket-owner ⌠Checksums:   ⌠x-amz-checksum-algorithm |
| ✅ [UploadPart](https://docs.aws.amazon.com/AmazonS3/latest/API/API_UploadPart.html) | ✅ System Metadata:   ✅ Content-MD5 ⌠SSE:   ⌠x-amz-server-side-encryption ✅ SSE-C:   ✅ x-amz-server-side-encryption-customer-algorithm   ✅ x-amz-server-side-encryption-customer-key   ✅ x-amz-server-side-encryption-customer-key-MD5 ⌠Request Payer:   ⌠x-amz-request-payer ⌠Bucket Owner:   ⌠x-amz-expected-bucket-owner |
| ✅ [UploadPartCopy](https://docs.aws.amazon.com/AmazonS3/latest/API/API_UploadPartCopy.html) | ⌠Conditional Operations:   ⌠x-amz-copy-source   ⌠x-amz-copy-source-if-match   ⌠x-amz-copy-source-if-modified-since   ⌠x-amz-copy-source-if-none-match   ⌠x-amz-copy-source-if-unmodified-since ✅ Range:   ✅ x-amz-copy-source-range ✅ SSE-C:   ✅ x-amz-server-side-encryption-customer-algorithm   ✅ x-amz-server-side-encryption-customer-key   ✅ x-amz-server-side-encryption-customer-key-MD5   ✅ x-amz-copy-source-server-side-encryption-customer-algorithm   ✅ x-amz-copy-source-server-side-encryption-customer-key   ✅ x-amz-copy-source-server-side-encryption-customer-key-MD5 ⌠Request Payer:   ⌠x-amz-request-payer ⌠Bucket Owner:   ⌠x-amz-expected-bucket-owner   ⌠x-amz-source-expected-bucket-owner |
| ✅ [ListParts](https://docs.aws.amazon.com/AmazonS3/latest/API/API_ListParts.html) | Query Parameters:   ✅ max-parts   ✅ part-number-marker ⌠Request Payer:   ⌠x-amz-request-payer ⌠Bucket Owner:   ⌠x-amz-expected-bucket-owner |
Warning
Even though `ListObjects` is a supported operation, it is recommended that you use `ListObjectsV2` instead when developing applications. For more information, refer to [ListObjects](https://docs.aws.amazon.com/AmazonS3/latest/API/API_ListObjects.html).
### Unimplemented object-level operations
Unimplemented object-level operations
| API Name | Feature |
| - | - |
| ⌠[GetObjectTagging](https://docs.aws.amazon.com/AmazonS3/latest/API/API_GetObjectTagging.html) | ⌠Bucket Owner:   ⌠x-amz-expected-bucket-owner ⌠Request Payer:   ⌠x-amz-request-payer |
| ⌠[PutObjectTagging](https://docs.aws.amazon.com/AmazonS3/latest/API/API_PutObjectTagging.html) | ⌠Bucket Owner:   ⌠x-amz-expected-bucket-owner ⌠Request Payer:   ⌠x-amz-request-payer ⌠Checksums:   ⌠x-amz-sdk-checksum-algorithm |
| ⌠[DeleteObjectTagging](https://docs.aws.amazon.com/AmazonS3/latest/API/API_DeleteObjectTagging.html) | ⌠Bucket Owner:   ⌠x-amz-expected-bucket-owner |
---
title: Extensions · Cloudflare R2 docs
description: R2 implements some extensions on top of the basic S3 API. This page
outlines these additional, available features. Some of the functionality
described in this page requires setting a custom header. For examples on how
to do so, refer to Configure custom headers.
lastUpdated: 2025-04-08T15:24:25.000Z
chatbotDeprioritize: false
source_url:
html: https://developers.cloudflare.com/r2/api/s3/extensions/
md: https://developers.cloudflare.com/r2/api/s3/extensions/index.md
---
R2 implements some extensions on top of the basic S3 API. This page outlines these additional, available features. Some of the functionality described in this page requires setting a custom header. For examples on how to do so, refer to [Configure custom headers](https://developers.cloudflare.com/r2/examples/aws/custom-header).
## Extended metadata using Unicode
The [Workers R2 API](https://developers.cloudflare.com/r2/api/workers/workers-api-reference/) supports Unicode in keys and values natively without requiring any additional encoding or decoding for the `customMetadata` field. These fields map to the `x-amz-meta-`-prefixed headers used within the R2 S3-compatible API endpoint.
HTTP header names and values may only contain ASCII characters, which is a small subset of the Unicode character library. To easily accommodate users, R2 adheres to [RFC 2047](https://datatracker.ietf.org/doc/html/rfc2047) and automatically decodes all `x-amz-meta-*` header values before storage. On retrieval, any metadata values with unicode are RFC 2047-encoded before rendering the response. The length limit for metadata values is applied to the decoded Unicode value.
Metadata variance
Be mindful when using both Workers and S3 API endpoints to access the same data. If the R2 metadata keys contain Unicode, they are stripped when accessed through the S3 API and the `x-amz-missing-meta` header is set to the number of keys that were omitted.
These headers map to the `httpMetadata` field in the [R2 bindings](https://developers.cloudflare.com/workers/runtime-apis/bindings/):
| HTTP Header | Property Name |
| - | - |
| `Content-Encoding` | `httpMetadata.contentEncoding` |
| `Content-Type` | `httpMetadata.contentType` |
| `Content-Language` | `httpMetadata.contentLanguage` |
| `Content-Disposition` | `httpMetadata.contentDisposition` |
| `Cache-Control` | `httpMetadata.cacheControl` |
| `Expires` | `httpMetadata.expires` |
| | |
If using Unicode in object key names, refer to [Unicode Interoperability](https://developers.cloudflare.com/r2/reference/unicode-interoperability/).
## Auto-creating buckets on upload
If you are creating buckets on demand, you might initiate an upload with the assumption that a target bucket exists. In this situation, if you received a `NoSuchBucket` error, you would probably issue a `CreateBucket` operation. However, following this approach can cause issues: if the body has already been partially consumed, the upload will need to be aborted. A common solution to this issue, followed by other object storage providers, is to use the [HTTP `100`](https://developer.mozilla.org/en-US/docs/Web/HTTP/Reference/Status/100) response to detect whether the body should be sent, or if the bucket must be created before retrying the upload. However, Cloudflare does not support the HTTP `100` response. Even if the HTTP `100` response was supported, you would still have additional latency due to the round trips involved.
To support sending an upload with a streaming body to a bucket that may not exist yet, upload operations such as `PutObject` or `CreateMultipartUpload` allow you to specify a header that will ensure the `NoSuchBucket` error is not returned. If the bucket does not exist at the time of upload, it is implicitly instantiated with the following `CreateBucket` request:
```txt
PUT / HTTP/1.1
Host: bucket.account.r2.cloudflarestorage.com
auto
```
This is only useful if you are creating buckets on demand because you do not know the name of the bucket or the preferred access location ahead of time. For example, you have one bucket per one of your customers and the bucket is created on first upload to the bucket and not during account registration. In these cases, the [`ListBuckets` extension](#listbuckets), which supports accounts with more than 1,000 buckets, may also be useful.
## PutObject and CreateMultipartUpload
### cf-create-bucket-if-missing
Add a `cf-create-bucket-if-missing` header with the value `true` to implicitly create the bucket if it does not exist yet. Refer to [Auto-creating buckets on upload](#auto-creating-buckets-on-upload) for a more detailed explanation of when to add this header.
## PutObject
### Conditional operations in `PutObject`
`PutObject` supports [conditional uploads](https://developer.mozilla.org/en-US/docs/Web/HTTP/Conditional_requests) via the [`If-Match`](https://developer.mozilla.org/en-US/docs/Web/HTTP/Reference/Headers/If-Match), [`If-None-Match`](https://developer.mozilla.org/en-US/docs/Web/HTTP/Reference/Headers/If-None-Match), [`If-Modified-Since`](https://developer.mozilla.org/en-US/docs/Web/HTTP/Reference/Headers/If-Modified-Since), and [`If-Unmodified-Since`](https://developer.mozilla.org/en-US/docs/Web/HTTP/Reference/Headers/If-Unmodified-Since) headers. These headers will cause the `PutObject` operation to be rejected with `412 PreconditionFailed` error codes when the preceding state of the object that is being written to does not match the specified conditions.
## CopyObject
### MERGE metadata directive
The `x-amz-metadata-directive` allows a `MERGE` value, in addition to the standard `COPY` and `REPLACE` options. When used, `MERGE` is a combination of `COPY` and `REPLACE`, which will `COPY` any metadata keys from the source object and `REPLACE` those that are specified in the request with the new value. You cannot use `MERGE` to remove existing metadata keys from the source — use `REPLACE` instead.
## `ListBuckets`
`ListBuckets` supports all the same search parameters as `ListObjectsV2` in R2 because some customers may have more than 1,000 buckets. Because tooling, like existing S3 libraries, may not expose a way to set these search parameters, these values may also be sent in via headers. Values in headers take precedence over the search parameters.
| Search parameter | HTTP Header | Meaning |
| - | - | - |
| `prefix` | `cf-prefix` | Show buckets with this prefix only. |
| `start-after` | `cf-start-after` | Show buckets whose name appears lexicographically in the account. |
| `continuation-token` | `cf-continuation-token` | Resume listing from a previously returned continuation token. |
| `max-keys` | `cf-max-keys` | Return this maximum number of buckets. Default and max is `1000`. |
| | | |
The XML response contains a `NextContinuationToken` and `IsTruncated` elements as appropriate. Since these may not be accessible from existing S3 APIs, these are also available in response headers:
| XML Response Element | HTTP Response Header | Meaning |
| - | - | - |
| `IsTruncated` | `cf-is-truncated` | This is set to `true` if the list of buckets returned is not all the buckets on the account. |
| `NextContinuationToken` | `cf-next-continuation-token` | This is set to continuation token to pass on a subsequent `ListBuckets` to resume the listing. |
| `StartAfter` | | This is the start-after value that was passed in on the request. |
| `KeyCount` | | The number of buckets returned. |
| `ContinuationToken` | | The continuation token that was supplied in the request. |
| `MaxKeys` | | The max keys that were specified in the request. |
| | | |
### Conditional operations in `CopyObject` for the destination object
Note
This feature is currently in beta. If you have feedback, reach out to us on the [Cloudflare Developer Discord](https://discord.cloudflare.com) in the #r2-storage channel or open a thread on the [Community Forum](https://community.cloudflare.com/c/developers/storage/81).
`CopyObject` already supports conditions that relate to the source object through the `x-amz-copy-source-if-...` headers as part of our compliance with the S3 API. In addition to this, R2 supports an R2 specific set of headers that allow the `CopyObject` operation to be conditional on the target object:
* `cf-copy-destination-if-match`
* `cf-copy-destination-if-none-match`
* `cf-copy-destination-if-modified-since`
* `cf-copy-destination-if-unmodified-since`
These headers work akin to the similarly named conditional headers supported on `PutObject`. When the preceding state of the destination object to does not match the specified conditions the `CopyObject` operation will be rejected with a `412 PreconditionFailed` error code.
#### Non-atomicity relative to `x-amz-copy-source-if`
The `x-amz-copy-source-if-...` headers are guaranteed to be checked when the source object for the copy operation is selected, and the `cf-copy-destination-if-...` headers are guaranteed to be checked when the object is committed to the bucket state. However, the time at which the source object is selected for copying, and the point in time when the destination object is committed to the bucket state are not necessarily the same. This means that the `cf-copy-destination-if-...` headers are not atomic in relation to the `x-amz-copy-source-if...` headers.
---
title: Presigned URLs · Cloudflare R2 docs
description: Presigned URLs are an S3 concept for granting temporary access to
objects without exposing your API credentials. A presigned URL includes
signature parameters in the URL itself, authorizing anyone with the URL to
perform a specific operation (like GetObject or PutObject) on a specific
object until the URL expires.
lastUpdated: 2025-12-02T15:31:53.000Z
chatbotDeprioritize: false
source_url:
html: https://developers.cloudflare.com/r2/api/s3/presigned-urls/
md: https://developers.cloudflare.com/r2/api/s3/presigned-urls/index.md
---
Presigned URLs are an [S3 concept](https://docs.aws.amazon.com/AmazonS3/latest/userguide/using-presigned-url.html) for granting temporary access to objects without exposing your API credentials. A presigned URL includes signature parameters in the URL itself, authorizing anyone with the URL to perform a specific operation (like `GetObject` or `PutObject`) on a specific object until the URL expires.
They are ideal for granting temporary access to specific objects, such as allowing users to upload files directly to R2 or providing time-limited download links.
To generate a presigned URL, you specify:
1. **Resource identifier**: Account ID, bucket name, and object path
2. **Operation**: The S3 API operation permitted (GET, PUT, HEAD, or DELETE)
3. **Expiry**: Timeout from 1 second to 7 days (604,800 seconds)
Presigned URLs are generated client-side with no communication with R2, requiring only your R2 API credentials and an implementation of the AWS Signature Version 4 signing algorithm.
## Generate a presigned URL
### Prerequisites
* [Account ID](https://developers.cloudflare.com/fundamentals/account/find-account-and-zone-ids/) (for constructing the S3 endpoint URL)
* [R2 API token](https://developers.cloudflare.com/r2/api/tokens/) (Access Key ID and Secret Access Key)
* AWS SDK or compatible S3 client library
### SDK examples
* JavaScript
```ts
import { S3Client, GetObjectCommand, PutObjectCommand } from "@aws-sdk/client-s3";
import { getSignedUrl } from "@aws-sdk/s3-request-presigner";
const S3 = new S3Client({
region: "auto", // Required by SDK but not used by R2
// Provide your Cloudflare account ID
endpoint: `https://.r2.cloudflarestorage.com`,
// Retrieve your S3 API credentials for your R2 bucket via API tokens (see: https://developers.cloudflare.com/r2/api/tokens)
credentials: {
accessKeyId: '',
secretAccessKey: '',
},
});
// Generate presigned URL for reading (GET)
const getUrl = await getSignedUrl(
S3,
new GetObjectCommand({ Bucket: "my-bucket", Key: "image.png" }),
{ expiresIn: 3600 }, // Valid for 1 hour
);
// https://my-bucket..r2.cloudflarestorage.com/image.png?X-Amz-Algorithm=...
// Generate presigned URL for writing (PUT)
// Specify ContentType to restrict uploads to a specific file type
const putUrl = await getSignedUrl(
S3,
new PutObjectCommand({
Bucket: "my-bucket",
Key: "image.png",
ContentType: "image/png",
}),
{ expiresIn: 3600 },
);
```
* Python
```python
import boto3
s3 = boto3.client(
service_name="s3",
# Provide your Cloudflare account ID
endpoint_url='https://.r2.cloudflarestorage.com',
# Retrieve your S3 API credentials for your R2 bucket via API tokens (see: https://developers.cloudflare.com/r2/api/tokens)
aws_access_key_id='',
aws_secret_access_key='',
region_name="auto", # Required by SDK but not used by R2
)
# Generate presigned URL for reading (GET)
get_url = s3.generate_presigned_url(
'get_object',
Params={'Bucket': 'my-bucket', 'Key': 'image.png'},
ExpiresIn=3600 # Valid for 1 hour
)
# https://my-bucket..r2.cloudflarestorage.com/image.png?X-Amz-Algorithm=...
# Generate presigned URL for writing (PUT)
# Specify ContentType to restrict uploads to a specific file type
put_url = s3.generate_presigned_url(
'put_object',
Params={
'Bucket': 'my-bucket',
'Key': 'image.png',
'ContentType': 'image/png'
},
ExpiresIn=3600
)
```
* CLI
```sh
# Generate presigned URL for reading (GET)
# The AWS CLI presign command defaults to GET operations
aws s3 presign --endpoint-url https://.r2.cloudflarestorage.com \
s3://my-bucket/image.png \
--expires-in 3600
# Output:
# https://.r2.cloudflarestorage.com/my-bucket/image.png?X-Amz-Algorithm=AWS4-HMAC-SHA256&X-Amz-Credential=...
# Note: The AWS CLI presign command only supports GET operations.
# For PUT operations, use one of the SDK examples above.
```
For complete examples and additional operations, refer to the SDK-specific documentation:
* [AWS SDK for JavaScript](https://developers.cloudflare.com/r2/examples/aws/aws-sdk-js-v3/#generate-presigned-urls)
* [AWS SDK for Python (Boto3)](https://developers.cloudflare.com/r2/examples/aws/boto3/#generate-presigned-urls)
* [AWS CLI](https://developers.cloudflare.com/r2/examples/aws/aws-cli/#generate-presigned-urls)
* [AWS SDK for Go](https://developers.cloudflare.com/r2/examples/aws/aws-sdk-go/#generate-presigned-urls)
* [AWS SDK for PHP](https://developers.cloudflare.com/r2/examples/aws/aws-sdk-php/#generate-presigned-urls)
### Best practices
When generating presigned URLs, you can limit abuse and misuse by:
* **Restricting Content-Type**: Specify the allowed `Content-Type` in your SDK's parameters. The signature will include this header, so uploads will fail with a `403/SignatureDoesNotMatch` error if the client sends a different `Content-Type` for an upload request.
* **Configuring CORS**: If your presigned URLs will be used from a browser, set up [CORS rules](https://developers.cloudflare.com/r2/buckets/cors/#use-cors-with-a-presigned-url) on your bucket to control which origins can make requests.
## Using a presigned URL
Once generated, use a presigned URL like any HTTP endpoint. The signature is embedded in the URL, so no additional authentication headers are required.
```sh
# Download using a GET presigned URL
curl "https://my-bucket..r2.cloudflarestorage.com/image.png?X-Amz-Algorithm=..."
# Upload using a PUT presigned URL
curl -X PUT "https://my-bucket..r2.cloudflarestorage.com/image.png?X-Amz-Algorithm=..." \
--data-binary @image.png
```
You can also use presigned URLs directly in web browsers, mobile apps, or any HTTP client. The same presigned URL can be reused multiple times until it expires.
## Presigned URL example
The following is an example of a presigned URL that was created using R2 API credentials and following the AWS Signature Version 4 signing process:
```plaintext
https://my-bucket.123456789abcdef0123456789abcdef.r2.cloudflarestorage.com/photos/cat.png?X-Amz-Algorithm=AWS4-HMAC-SHA256&X-Amz-Content-Sha256=UNSIGNED-PAYLOAD&X-Amz-Credential=CFEXAMPLEKEY12345%2F20251201%2Fauto%2Fs3%2Faws4_request&X-Amz-Date=20251201T180512Z&X-Amz-Expires=3600&X-Amz-Signature=8c3ac40fa6c83d64b4516e0c9e5fa94c998bb79131be9ddadf90cefc5ec31033&X-Amz-SignedHeaders=host&x-amz-checksum-mode=ENABLED&x-id=GetObject
```
In this example, this presigned url performs a `GetObject` on the object `photos/cat.png` within bucket `my-bucket` in the account with id `123456789abcdef0123456789abcdef`. The key signature parameters that compose this presigned URL are:
* `X-Amz-Algorithm`: Identifies the algorithm used to sign the URL.
* `X-Amz-Credential`: Contains information about the credentials used to calculate the signature.
* `X-Amz-Date`: The date and time (in ISO 8601 format) when the signature was created.
* `X-Amz-Expires`: The duration in seconds that the presigned URL remains valid, starting from `X-Amz-Date`.
* `X-Amz-Signature`: The signature proving the URL was signed using the secret key.
* `X-Amz-SignedHeaders`: Lists the HTTP headers that were included in the signature calculation.
Note
The signature parameters (e.g. `X-Amz-Algorithm`, `X-Amz-Credential`, `X-Amz-Date`, `X-Amz-Expires`, `X-Amz-Signature`) cannot be tampered with. Attempting to modify the resource, operation, or expiry will result in a `403/SignatureDoesNotMatch` error.
## Supported operations
R2 supports presigned URLs for the following HTTP methods:
* `GET`: Fetch an object from a bucket
* `HEAD`: Fetch an object's metadata from a bucket
* `PUT`: Upload an object to a bucket
* `DELETE`: Delete an object from a bucket
`POST` (multipart form uploads via HTML forms) is not currently supported.
## Security considerations
Treat presigned URLs as bearer tokens. Anyone with the URL can perform the specified operation until it expires. Share presigned URLs only with intended recipients and consider using short expiration times for sensitive operations.
## Custom domains
Presigned URLs work with the S3 API domain (`.r2.cloudflarestorage.com`) and cannot be used with custom domains.
If you need authentication with R2 buckets accessed via custom domains (public buckets), use the [WAF HMAC validation feature](https://developers.cloudflare.com/ruleset-engine/rules-language/functions/#hmac-validation) (requires Pro plan or above).
## Related resources
[R2 API tokens ](https://developers.cloudflare.com/r2/api/tokens/)Create credentials for generating presigned URLs.
[Public buckets ](https://developers.cloudflare.com/r2/buckets/public-buckets/)Alternative approach for public read access without authentication.
[R2 bindings in Workers ](https://developers.cloudflare.com/r2/api/workers/workers-api-usage/)Alternative for server-side R2 access with built-in authentication.
[Storing user generated content ](https://developers.cloudflare.com/reference-architecture/diagrams/storage/storing-user-generated-content/)Architecture guide for handling user uploads with R2.
---
title: Workers API reference · Cloudflare R2 docs
description: The in-Worker R2 API is accessed by binding an R2 bucket to a
Worker. The Worker you write can expose external access to buckets via a route
or manipulate R2 objects internally.
lastUpdated: 2026-01-29T10:38:24.000Z
chatbotDeprioritize: false
source_url:
html: https://developers.cloudflare.com/r2/api/workers/workers-api-reference/
md: https://developers.cloudflare.com/r2/api/workers/workers-api-reference/index.md
---
The in-Worker R2 API is accessed by binding an R2 bucket to a [Worker](https://developers.cloudflare.com/workers). The Worker you write can expose external access to buckets via a route or manipulate R2 objects internally.
The R2 API includes some extensions and semantic differences from the S3 API. If you need S3 compatibility, consider using the [S3-compatible API](https://developers.cloudflare.com/r2/api/s3/).
## Concepts
R2 organizes the data you store, called objects, into containers, called buckets. Buckets are the fundamental unit of performance, scaling, and access within R2.
## Create a binding
Bindings
A binding is how your Worker interacts with external resources such as [KV Namespaces](https://developers.cloudflare.com/kv/concepts/kv-namespaces/), [Durable Objects](https://developers.cloudflare.com/durable-objects/), or [R2 Buckets](https://developers.cloudflare.com/r2/buckets/). A binding is a runtime variable that the Workers runtime provides to your code. You can declare a variable name in your Wrangler file that will be bound to these resources at runtime, and interact with them through this variable. Every binding's variable name and behavior is determined by you when deploying the Worker. Refer to [Environment Variables](https://developers.cloudflare.com/workers/configuration/environment-variables/) for more information.
A binding is defined in the Wrangler file of your Worker project's directory.
To bind your R2 bucket to your Worker, add the following to your Wrangler file. Update the `binding` property to a valid JavaScript variable identifier and `bucket_name` to the name of your R2 bucket:
* wrangler.jsonc
```jsonc
{
"r2_buckets": [
{
"binding": "MY_BUCKET", // <~ valid JavaScript variable name
"bucket_name": ""
}
]
}
```
* wrangler.toml
```toml
[[r2_buckets]]
binding = "MY_BUCKET"
bucket_name = ""
```
Within your Worker, your bucket binding is now available under the `MY_BUCKET` variable and you can begin interacting with it using the [bucket methods](#bucket-method-definitions) described below.
## Bucket method definitions
The following methods are available on the bucket binding object injected into your code.
For example, to issue a `PUT` object request using the binding above:
* JavaScript
```js
export default {
async fetch(request, env) {
const url = new URL(request.url);
const key = url.pathname.slice(1);
switch (request.method) {
case "PUT":
await env.MY_BUCKET.put(key, request.body);
return new Response(`Put ${key} successfully!`);
default:
return new Response(`${request.method} is not allowed.`, {
status: 405,
headers: {
Allow: "PUT",
},
});
}
},
};
```
* Python
```py
from workers import WorkerEntrypoint, Response
from urllib.parse import urlparse
class Default(WorkerEntrypoint):
async def fetch(self, request):
url = urlparse(request.url)
key = url.path[1:]
if request.method == "PUT":
await self.env.MY_BUCKET.put(key, request.body)
return Response(f"Put {key} successfully!")
else:
return Response(
f"{request.method} is not allowed.",
status=405,
headers={"Allow": "PUT"}
)
```
- `head` (key: string): Promise\
* Retrieves the `R2Object` for the given key containing only object metadata, if the key exists, and `null` if the key does not exist.
- `get` (key: string, options?: R2GetOptions): Promise\
* Retrieves the `R2ObjectBody` for the given key containing object metadata and the object body as a `ReadableStream`, if the key exists, and `null` if the key does not exist.
* In the event that a precondition specified in `options` fails, `get()` returns an `R2Object` with `body` undefined.
- `put` (key: string, value: ReadableStream | ArrayBuffer | ArrayBufferView | string | null | Blob, options?: R2PutOptions): Promise\
* Stores the given `value` and metadata under the associated `key`. Once the write succeeds, returns an `R2Object` containing metadata about the stored Object.
* In the event that a precondition specified in `options` fails, `put()` returns `null`, and the object will not be stored.
* R2 writes are strongly consistent. Once the Promise resolves, all subsequent read operations will see this key value pair globally.
- `delete` (key: string | string\[]): Promise\
* Deletes the given `values` and metadata under the associated `keys`. Once the delete succeeds, returns `void`.
* R2 deletes are strongly consistent. Once the Promise resolves, all subsequent read operations will no longer see the provided key value pairs globally.
* Up to 1000 keys may be deleted per call.
- `list` (options?: R2ListOptions): Promise\
* Returns an `R2Objects` containing a list of `R2Object` contained within the bucket.
* The returned list of objects is ordered lexicographically.
* Returns up to 1000 entries, but may return less in order to minimize memory pressure within the Worker.
* To explicitly set the number of objects to list, provide an [R2ListOptions](https://developers.cloudflare.com/r2/api/workers/workers-api-reference/#r2listoptions) object with the `limit` property set.
* `createMultipartUpload` (key: string, options?: R2MultipartOptions): Promise\
* Creates a multipart upload.
* Returns Promise which resolves to an `R2MultipartUpload` object representing the newly created multipart upload. Once the multipart upload has been created, the multipart upload can be immediately interacted with globally, either through the Workers API, or through the S3 API.
- `resumeMultipartUpload` (key: string, uploadId: string): R2MultipartUpload
* Returns an object representing a multipart upload with the given key and uploadId.
* The resumeMultipartUpload operation does not perform any checks to ensure the validity of the uploadId, nor does it verify the existence of a corresponding active multipart upload. This is done to minimize latency before being able to call subsequent operations on the `R2MultipartUpload` object.
## `R2Object` definition
`R2Object` is created when you `PUT` an object into an R2 bucket. `R2Object` represents the metadata of an object based on the information provided by the uploader. Every object that you `PUT` into an R2 bucket will have an `R2Object` created.
* `key` string
* The object's key.
* `version` string
* Random unique string associated with a specific upload of a key.
* `size` number
* Size of the object in bytes.
* `etag` string
Note
Cloudflare recommends using the `httpEtag` field when returning an etag in a response header. This ensures the etag is quoted and conforms to [RFC 9110](https://www.rfc-editor.org/rfc/rfc9110#section-8.8.3).
* The etag associated with the object upload.
* `httpEtag` string
* The object's etag, in quotes so as to be returned as a header.
* `uploaded` Date
* A Date object representing the time the object was uploaded.
* `httpMetadata` R2HTTPMetadata
* Various HTTP headers associated with the object. Refer to [HTTP Metadata](#http-metadata).
* `customMetadata` Record\
* A map of custom, user-defined metadata associated with the object.
* `range` R2Range
* A `R2Range` object containing the returned range of the object.
* `checksums` R2Checksums
* A `R2Checksums` object containing the stored checksums of the object. Refer to [checksums](#checksums).
* `writeHttpMetadata` (headers: Headers): void
* Retrieves the `httpMetadata` from the `R2Object` and applies their corresponding HTTP headers to the `Headers` input object. Refer to [HTTP Metadata](#http-metadata).
* `storageClass` 'Standard' | 'InfrequentAccess'
* The storage class associated with the object. Refer to [Storage Classes](#storage-class).
* `ssecKeyMd5` string
* Hex-encoded MD5 hash of the [SSE-C](https://developers.cloudflare.com/r2/examples/ssec) key used for encryption (if one was provided). Hash can be used to identify which key is needed to decrypt object.
## `R2ObjectBody` definition
`R2ObjectBody` represents an object's metadata combined with its body. It is returned when you `GET` an object from an R2 bucket. The full list of keys for `R2ObjectBody` includes the list below and all keys inherited from [`R2Object`](#r2object-definition).
* `body` ReadableStream
* The object's value.
* `bodyUsed` boolean
* Whether the object's value has been consumed or not.
* `arrayBuffer` (): Promise\
* Returns a Promise that resolves to an `ArrayBuffer` containing the object's value.
* `text` (): Promise\
* Returns a Promise that resolves to an string containing the object's value.
* `json` \() : Promise\
* Returns a Promise that resolves to the given object containing the object's value.
* `blob` (): Promise\
* Returns a Promise that resolves to a binary Blob containing the object's value.
## `R2MultipartUpload` definition
An `R2MultipartUpload` object is created when you call `createMultipartUpload` or `resumeMultipartUpload`. `R2MultipartUpload` is a representation of an ongoing multipart upload.
Uncompleted multipart uploads will be automatically aborted after 7 days.
Note
An `R2MultipartUpload` object does not guarantee that there is an active underlying multipart upload corresponding to that object.
A multipart upload can be completed or aborted at any time, either through the S3 API, or by a parallel invocation of your Worker. Therefore it is important to add the necessary error handling code around each operation on a `R2MultipartUpload` object in case the underlying multipart upload no longer exists.
* `key` string
* The `key` for the multipart upload.
* `uploadId` string
* The `uploadId` for the multipart upload.
* `uploadPart` (partNumber: number, value: ReadableStream | ArrayBuffer | ArrayBufferView | string | Blob, options?: R2MultipartOptions): Promise\
* Uploads a single part with the specified part number to this multipart upload. Each part must be uniform in size with an exception for the final part which can be smaller.
* Returns an `R2UploadedPart` object containing the `etag` and `partNumber`. These `R2UploadedPart` objects are required when completing the multipart upload.
* `abort` (): Promise\
* Aborts the multipart upload. Returns a Promise that resolves when the upload has been successfully aborted.
* `complete` (uploadedParts: R2UploadedPart\[]): Promise\
* Completes the multipart upload with the given parts.
* Returns a Promise that resolves when the complete operation has finished. Once this happens, the object is immediately accessible globally by any subsequent read operation.
## Method-specific types
### R2GetOptions
* `onlyIf` R2Conditional | Headers
* Specifies that the object should only be returned given satisfaction of certain conditions in the `R2Conditional` or in the conditional Headers. Refer to [Conditional operations](#conditional-operations).
* `range` R2Range
* Specifies that only a specific length (from an optional offset) or suffix of bytes from the object should be returned. Refer to [Ranged reads](#ranged-reads).
* `ssecKey` ArrayBuffer | string
* Specifies a key to be used for [SSE-C](https://developers.cloudflare.com/r2/examples/ssec). Key must be 32 bytes in length, in the form of a hex-encoded string or an ArrayBuffer.
#### Ranged reads
`R2GetOptions` accepts a `range` parameter, which can be used to restrict the data returned in `body`.
There are 3 variations of arguments that can be used in a range:
* An offset with an optional length.
* An optional offset with a length.
* A suffix.
* `offset` number
* The byte to begin returning data from, inclusive.
* `length` number
* The number of bytes to return. If more bytes are requested than exist in the object, fewer bytes than this number may be returned.
* `suffix` number
* The number of bytes to return from the end of the file, starting from the last byte. If more bytes are requested than exist in the object, fewer bytes than this number may be returned.
### R2PutOptions
* `onlyIf` R2Conditional | Headers
* Specifies that the object should only be stored given satisfaction of certain conditions in the `R2Conditional`. Refer to [Conditional operations](#conditional-operations).
* `httpMetadata` R2HTTPMetadata | Headers optional
* Various HTTP headers associated with the object. Refer to [HTTP Metadata](#http-metadata).
* `customMetadata` Record\ optional
* A map of custom, user-defined metadata that will be stored with the object.
Note
Only a single hashing algorithm can be specified at once.
* `md5` ArrayBuffer | string optional
* A md5 hash to use to check the received object's integrity.
* `sha1` ArrayBuffer | string optional
* A SHA-1 hash to use to check the received object's integrity.
* `sha256` ArrayBuffer | string optional
* A SHA-256 hash to use to check the received object's integrity.
* `sha384` ArrayBuffer | string optional
* A SHA-384 hash to use to check the received object's integrity.
* `sha512` ArrayBuffer | string optional
* A SHA-512 hash to use to check the received object's integrity.
* `storageClass` 'Standard' | 'InfrequentAccess'
* Sets the storage class of the object if provided. Otherwise, the object will be stored in the default storage class associated with the bucket. Refer to [Storage Classes](#storage-class).
* `ssecKey` ArrayBuffer | string
* Specifies a key to be used for [SSE-C](https://developers.cloudflare.com/r2/examples/ssec). Key must be 32 bytes in length, in the form of a hex-encoded string or an ArrayBuffer.
### R2MultipartOptions
* `httpMetadata` R2HTTPMetadata | Headers optional
* Various HTTP headers associated with the object. Refer to [HTTP Metadata](#http-metadata).
* `customMetadata` Record\ optional
* A map of custom, user-defined metadata that will be stored with the object.
* `storageClass` string
* Sets the storage class of the object if provided. Otherwise, the object will be stored in the default storage class associated with the bucket. Refer to [Storage Classes](#storage-class).
* `ssecKey` ArrayBuffer | string
* Specifies a key to be used for [SSE-C](https://developers.cloudflare.com/r2/examples/ssec). Key must be 32 bytes in length, in the form of a hex-encoded string or an ArrayBuffer.
### R2ListOptions
* `limit` number optional
* The number of results to return. Defaults to `1000`, with a maximum of `1000`.
* If `include` is set, you may receive fewer than `limit` results in your response to accommodate metadata.
* `prefix` string optional
* The prefix to match keys against. Keys will only be returned if they start with given prefix.
* `cursor` string optional
* An opaque token that indicates where to continue listing objects from. A cursor can be retrieved from a previous list operation.
* `delimiter` string optional
* The character to use when grouping keys.
* `include` Array\ optional
* Can include `httpMetadata` and/or `customMetadata`. If included, items returned by the list will include the specified metadata.
* Note that there is a limit on the total amount of data that a single `list` operation can return. If you request data, you may receive fewer than `limit` results in your response to accommodate metadata.
* The [compatibility date](https://developers.cloudflare.com/workers/configuration/compatibility-dates/) must be set to `2022-08-04` or later in your Wrangler file. If not, then the `r2_list_honor_include` compatibility flag must be set. Otherwise it is treated as `include: ['httpMetadata', 'customMetadata']` regardless of what the `include` option provided actually is.
This means applications must be careful to avoid comparing the amount of returned objects against your `limit`. Instead, use the `truncated` property to determine if the `list` request has more data to be returned.
```js
const options = {
limit: 500,
include: ["customMetadata"],
};
const listed = await env.MY_BUCKET.list(options);
let truncated = listed.truncated;
let cursor = truncated ? listed.cursor : undefined;
// ⌠- if your limit can't fit into a single response or your
// bucket has less objects than the limit, it will get stuck here.
while (listed.objects.length < options.limit) {
// ...
}
// ✅ - use the truncated property to check if there are more
// objects to be returned
while (truncated) {
const next = await env.MY_BUCKET.list({
...options,
cursor: cursor,
});
listed.objects.push(...next.objects);
truncated = next.truncated;
cursor = next.cursor;
}
```
### R2Objects
An object containing an `R2Object` array, returned by `BUCKET_BINDING.list()`.
* `objects` Array\
* An array of objects matching the `list` request.
* `truncated` boolean
* If true, indicates there are more results to be retrieved for the current `list` request.
* `cursor` string optional
* A token that can be passed to future `list` calls to resume listing from that point. Only present if truncated is true.
* `delimitedPrefixes` Array\
* If a delimiter has been specified, contains all prefixes between the specified prefix and the next occurrence of the delimiter.
* For example, if no prefix is provided and the delimiter is '/', `foo/bar/baz` would return `foo` as a delimited prefix. If `foo/` was passed as a prefix with the same structure and delimiter, `foo/bar` would be returned as a delimited prefix.
### Conditional operations
You can pass an `R2Conditional` object to `R2GetOptions` and `R2PutOptions`. If the condition check for `get()` fails, the body will not be returned. This will make `get()` have lower latency.
If the condition check for `put()` fails, `null` will be returned instead of the `R2Object`.
* `etagMatches` string optional
* Performs the operation if the object's etag matches the given string.
* `etagDoesNotMatch` string optional
* Performs the operation if the object's etag does not match the given string.
* `uploadedBefore` Date optional
* Performs the operation if the object was uploaded before the given date.
* `uploadedAfter` Date optional
* Performs the operation if the object was uploaded after the given date.
Alternatively, you can pass a `Headers` object containing conditional headers to `R2GetOptions` and `R2PutOptions`. For information on these conditional headers, refer to [the MDN docs on conditional requests](https://developer.mozilla.org/en-US/docs/Web/HTTP/Conditional_requests#conditional_headers). All conditional headers aside from `If-Range` are supported.
For more specific information about conditional requests, refer to [RFC 7232](https://datatracker.ietf.org/doc/html/rfc7232).
### HTTP Metadata
Generally, these fields match the HTTP metadata passed when the object was created. They can be overridden when issuing `GET` requests, in which case, the given values will be echoed back in the response.
* `contentType` string optional
* `contentLanguage` string optional
* `contentDisposition` string optional
* `contentEncoding` string optional
* `cacheControl` string optional
* `cacheExpiry` Date optional
### Checksums
If a checksum was provided when using the `put()` binding, it will be available on the returned object under the `checksums` property. The MD5 checksum will be included by default for non-multipart objects.
* `md5` ArrayBuffer optional
* The MD5 checksum of the object.
* `sha1` ArrayBuffer optional
* The SHA-1 checksum of the object.
* `sha256` ArrayBuffer optional
* The SHA-256 checksum of the object.
* `sha384` ArrayBuffer optional
* The SHA-384 checksum of the object.
* `sha512` ArrayBuffer optional
* The SHA-512 checksum of the object.
### `R2UploadedPart`
An `R2UploadedPart` object represents a part that has been uploaded. `R2UploadedPart` objects are returned from `uploadPart` operations and must be passed to `completeMultipartUpload` operations.
* `partNumber` number
* The number of the part.
* `etag` string
* The `etag` of the part.
### Storage Class
The storage class where an `R2Object` is stored. The available storage classes are `Standard` and `InfrequentAccess`. Refer to [Storage classes](https://developers.cloudflare.com/r2/buckets/storage-classes/) for more information.
---
title: Use R2 from Workers · Cloudflare R2 docs
description: C3 (create-cloudflare-cli) is a command-line tool designed to help
you set up and deploy Workers & Pages applications to Cloudflare as fast as
possible.
lastUpdated: 2026-01-29T10:38:24.000Z
chatbotDeprioritize: false
source_url:
html: https://developers.cloudflare.com/r2/api/workers/workers-api-usage/
md: https://developers.cloudflare.com/r2/api/workers/workers-api-usage/index.md
---
## 1. Create a new application with C3
C3 (`create-cloudflare-cli`) is a command-line tool designed to help you set up and deploy Workers & Pages applications to Cloudflare as fast as possible.
To get started, open a terminal window and run:
* npm
```sh
npm create cloudflare@latest -- r2-worker
```
* yarn
```sh
yarn create cloudflare r2-worker
```
* pnpm
```sh
pnpm create cloudflare@latest r2-worker
```
For setup, select the following options:
* For *What would you like to start with?*, choose `Hello World example`.
* For *Which template would you like to use?*, choose `Worker only`.
* For *Which language do you want to use?*, choose `JavaScript`.
* For *Do you want to use git for version control?*, choose `Yes`.
* For *Do you want to deploy your application?*, choose `No` (we will be making some changes before deploying).
Then, move into your newly created directory:
```sh
cd r2-worker
```
## 2. Create your bucket
Create your bucket by running:
```sh
npx wrangler r2 bucket create
```
To check that your bucket was created, run:
```sh
npx wrangler r2 bucket list
```
After running the `list` command, you will see all bucket names, including the one you have just created.
## 3. Bind your bucket to a Worker
You will need to bind your bucket to a Worker.
Bindings
A binding is how your Worker interacts with external resources such as [KV Namespaces](https://developers.cloudflare.com/kv/concepts/kv-namespaces/), [Durable Objects](https://developers.cloudflare.com/durable-objects/), or [R2 Buckets](https://developers.cloudflare.com/r2/buckets/). A binding is a runtime variable that the Workers runtime provides to your code. You can declare a variable name in your Wrangler file that will be bound to these resources at runtime, and interact with them through this variable. Every binding's variable name and behavior is determined by you when deploying the Worker. Refer to the [Environment Variables](https://developers.cloudflare.com/workers/configuration/environment-variables/) documentation for more information.
A binding is defined in the Wrangler file of your Worker project's directory.
To bind your R2 bucket to your Worker, add the following to your Wrangler file. Update the `binding` property to a valid JavaScript variable identifier and `bucket_name` to the `` you used to create your bucket in [step 2](#2-create-your-bucket):
* wrangler.jsonc
```jsonc
{
"r2_buckets": [
{
"binding": "MY_BUCKET", // <~ valid JavaScript variable name
"bucket_name": ""
}
]
}
```
* wrangler.toml
```toml
[[r2_buckets]]
binding = "MY_BUCKET"
bucket_name = ""
```
For more detailed information on configuring your Worker (for example, if you are using [jurisdictions](https://developers.cloudflare.com/r2/reference/data-location/#jurisdictional-restrictions)), refer to the [Wrangler Configuration documentation](https://developers.cloudflare.com/workers/wrangler/configuration/).
## 4. Access your R2 bucket from your Worker
Within your Worker code, your bucket is now available under the `MY_BUCKET` variable and you can begin interacting with it.
Local Development mode in Wrangler
By default `wrangler dev` runs in local development mode. In this mode, all operations performed by your local worker will operate against local storage on your machine.
If you want the R2 operations that are performed during development to be performed against a real R2 bucket, you can set `"remote" : true` in the R2 binding configuration. Refer to [remote bindings documentation](https://developers.cloudflare.com/workers/development-testing/#remote-bindings) for more information.
An R2 bucket is able to READ, LIST, WRITE, and DELETE objects. You can see an example of all operations below using the Module Worker syntax. Add the following snippet into your project's `index.js` file:
* TypeScript
```ts
import { WorkerEntrypoint } from "cloudflare:workers";
export default class extends WorkerEntrypoint {
async fetch(request: Request) {
const url = new URL(request.url);
const key = url.pathname.slice(1);
switch (request.method) {
case "PUT": {
await this.env.R2.put(key, request.body, {
onlyIf: request.headers,
httpMetadata: request.headers,
});
return new Response(`Put ${key} successfully!`);
}
case "GET": {
const object = await this.env.R2.get(key, {
onlyIf: request.headers,
range: request.headers,
});
if (object === null) {
return new Response("Object Not Found", { status: 404 });
}
const headers = new Headers();
object.writeHttpMetadata(headers);
headers.set("etag", object.httpEtag);
// When no body is present, preconditions have failed
return new Response("body" in object ? object.body : undefined, {
status: "body" in object ? 200 : 412,
headers,
});
}
case "DELETE": {
await this.env.R2.delete(key);
return new Response("Deleted!");
}
default:
return new Response("Method Not Allowed", {
status: 405,
headers: {
Allow: "PUT, GET, DELETE",
},
});
}
}
};
```
* JavaScript
```js
export default {
async fetch(request, env) {
const url = new URL(request.url);
const key = url.pathname.slice(1);
switch (request.method) {
case "PUT": {
await this.env.R2.put(key, request.body, {
onlyIf: request.headers,
httpMetadata: request.headers,
});
return new Response(`Put ${key} successfully!`);
}
case "GET": {
const object = await this.env.R2.get(key, {
onlyIf: request.headers,
range: request.headers,
});
if (object === null) {
return new Response("Object Not Found", { status: 404 });
}
const headers = new Headers();
object.writeHttpMetadata(headers);
headers.set("etag", object.httpEtag);
// When no body is present, preconditions have failed
return new Response("body" in object ? object.body : undefined, {
status: "body" in object ? 200 : 412,
headers,
});
}
case "DELETE": {
await this.env.R2.delete(key);
return new Response("Deleted!");
}
default:
return new Response("Method Not Allowed", {
status: 405,
headers: {
Allow: "PUT, GET, DELETE",
},
});
}
}
}
```
* Python
```py
from workers import WorkerEntrypoint, Response
from urllib.parse import urlparse
class Default(WorkerEntrypoint):
async def fetch(self, request):
url = urlparse(request.url)
key = url.path[1:]
if request.method == "PUT":
await self.env.R2.put(
key,
request.body,
onlyIf=request.headers,
httpMetadata=request.headers,
)
return Response(f"Put {key} successfully!")
elif request.method == "GET":
obj = await self.env.R2.get(
key,
onlyIf=request.headers,
range=request.headers,
)
if obj is None:
return Response("Object Not Found", status=404)
# When no body is present, preconditions have failed
body = obj.body if hasattr(obj, "body") else None
status = 200 if hasattr(obj, "body") else 412
headers = {"etag": obj.httpEtag}
return Response(body, status=status, headers=headers)
elif request.method == "DELETE":
await self.env.R2.delete(key)
return Response("Deleted!")
else:
return Response(
"Method Not Allowed",
status=405,
headers={"Allow": "PUT, GET, DELETE"},
)
```
Prevent potential errors when accessing request.body
The body of a [Request](https://developer.mozilla.org/en-US/docs/Web/API/Request) can only be accessed once. If you previously used `request.formData()` in the same request, you may encounter a TypeError when attempting to access `request.body`.
To avoid errors, create a clone of the Request object with `request.clone()` for each subsequent attempt to access a Request's body. Keep in mind that Workers have a [memory limit of 128 MB per Worker](https://developers.cloudflare.com/workers/platform/limits#worker-limits) and loading particularly large files into a Worker's memory multiple times may reach this limit. To ensure memory usage does not reach this limit, consider using [Streams](https://developers.cloudflare.com/workers/runtime-apis/streams/).
## 5. Bucket access and privacy
With the above code added to your Worker, every incoming request has the ability to interact with your bucket. This means your bucket is publicly exposed and its contents can be accessed and modified by undesired actors.
You must now define authorization logic to determine who can perform what actions to your bucket. This logic lives within your Worker's code, as it is your application's job to determine user privileges. The following is a short list of resources related to access and authorization practices:
1. [Basic Authentication](https://developers.cloudflare.com/workers/examples/basic-auth/): Shows how to restrict access using the HTTP Basic schema.
2. [Using Custom Headers](https://developers.cloudflare.com/workers/examples/auth-with-headers/): Allow or deny a request based on a known pre-shared key in a header.
Continuing with your newly created bucket and Worker, you will need to protect all bucket operations.
For `PUT` and `DELETE` requests, you will make use of a new `AUTH_KEY_SECRET` environment variable, which you will define later as a Wrangler secret.
For `GET` requests, you will ensure that only a specific file can be requested. All of this custom logic occurs inside of an `authorizeRequest` function, with the `hasValidHeader` function handling the custom header logic. If all validation passes, then the operation is allowed.
* JavaScript
```js
const ALLOW_LIST = ["cat-pic.jpg"];
// Check requests for a pre-shared secret
const hasValidHeader = (request, env) => {
return request.headers.get("X-Custom-Auth-Key") === env.AUTH_KEY_SECRET;
};
function authorizeRequest(request, env, key) {
switch (request.method) {
case "PUT":
case "DELETE":
return hasValidHeader(request, env);
case "GET":
return ALLOW_LIST.includes(key);
default:
return false;
}
}
export default {
async fetch(request, env, ctx) {
const url = new URL(request.url);
const key = url.pathname.slice(1);
if (!authorizeRequest(request, env, key)) {
return new Response("Forbidden", { status: 403 });
}
// ...
},
};
```
* Python
```py
from workers import WorkerEntrypoint, Response
from urllib.parse import urlparse
ALLOW_LIST = ["cat-pic.jpg"]
# Check requests for a pre-shared secret
def has_valid_header(request, env):
return request.headers.get("X-Custom-Auth-Key") == env.AUTH_KEY_SECRET
def authorize_request(request, env, key):
if request.method in ["PUT", "DELETE"]:
return has_valid_header(request, env)
elif request.method == "GET":
return key in ALLOW_LIST
else:
return False
class Default(WorkerEntrypoint):
async def fetch(self, request):
url = urlparse(request.url)
key = url.path[1:]
if not authorize_request(request, self.env, key):
return Response("Forbidden", status=403)
# ...
```
For this to work, you need to create a secret via Wrangler:
```sh
npx wrangler secret put AUTH_KEY_SECRET
```
This command will prompt you to enter a secret in your terminal:
```sh
npx wrangler secret put AUTH_KEY_SECRET
```
```sh
Enter the secret text you'd like assigned to the variable AUTH_KEY_SECRET on the script named :
*********
🌀 Creating the secret for script name
✨ Success! Uploaded secret AUTH_KEY_SECRET.
```
This secret is now available as `AUTH_KEY_SECRET` on the `env` parameter in your Worker.
## 6. Deploy your Worker
With your Worker and bucket set up, run the `npx wrangler deploy` [command](https://developers.cloudflare.com/workers/wrangler/commands/#deploy) to deploy to Cloudflare's global network:
```sh
npx wrangler deploy
```
You can verify your authorization logic is working through the following commands, using your deployed Worker endpoint:
Warning
When uploading files to R2 via `curl`, ensure you use **[`--data-binary`](https://everything.curl.dev/http/post/binary)** instead of `--data` or `-d`. Files will otherwise be truncated.
```sh
# Attempt to write an object without providing the "X-Custom-Auth-Key" header
curl https://your-worker.dev/cat-pic.jpg -X PUT --data-binary 'test'
#=> Forbidden
# Expected because header was missing
# Attempt to write an object with the wrong "X-Custom-Auth-Key" header value
curl https://your-worker.dev/cat-pic.jpg -X PUT --header "X-Custom-Auth-Key: hotdog" --data-binary 'test'
#=> Forbidden
# Expected because header value did not match the AUTH_KEY_SECRET value
# Attempt to write an object with the correct "X-Custom-Auth-Key" header value
# Note: Assume that "*********" is the value of your AUTH_KEY_SECRET Wrangler secret
curl https://your-worker.dev/cat-pic.jpg -X PUT --header "X-Custom-Auth-Key: *********" --data-binary 'test'
#=> Put cat-pic.jpg successfully!
# Attempt to read object called "foo"
curl https://your-worker.dev/foo
#=> Forbidden
# Expected because "foo" is not in the ALLOW_LIST
# Attempt to read an object called "cat-pic.jpg"
curl https://your-worker.dev/cat-pic.jpg
#=> test
# Note: This is the value that was successfully PUT above
```
By completing this guide, you have successfully installed Wrangler and deployed your R2 bucket to Cloudflare.
## Related resources
1. [Workers Tutorials](https://developers.cloudflare.com/workers/tutorials/)
2. [Workers Examples](https://developers.cloudflare.com/workers/examples/)
---
title: Use the R2 multipart API from Workers · Cloudflare R2 docs
description: >-
By following this guide, you will create a Worker through which your
applications can perform multipart uploads.
This example worker could serve as a basis for your own use case where you can
add authentication to the worker, or even add extra validation logic when
uploading each part.
This guide also contains an example Python application that uploads files to
this worker.
lastUpdated: 2024-08-13T19:56:56.000Z
chatbotDeprioritize: false
source_url:
html: https://developers.cloudflare.com/r2/api/workers/workers-multipart-usage/
md: https://developers.cloudflare.com/r2/api/workers/workers-multipart-usage/index.md
---
By following this guide, you will create a Worker through which your applications can perform multipart uploads. This example worker could serve as a basis for your own use case where you can add authentication to the worker, or even add extra validation logic when uploading each part. This guide also contains an example Python application that uploads files to this worker.
This guide assumes you have set up the [R2 binding](https://developers.cloudflare.com/workers/runtime-apis/bindings/) for your Worker. Refer to [Use R2 from Workers](https://developers.cloudflare.com/r2/api/workers/workers-api-usage) for instructions on setting up an R2 binding.
## An example Worker using the multipart API
The following example Worker exposes an HTTP API which enables applications to use the multipart API through the Worker.
In this example, each request is routed based on the HTTP method and the action request parameter. As your Worker becomes more complicated, consider utilizing a serverless web framework such as [Hono](https://honojs.dev/) to handle the routing for you.
The following example Worker includes any new information about the state of the multipart upload in the response to each request. For the request which creates the multipart upload, the `uploadId` is returned. For requests uploading a part, the part number and `etag` are returned. In turn, the client keeps track of this state, and includes the uploadId in subsequent requests, and the `etag` and part number of each part when completing a multipart upload.
Add the following code to your project's `index.js` file and replace `MY_BUCKET` with your bucket's name:
```js
interface Env {
MY_BUCKET: R2Bucket;
}
export default {
async fetch(
request,
env,
ctx
): Promise {
const bucket = env.MY_BUCKET;
const url = new URL(request.url);
const key = url.pathname.slice(1);
const action = url.searchParams.get("action");
if (action === null) {
return new Response("Missing action type", { status: 400 });
}
// Route the request based on the HTTP method and action type
switch (request.method) {
case "POST":
switch (action) {
case "mpu-create": {
const multipartUpload = await bucket.createMultipartUpload(key);
return new Response(
JSON.stringify({
key: multipartUpload.key,
uploadId: multipartUpload.uploadId,
})
);
}
case "mpu-complete": {
const uploadId = url.searchParams.get("uploadId");
if (uploadId === null) {
return new Response("Missing uploadId", { status: 400 });
}
const multipartUpload = env.MY_BUCKET.resumeMultipartUpload(
key,
uploadId
);
interface completeBody {
parts: R2UploadedPart[];
}
const completeBody: completeBody = await request.json();
if (completeBody === null) {
return new Response("Missing or incomplete body", {
status: 400,
});
}
// Error handling in case the multipart upload does not exist anymore
try {
const object = await multipartUpload.complete(completeBody.parts);
return new Response(null, {
headers: {
etag: object.httpEtag,
},
});
} catch (error: any) {
return new Response(error.message, { status: 400 });
}
}
default:
return new Response(`Unknown action ${action} for POST`, {
status: 400,
});
}
case "PUT":
switch (action) {
case "mpu-uploadpart": {
const uploadId = url.searchParams.get("uploadId");
const partNumberString = url.searchParams.get("partNumber");
if (partNumberString === null || uploadId === null) {
return new Response("Missing partNumber or uploadId", {
status: 400,
});
}
if (request.body === null) {
return new Response("Missing request body", { status: 400 });
}
const partNumber = parseInt(partNumberString);
const multipartUpload = env.MY_BUCKET.resumeMultipartUpload(
key,
uploadId
);
try {
const uploadedPart: R2UploadedPart =
await multipartUpload.uploadPart(partNumber, request.body);
return new Response(JSON.stringify(uploadedPart));
} catch (error: any) {
return new Response(error.message, { status: 400 });
}
}
default:
return new Response(`Unknown action ${action} for PUT`, {
status: 400,
});
}
case "GET":
if (action !== "get") {
return new Response(`Unknown action ${action} for GET`, {
status: 400,
});
}
const object = await env.MY_BUCKET.get(key);
if (object === null) {
return new Response("Object Not Found", { status: 404 });
}
const headers = new Headers();
object.writeHttpMetadata(headers);
headers.set("etag", object.httpEtag);
return new Response(object.body, { headers });
case "DELETE":
switch (action) {
case "mpu-abort": {
const uploadId = url.searchParams.get("uploadId");
if (uploadId === null) {
return new Response("Missing uploadId", { status: 400 });
}
const multipartUpload = env.MY_BUCKET.resumeMultipartUpload(
key,
uploadId
);
try {
multipartUpload.abort();
} catch (error: any) {
return new Response(error.message, { status: 400 });
}
return new Response(null, { status: 204 });
}
case "delete": {
await env.MY_BUCKET.delete(key);
return new Response(null, { status: 204 });
}
default:
return new Response(`Unknown action ${action} for DELETE`, {
status: 400,
});
}
default:
return new Response("Method Not Allowed", {
status: 405,
headers: { Allow: "PUT, POST, GET, DELETE" },
});
}
},
} satisfies ExportedHandler;
```
After you have updated your Worker with the above code, run `npx wrangler deploy`.
You can now use this Worker to perform multipart uploads. You can either send requests from your existing application to this Worker to perform uploads or use a script to upload files through this Worker.
The next section is optional and shows an example of a Python script which uploads a chosen file on your machine to your Worker.
## Perform a multipart upload with your Worker (optional)
This example application uploads a local file to the Worker in multiple parts. It uses Python's built-in `ThreadPoolExecutor` to parallelize the uploading of parts to the Worker, which increases upload speeds. HTTP requests to the Worker are made with the [requests](https://pypi.org/project/requests/) library.
Utilizing the multipart API in this way also allows you to use your Worker to upload files larger than the [Workers request body size limit](https://developers.cloudflare.com/workers/platform/limits#request-limits). The uploading of individual parts is still subject to this limit.
Save the following code in a file named `mpuscript.py` on your local machine. Change the `worker_endpoint variable` to where your worker is deployed. Pass the file you want to upload as an argument when running this script: `python3 mpuscript.py myfile`. This will upload the file `myfile` from your machine to your bucket through the Worker.
```python
import math
import os
import requests
from requests.adapters import HTTPAdapter, Retry
import sys
import concurrent.futures
# Take the file to upload as an argument
filename = sys.argv[1]
# The endpoint for our worker, change this to wherever you deploy your worker
worker_endpoint = "https://myworker.myzone.workers.dev/"
# Configure the part size to be 10MB. 5MB is the minimum part size, except for the last part
partsize = 10 * 1024 * 1024
def upload_file(worker_endpoint, filename, partsize):
url = f"{worker_endpoint}{filename}"
# Create the multipart upload
uploadId = requests.post(url, params={"action": "mpu-create"}).json()["uploadId"]
part_count = math.ceil(os.stat(filename).st_size / partsize)
# Create an executor for up to 25 concurrent uploads.
executor = concurrent.futures.ThreadPoolExecutor(25)
# Submit a task to the executor to upload each part
futures = [
executor.submit(upload_part, filename, partsize, url, uploadId, index)
for index in range(part_count)
]
concurrent.futures.wait(futures)
# get the parts from the futures
uploaded_parts = [future.result() for future in futures]
# complete the multipart upload
response = requests.post(
url,
params={"action": "mpu-complete", "uploadId": uploadId},
json={"parts": uploaded_parts},
)
if response.status_code == 200:
print("🎉 successfully completed multipart upload")
else:
print(response.text)
def upload_part(filename, partsize, url, uploadId, index):
# Open the file in rb mode, which treats it as raw bytes rather than attempting to parse utf-8
with open(filename, "rb") as file:
file.seek(partsize * index)
part = file.read(partsize)
# Retry policy for when uploading a part fails
s = requests.Session()
retries = Retry(total=3, status_forcelist=[400, 500, 502, 503, 504])
s.mount("https://", HTTPAdapter(max_retries=retries))
return s.put(
url,
params={
"action": "mpu-uploadpart",
"uploadId": uploadId,
"partNumber": str(index + 1),
},
data=part,
).json()
upload_file(worker_endpoint, filename, partsize)
```
## State management
The stateful nature of multipart uploads does not easily map to the usage model of Workers, which are inherently stateless. In a normal multipart upload, the multipart upload is usually performed in one continuous execution of the client application. This is different from multipart uploads in a Worker, which will often be completed over multiple invocations of that Worker. This makes state management more challenging.
To overcome this, the state associated with a multipart upload, namely the `uploadId` and which parts have been uploaded, needs to be kept track of somewhere outside of the Worker.
In the example Worker and Python application described in this guide, the state of the multipart upload is tracked in the client application which sends requests to the Worker, with the necessary state contained in each request. Keeping track of the multipart state in the client application enables maximal flexibility and allows for parallel and unordered uploads of each part.
When keeping track of this state in the client is impossible, alternative designs can be considered. For example, you could track the `uploadId` and which parts have been uploaded in a Durable Object or other database.
---
title: DuckDB · Cloudflare R2 docs
description: Below is an example of using DuckDB to connect to R2 Data Catalog.
For more information on connecting to R2 Data Catalog with DuckDB, refer to
DuckDB documentation.
lastUpdated: 2026-02-07T13:41:41.000Z
chatbotDeprioritize: false
source_url:
html: https://developers.cloudflare.com/r2/data-catalog/config-examples/duckdb/
md: https://developers.cloudflare.com/r2/data-catalog/config-examples/duckdb/index.md
---
Below is an example of using [DuckDB](https://duckdb.org/) to connect to R2 Data Catalog. For more information on connecting to R2 Data Catalog with DuckDB, refer to [DuckDB documentation](https://duckdb.org/docs/stable/core_extensions/iceberg/iceberg_rest_catalogs#r2-catalog).
## Prerequisites
* Sign up for a [Cloudflare account](https://dash.cloudflare.com/sign-up/workers-and-pages).
* [Create an R2 bucket](https://developers.cloudflare.com/r2/buckets/create-buckets/) and [enable the data catalog](https://developers.cloudflare.com/r2/data-catalog/manage-catalogs/#enable-r2-data-catalog-on-a-bucket).
* [Create an R2 API token](https://developers.cloudflare.com/r2/api/tokens/) with both [R2 and data catalog permissions](https://developers.cloudflare.com/r2/api/tokens/#permissions).
* Install [DuckDB](https://duckdb.org/docs/installation/).
* Note: [DuckDB 1.4.0](https://github.com/duckdb/duckdb/releases/tag/v1.4.0) or greater is required to attach and write to [Iceberg REST Catalogs](https://duckdb.org/docs/stable/core_extensions/iceberg/iceberg_rest_catalogs).
* Note: DuckDB [does not currently support](https://duckdb.org/docs/stable/core_extensions/iceberg/iceberg_rest_catalogs#limitations-for-update-and-delete) `DELETE` on partitioned tables.
## Example usage
In the [DuckDB CLI](https://duckdb.org/docs/stable/clients/cli/overview.html) (Command Line Interface), run the following commands:
```sql
-- Install the iceberg DuckDB extension (if you haven't already) and load the extension.
INSTALL iceberg;
LOAD iceberg;
-- Install and load httpfs extension for reading/writing files over HTTP(S).
INSTALL httpfs;
LOAD httpfs;
-- Create a DuckDB secret to store R2 Data Catalog credentials.
CREATE SECRET r2_secret (
TYPE ICEBERG,
TOKEN ''
);
-- Attach R2 Data Catalog with the following ATTACH statement.
ATTACH '' AS my_r2_catalog (
TYPE ICEBERG,
ENDPOINT ''
);
-- Create the default schema in the catalog and set it as the active schema.
CREATE SCHEMA my_r2_catalog.default;
USE my_r2_catalog.default;
-- Create and populate a sample Iceberg table with data.
CREATE TABLE my_iceberg_table AS SELECT a FROM range(4) t(a);
-- Show all available tables.
SHOW ALL TABLES;
-- Query the Iceberg table you just created.
SELECT * FROM my_r2_catalog.default.my_iceberg_table;
```
---
title: PyIceberg · Cloudflare R2 docs
description: Below is an example of using PyIceberg to connect to R2 Data Catalog.
lastUpdated: 2026-01-27T21:11:25.000Z
chatbotDeprioritize: false
source_url:
html: https://developers.cloudflare.com/r2/data-catalog/config-examples/pyiceberg/
md: https://developers.cloudflare.com/r2/data-catalog/config-examples/pyiceberg/index.md
---
Below is an example of using [PyIceberg](https://py.iceberg.apache.org/) to connect to R2 Data Catalog.
## Prerequisites
* Sign up for a [Cloudflare account](https://dash.cloudflare.com/sign-up/workers-and-pages).
* [Create an R2 bucket](https://developers.cloudflare.com/r2/buckets/create-buckets/) and [enable the data catalog](https://developers.cloudflare.com/r2/data-catalog/manage-catalogs/#enable-r2-data-catalog-on-a-bucket).
* [Create an R2 API token](https://developers.cloudflare.com/r2/api/tokens/) with both [R2 and data catalog permissions](https://developers.cloudflare.com/r2/api/tokens/#permissions).
* Install the [PyIceberg](https://py.iceberg.apache.org/#installation) and [PyArrow](https://arrow.apache.org/docs/python/install.html) libraries.
## Example usage
```py
import pyarrow as pa
from pyiceberg.catalog.rest import RestCatalog
from pyiceberg.exceptions import NamespaceAlreadyExistsError
# Define catalog connection details (replace variables)
WAREHOUSE = ""
TOKEN = ""
CATALOG_URI = ""
# Connect to R2 Data Catalog
catalog = RestCatalog(
name="my_catalog",
warehouse=WAREHOUSE,
uri=CATALOG_URI,
token=TOKEN,
)
# Create default namespace
catalog.create_namespace("default")
# Create simple PyArrow table
df = pa.table({
"id": [1, 2, 3],
"name": ["Alice", "Bob", "Charlie"],
})
# Create an Iceberg table
test_table = ("default", "my_table")
table = catalog.create_table(
test_table,
schema=df.schema,
)
```
---
title: Snowflake · Cloudflare R2 docs
description: Below is an example of using Snowflake to connect and query data
from R2 Data Catalog (read-only).
lastUpdated: 2026-01-27T21:11:25.000Z
chatbotDeprioritize: false
source_url:
html: https://developers.cloudflare.com/r2/data-catalog/config-examples/snowflake/
md: https://developers.cloudflare.com/r2/data-catalog/config-examples/snowflake/index.md
---
Below is an example of using [Snowflake](https://docs.snowflake.com/en/user-guide/tables-iceberg-configure-catalog-integration-rest) to connect and query data from R2 Data Catalog (read-only).
## Prerequisites
* Sign up for a [Cloudflare account](https://dash.cloudflare.com/sign-up/workers-and-pages).
* [Create an R2 bucket](https://developers.cloudflare.com/r2/buckets/create-buckets/) and [enable the data catalog](https://developers.cloudflare.com/r2/data-catalog/manage-catalogs/#enable-r2-data-catalog-on-a-bucket).
* [Create an R2 API token](https://developers.cloudflare.com/r2/api/tokens/) with both [R2 and data catalog permissions](https://developers.cloudflare.com/r2/api/tokens/#permissions).
* A [Snowflake](https://www.snowflake.com/) account with the necessary privileges to create external volumes and catalog integrations.
## Example usage
In your Snowflake [SQL worksheet](https://docs.snowflake.com/en/user-guide/ui-snowsight-worksheets-gs) or [notebook](https://docs.snowflake.com/en/user-guide/ui-snowsight/notebooks), run the following commands:
```sql
-- Create a database (if you don't already have one) to organize your external data
CREATE DATABASE IF NOT EXISTS r2_example_db;
-- Create an external volume pointing to your R2 bucket
CREATE OR REPLACE EXTERNAL VOLUME ext_vol_r2
STORAGE_LOCATIONS = (
(
NAME = 'my_r2_storage_location'
STORAGE_PROVIDER = 'S3COMPAT'
STORAGE_BASE_URL = 's3compat://'
CREDENTIALS = (
AWS_KEY_ID = ''
AWS_SECRET_KEY = ''
)
STORAGE_ENDPOINT = '.r2.cloudflarestorage.com'
)
)
ALLOW_WRITES = FALSE;
-- Create a catalog integration for R2 Data Catalog (read-only)
CREATE OR REPLACE CATALOG INTEGRATION r2_data_catalog
CATALOG_SOURCE = ICEBERG_REST
TABLE_FORMAT = ICEBERG
CATALOG_NAMESPACE = 'default'
REST_CONFIG = (
CATALOG_URI = ''
CATALOG_NAME = ''
)
REST_AUTHENTICATION = (
TYPE = BEARER
BEARER_TOKEN = ''
)
ENABLED = TRUE;
-- Create an Apache Iceberg table in your selected Snowflake database
CREATE ICEBERG TABLE my_iceberg_table
CATALOG = 'r2_data_catalog'
EXTERNAL_VOLUME = 'ext_vol_r2'
CATALOG_TABLE_NAME = 'my_table'; -- Name of existing table in your R2 data catalog
-- Query your Iceberg table
SELECT * FROM my_iceberg_table;
```
---
title: Spark (PySpark) · Cloudflare R2 docs
description: Below is an example of using PySpark to connect to R2 Data Catalog.
lastUpdated: 2026-01-27T21:11:25.000Z
chatbotDeprioritize: false
source_url:
html: https://developers.cloudflare.com/r2/data-catalog/config-examples/spark-python/
md: https://developers.cloudflare.com/r2/data-catalog/config-examples/spark-python/index.md
---
Below is an example of using [PySpark](https://spark.apache.org/docs/latest/api/python/index.html) to connect to R2 Data Catalog.
## Prerequisites
* Sign up for a [Cloudflare account](https://dash.cloudflare.com/sign-up/workers-and-pages).
* [Create an R2 bucket](https://developers.cloudflare.com/r2/buckets/create-buckets/) and [enable the data catalog](https://developers.cloudflare.com/r2/data-catalog/manage-catalogs/#enable-r2-data-catalog-on-a-bucket).
* [Create an R2 API token](https://developers.cloudflare.com/r2/api/tokens/) with both [R2 and data catalog permissions](https://developers.cloudflare.com/r2/api/tokens/#permissions).
* Install the [PySpark](https://spark.apache.org/docs/latest/api/python/getting_started/install.html) library.
## Example usage
```py
from pyspark.sql import SparkSession
# Define catalog connection details (replace variables)
WAREHOUSE = ""
TOKEN = ""
CATALOG_URI = ""
# Build Spark session with Iceberg configurations
spark = SparkSession.builder \
.appName("R2DataCatalogExample") \
.config('spark.jars.packages', 'org.apache.iceberg:iceberg-spark-runtime-3.5_2.12:1.6.1,org.apache.iceberg:iceberg-aws-bundle:1.6.1') \
.config("spark.sql.extensions", "org.apache.iceberg.spark.extensions.IcebergSparkSessionExtensions") \
.config("spark.sql.catalog.my_catalog", "org.apache.iceberg.spark.SparkCatalog") \
.config("spark.sql.catalog.my_catalog.type", "rest") \
.config("spark.sql.catalog.my_catalog.uri", CATALOG_URI) \
.config("spark.sql.catalog.my_catalog.warehouse", WAREHOUSE) \
.config("spark.sql.catalog.my_catalog.token", TOKEN) \
.config("spark.sql.catalog.my_catalog.header.X-Iceberg-Access-Delegation", "vended-credentials") \
.config("spark.sql.catalog.my_catalog.s3.remote-signing-enabled", "false") \
.config("spark.sql.defaultCatalog", "my_catalog") \
.getOrCreate()
spark.sql("USE my_catalog")
# Create namespace if it does not exist
spark.sql("CREATE NAMESPACE IF NOT EXISTS default")
# Create a table in the namespace using Iceberg
spark.sql("""
CREATE TABLE IF NOT EXISTS default.my_table (
id BIGINT,
name STRING
)
USING iceberg
""")
# Create a simple DataFrame
df = spark.createDataFrame(
[(1, "Alice"), (2, "Bob"), (3, "Charlie")],
["id", "name"]
)
# Write the DataFrame to the Iceberg table
df.write \
.format("iceberg") \
.mode("append") \
.save("default.my_table")
# Read the data back from the Iceberg table
result_df = spark.read \
.format("iceberg") \
.load("default.my_table")
result_df.show()
```
---
title: Spark (Scala) · Cloudflare R2 docs
description: Below is an example of how you can build an Apache Spark
application (with Scala) which connects to R2 Data Catalog. This application
is built to run locally, but it can be adapted to run on a cluster.
lastUpdated: 2026-01-27T21:11:25.000Z
chatbotDeprioritize: false
source_url:
html: https://developers.cloudflare.com/r2/data-catalog/config-examples/spark-scala/
md: https://developers.cloudflare.com/r2/data-catalog/config-examples/spark-scala/index.md
---
Below is an example of how you can build an [Apache Spark](https://spark.apache.org/) application (with Scala) which connects to R2 Data Catalog. This application is built to run locally, but it can be adapted to run on a cluster.
## Prerequisites
* Sign up for a [Cloudflare account](https://dash.cloudflare.com/sign-up/workers-and-pages).
* [Create an R2 bucket](https://developers.cloudflare.com/r2/buckets/create-buckets/) and [enable the data catalog](https://developers.cloudflare.com/r2/data-catalog/manage-catalogs/#enable-r2-data-catalog-on-a-bucket).
* [Create an R2 API token](https://developers.cloudflare.com/r2/api/tokens/) with both [R2 and data catalog permissions](https://developers.cloudflare.com/r2/api/tokens/#permissions).
* Install Java 17, Spark 3.5.3, and SBT 1.10.11
* Note: The specific versions of tools are critical for getting things to work in this example.
* Tip: [“SDKMANâ€](https://sdkman.io/) is a convenient package manager for installing SDKs.
## Example usage
To start, create a new empty project directory somewhere on your machine.
Inside that directory, create the following file at `src/main/scala/com/example/R2DataCatalogDemo.scala`. This will serve as the main entry point for your Spark application.
```java
package com.example
import org.apache.spark.sql.SparkSession
object R2DataCatalogDemo {
def main(args: Array[String]): Unit = {
val uri = sys.env("CATALOG_URI")
val warehouse = sys.env("WAREHOUSE")
val token = sys.env("TOKEN")
val spark = SparkSession.builder()
.appName("My R2 Data Catalog Demo")
.master("local[*]")
.config("spark.sql.extensions", "org.apache.iceberg.spark.extensions.IcebergSparkSessionExtensions")
.config("spark.sql.catalog.mydemo", "org.apache.iceberg.spark.SparkCatalog")
.config("spark.sql.catalog.mydemo.type", "rest")
.config("spark.sql.catalog.mydemo.uri", uri)
.config("spark.sql.catalog.mydemo.warehouse", warehouse)
.config("spark.sql.catalog.mydemo.token", token)
.getOrCreate()
import spark.implicits._
val data = Seq(
(1, "Alice", 25),
(2, "Bob", 30),
(3, "Charlie", 35),
(4, "Diana", 40)
).toDF("id", "name", "age")
spark.sql("USE mydemo")
spark.sql("CREATE NAMESPACE IF NOT EXISTS demoNamespace")
data.writeTo("demoNamespace.demotable").createOrReplace()
val readResult = spark.sql("SELECT * FROM demoNamespace.demotable WHERE age > 30")
println("Records with age > 30:")
readResult.show()
}
}
```
For building this application and managing dependencies, we will use [sbt (“simple build toolâ€)](https://www.scala-sbt.org/). The following is an example `build.sbt` file to place at the root of your project. It is configured to produce a "fat JAR", bundling all required dependencies.
```java
name := "R2DataCatalogDemo"
version := "1.0"
val sparkVersion = "3.5.3"
val icebergVersion = "1.8.1"
// You need to use binaries of Spark compiled with either 2.12 or 2.13; and 2.12 is more common.
// If you download Spark 3.5.3 with sdkman, then it comes with 2.12.18
scalaVersion := "2.12.18"
libraryDependencies ++= Seq(
"org.apache.spark" %% "spark-core" % sparkVersion,
"org.apache.spark" %% "spark-sql" % sparkVersion,
"org.apache.iceberg" % "iceberg-core" % icebergVersion,
"org.apache.iceberg" % "iceberg-spark-runtime-3.5_2.12" % icebergVersion,
"org.apache.iceberg" % "iceberg-aws-bundle" % icebergVersion,
)
// build a fat JAR with all dependencies
assembly / assemblyMergeStrategy := {
case PathList("META-INF", "services", xs @ _*) => MergeStrategy.concat
case PathList("META-INF", xs @ _*) => MergeStrategy.discard
case "reference.conf" => MergeStrategy.concat
case "application.conf" => MergeStrategy.concat
case x if x.endsWith(".properties") => MergeStrategy.first
case x => MergeStrategy.first
}
// For Java 17 Compatability
Compile / javacOptions ++= Seq("--release", "17")
```
To enable the [sbt-assembly plugin](https://github.com/sbt/sbt-assembly?tab=readme-ov-file) (used to build fat JARs), add the following to a new file at `project/assembly.sbt`:
```plaintext
addSbtPlugin("com.eed3si9n" % "sbt-assembly" % "1.2.0")
```
Make sure Java, Spark, and sbt are installed and available in your shell. If you are using SDKMAN, you can install them as shown below:
```bash
sdk install java 17.0.14-amzn
sdk install spark 3.5.3
sdk install sbt 1.10.11
```
With everything installed, you can now build the project using sbt. This will generate a single bundled JAR file.
```bash
sbt clean assembly
```
After building, the output JAR should be located at `target/scala-2.12/R2DataCatalogDemo-assembly-1.0.jar`.
To run the application, you will use `spark-submit`. Below is an example shell script (`submit.sh`) that includes the necessary Java compatibility flags for Spark on Java 17:
```plaintext
# We need to set these "--add-opens" so that Spark can run on Java 17 (it needs access to
# parts of the JVM which have been modularized and made internal).
JAVA_17_COMPATABILITY="--add-opens=java.base/sun.nio.ch=ALL-UNNAMED --add-opens=java.base/java.nio=ALL-UNNAMED --add-opens=java.base/java.lang=ALL-UNNAMED --add-opens=java.base/java.util=ALL-UNNAMED --add-opens=java.base/java.util.concurrent=ALL-UNNAMED"
spark-submit \
--conf "spark.driver.extraJavaOptions=$JAVA_17_COMPATABILITY" \
--conf "spark.executor.extraJavaOptions=$JAVA_17_COMPATABILITY" \
--class com.example.R2DataCatalogDemo target/scala-2.12/R2DataCatalogDemo-assembly-1.0.jar
```
Before running it, make sure the script is executable:
```bash
chmod +x submit.sh
```
At this point, your project directory should be structured like this:
Before submitting the job, make sure you have the required environment variable set for your catalog URI, warehouse, and [Cloudflare API token](https://developers.cloudflare.com/r2/api/tokens/).
```bash
export CATALOG_URI=
export WAREHOUSE=
export TOKEN=
```
You are now ready to run the job:
```bash
./submit.sh
```
---
title: StarRocks · Cloudflare R2 docs
description: Below is an example of using StarRocks to connect, query, modify
data from R2 Data Catalog (read-write).
lastUpdated: 2026-01-27T21:11:25.000Z
chatbotDeprioritize: false
source_url:
html: https://developers.cloudflare.com/r2/data-catalog/config-examples/starrocks/
md: https://developers.cloudflare.com/r2/data-catalog/config-examples/starrocks/index.md
---
Below is an example of using [StarRocks](https://docs.starrocks.io/docs/data_source/catalog/iceberg/iceberg_catalog/#rest) to connect, query, modify data from R2 Data Catalog (read-write).
## Prerequisites
* Sign up for a [Cloudflare account](https://dash.cloudflare.com/sign-up/workers-and-pages).
* [Create an R2 bucket](https://developers.cloudflare.com/r2/buckets/create-buckets/) and [enable the data catalog](https://developers.cloudflare.com/r2/data-catalog/manage-catalogs/#enable-r2-data-catalog-on-a-bucket).
* [Create an R2 API token](https://developers.cloudflare.com/r2/api/tokens/) with both [R2 and data catalog permissions](https://developers.cloudflare.com/r2/api/tokens/#permissions).
* A running [StarRocks](https://www.starrocks.io/) frontend instance. You can use the [all-in-one](https://docs.starrocks.io/docs/quick_start/shared-nothing/#launch-starrocks) docker setup.
## Example usage
In your running StarRocks instance, run these commands:
```sql
-- Create an Iceberg catalog named `r2` and set it as the current catalog
CREATE EXTERNAL CATALOG r2
PROPERTIES
(
"type" = "iceberg",
"iceberg.catalog.type" = "rest",
"iceberg.catalog.uri" = "",
"iceberg.catalog.security" = "oauth2",
"iceberg.catalog.oauth2.token" = "",
"iceberg.catalog.warehouse" = ""
);
SET CATALOG r2;
-- Create a database and display all databases in newly connected catalog
CREATE DATABASE testdb;
SHOW DATABASES FROM r2;
+--------------------+
| Database |
+--------------------+
| information_schema |
| testdb |
+--------------------+
2 rows in set (0.66 sec)
```
---
title: Apache Trino · Cloudflare R2 docs
description: Below is an example of using Apache Trino to connect to R2 Data
Catalog. For more information on connecting to R2 Data Catalog with Trino,
refer to Trino documentation.
lastUpdated: 2026-01-27T21:11:25.000Z
chatbotDeprioritize: false
source_url:
html: https://developers.cloudflare.com/r2/data-catalog/config-examples/trino/
md: https://developers.cloudflare.com/r2/data-catalog/config-examples/trino/index.md
---
Below is an example of using [Apache Trino](https://trino.io/) to connect to R2 Data Catalog. For more information on connecting to R2 Data Catalog with Trino, refer to [Trino documentation](https://trino.io/docs/current/connector/iceberg.html).
## Prerequisites
* Sign up for a [Cloudflare account](https://dash.cloudflare.com/sign-up/workers-and-pages).
* [Create an R2 bucket](https://developers.cloudflare.com/r2/buckets/create-buckets/) and [enable the data catalog](https://developers.cloudflare.com/r2/data-catalog/manage-catalogs/#enable-r2-data-catalog-on-a-bucket).
* [Create an R2 API token, key, and secret](https://developers.cloudflare.com/r2/api/tokens/) with both [R2 and data catalog permissions](https://developers.cloudflare.com/r2/api/tokens/#permissions).
* Install [Docker](https://docs.docker.com/get-docker/) to run the Trino container.
## Setup
Create a local directory for the catalog configuration and change directories to it
```bash
mkdir -p trino-catalog && cd trino-catalog/
```
Create a configuration file called `r2.properties` for your R2 Data Catalog connection:
```properties
# r2.properties
connector.name=iceberg
# R2 Configuration
fs.native-s3.enabled=true
s3.region=auto
s3.aws-access-key=
s3.aws-secret-key=
s3.endpoint=
s3.path-style-access=true
# R2 Data Catalog Configuration
iceberg.catalog.type=rest
iceberg.rest-catalog.uri=
iceberg.rest-catalog.warehouse=
iceberg.rest-catalog.security=OAUTH2
iceberg.rest-catalog.oauth2.token=
```
## Example usage
1. Start Trino with the R2 catalog configuration:
```bash
# Create a local directory for the catalog configuration
mkdir -p trino-catalog
# Place your r2.properties file in the catalog directory
cp r2.properties trino-catalog/
# Run Trino with the catalog configuration
docker run -d \
--name trino-r2 \
-p 8080:8080 \
-v $(pwd)/trino-catalog:/etc/trino/catalog \
trinodb/trino:latest
```
2. Connect to Trino and query your R2 Data Catalog:
```bash
# Connect to the Trino CLI
docker exec -it trino-r2 trino
```
3. In the Trino CLI, run the following commands:
```sql
-- Show all schemas in the R2 catalog
SHOW SCHEMAS IN r2;
-- Show all schemas in the R2 catalog
CREATE SCHEMA r2.example_schema
-- Create a table with some values in it
CREATE TABLE r2.example_schema.yearly_clicks (
year,
clicks
)
WITH (
partitioning = ARRAY['year']
)
AS VALUES
(2021, 10000),
(2022, 20000);
-- Show tables in a specific schema
SHOW TABLES IN r2.example_schema;
-- Query your Iceberg table
SELECT * FROM r2.example_schema.yearly_clicks;
```
---
title: aws CLI · Cloudflare R2 docs
description: You must generate an Access Key before getting started. All
examples will utilize access_key_id and access_key_secret variables which
represent the Access Key ID and Secret Access Key values you generated.
lastUpdated: 2026-01-27T21:11:25.000Z
chatbotDeprioritize: false
source_url:
html: https://developers.cloudflare.com/r2/examples/aws/aws-cli/
md: https://developers.cloudflare.com/r2/examples/aws/aws-cli/index.md
---
You must [generate an Access Key](https://developers.cloudflare.com/r2/api/tokens/) before getting started. All examples will utilize `access_key_id` and `access_key_secret` variables which represent the **Access Key ID** and **Secret Access Key** values you generated.
With the [`aws`](https://docs.aws.amazon.com/cli/latest/userguide/getting-started-install.html) CLI installed, you may run [`aws configure`](https://docs.aws.amazon.com/cli/latest/userguide/cli-configure-quickstart.html#cli-configure-quickstart-config) to configure a new profile. You will be prompted with a series of questions for the new profile's details.
```shell
aws configure
```
```sh
AWS Access Key ID [None]:
AWS Secret Access Key [None]:
Default region name [None]: auto
Default output format [None]: json
```
The `region` value can be set to `auto` since it is required by the SDK but not used by R2.
You may then use the `aws` CLI for any of your normal workflows.
```sh
# Provide your Cloudflare account ID
aws s3api list-buckets --endpoint-url https://.r2.cloudflarestorage.com
# {
# "Buckets": [
# {
# "Name": "my-bucket",
# "CreationDate": "2022-05-18T17:19:59.645000+00:00"
# }
# ],
# "Owner": {
# "DisplayName": "134a5a2c0ba47b38eada4b9c8ead10b6",
# "ID": "134a5a2c0ba47b38eada4b9c8ead10b6"
# }
# }
aws s3api list-objects-v2 --endpoint-url https://.r2.cloudflarestorage.com --bucket my-bucket
# {
# "Contents": [
# {
# "Key": "ferriswasm.png",
# "LastModified": "2022-05-18T17:20:21.670000+00:00",
# "ETag": "\"eb2b891dc67b81755d2b726d9110af16\"",
# "Size": 87671,
# "StorageClass": "STANDARD"
# }
# ]
# }
```
## Generate presigned URLs
You can also generate presigned links which allow you to share public access to a file temporarily.
```sh
# You can pass the --expires-in flag to determine how long the presigned link is valid.
aws s3 presign --endpoint-url https://.r2.cloudflarestorage.com s3://my-bucket/ferriswasm.png --expires-in 3600
# https://.r2.cloudflarestorage.com/my-bucket/ferriswasm.png?X-Amz-Algorithm=AWS4-HMAC-SHA256&X-Amz-Credential=&X-Amz-Date=&X-Amz-Expires=3600&X-Amz-SignedHeaders=host&X-Amz-Signature=
```
---
title: aws-sdk-go · Cloudflare R2 docs
description: You must generate an Access Key before getting started. All
examples will utilize access_key_id and access_key_secret variables which
represent the Access Key ID and Secret Access Key values you generated.
lastUpdated: 2026-01-27T21:11:25.000Z
chatbotDeprioritize: false
source_url:
html: https://developers.cloudflare.com/r2/examples/aws/aws-sdk-go/
md: https://developers.cloudflare.com/r2/examples/aws/aws-sdk-go/index.md
---
You must [generate an Access Key](https://developers.cloudflare.com/r2/api/tokens/) before getting started. All examples will utilize `access_key_id` and `access_key_secret` variables which represent the **Access Key ID** and **Secret Access Key** values you generated.
This example uses version 2 of the [aws-sdk-go](https://github.com/aws/aws-sdk-go-v2) package. You must pass in the R2 configuration credentials when instantiating your `S3` service client:
```go
package main
import (
"context"
"encoding/json"
"fmt"
"github.com/aws/aws-sdk-go-v2/aws"
"github.com/aws/aws-sdk-go-v2/config"
"github.com/aws/aws-sdk-go-v2/credentials"
"github.com/aws/aws-sdk-go-v2/service/s3"
"log"
)
func main() {
var bucketName = "sdk-example"
// Provide your Cloudflare account ID
var accountId = ""
// Retrieve your S3 API credentials for your R2 bucket via API tokens
// (see: https://developers.cloudflare.com/r2/api/tokens)
var accessKeyId = ""
var accessKeySecret = ""
cfg, err := config.LoadDefaultConfig(context.TODO(),
config.WithCredentialsProvider(credentials.NewStaticCredentialsProvider(accessKeyId, accessKeySecret, "")),
config.WithRegion("auto"), // Required by SDK but not used by R2
)
if err != nil {
log.Fatal(err)
}
client := s3.NewFromConfig(cfg, func(o *s3.Options) {
o.BaseEndpoint = aws.String(fmt.Sprintf("https://%s.r2.cloudflarestorage.com", accountId))
})
listObjectsOutput, err := client.ListObjectsV2(context.TODO(), &s3.ListObjectsV2Input{
Bucket: &bucketName,
})
if err != nil {
log.Fatal(err)
}
for _, object := range listObjectsOutput.Contents {
obj, _ := json.MarshalIndent(object, "", "\t")
fmt.Println(string(obj))
}
// {
// "ChecksumAlgorithm": null,
// "ETag": "\"eb2b891dc67b81755d2b726d9110af16\"",
// "Key": "ferriswasm.png",
// "LastModified": "2022-05-18T17:20:21.67Z",
// "Owner": null,
// "Size": 87671,
// "StorageClass": "STANDARD"
// }
listBucketsOutput, err := client.ListBuckets(context.TODO(), &s3.ListBucketsInput{})
if err != nil {
log.Fatal(err)
}
for _, object := range listBucketsOutput.Buckets {
obj, _ := json.MarshalIndent(object, "", "\t")
fmt.Println(string(obj))
}
// {
// "CreationDate": "2022-05-18T17:19:59.645Z",
// "Name": "sdk-example"
// }
}
```
## Generate presigned URLs
You can also generate presigned links that can be used to temporarily share public write access to a bucket.
```go
presignClient := s3.NewPresignClient(client)
presignResult, err := presignClient.PresignPutObject(context.TODO(), &s3.PutObjectInput{
Bucket: aws.String(bucketName),
Key: aws.String("example.txt"),
})
if err != nil {
panic("Couldn't get presigned URL for PutObject")
}
fmt.Printf("Presigned URL For object: %s\n", presignResult.URL)
```
---
title: aws-sdk-java · Cloudflare R2 docs
description: You must generate an Access Key before getting started. All
examples will utilize access_key_id and access_key_secret variables which
represent the Access Key ID and Secret Access Key values you generated.
lastUpdated: 2026-02-06T12:29:12.000Z
chatbotDeprioritize: false
source_url:
html: https://developers.cloudflare.com/r2/examples/aws/aws-sdk-java/
md: https://developers.cloudflare.com/r2/examples/aws/aws-sdk-java/index.md
---
You must [generate an Access Key](https://developers.cloudflare.com/r2/api/tokens/) before getting started. All examples will utilize `access_key_id` and `access_key_secret` variables which represent the **Access Key ID** and **Secret Access Key** values you generated.
This example uses version 2 of the [aws-sdk-java](https://github.com/aws/aws-sdk-java-v2/#using-the-sdk) package. You must pass in the R2 configuration credentials when instantiating your `S3` service client.
Note
You must set `chunkedEncodingEnabled(false)` in the `S3Configuration` when building your client. The AWS SDK for Java v2 uses chunked transfer encoding by default for `putObject` requests, which causes a signature mismatch error (HTTP 403) with R2. Disabling chunked encoding ensures the request signature is calculated correctly.
```java
import software.amazon.awssdk.auth.credentials.AwsBasicCredentials;
import software.amazon.awssdk.auth.credentials.StaticCredentialsProvider;
import software.amazon.awssdk.regions.Region;
import software.amazon.awssdk.services.s3.S3Client;
import software.amazon.awssdk.services.s3.model.*;
import software.amazon.awssdk.services.s3.S3Configuration;
import software.amazon.awssdk.core.sync.RequestBody;
import java.net.URI;
import java.util.List;
/**
* Client for interacting with Cloudflare R2 Storage using AWS SDK S3 compatibility
*/
public class CloudflareR2Client {
private final S3Client s3Client;
/**
* Creates a new CloudflareR2Client with the provided configuration
*/
public CloudflareR2Client(S3Config config) {
this.s3Client = buildS3Client(config);
}
/**
* Configuration class for R2 credentials and endpoint
* - accountId: Your Cloudflare account ID
* - accessKey: Your R2 Access Key ID (see: https://developers.cloudflare.com/r2/api/tokens)
* - secretKey: Your R2 Secret Access Key (see: https://developers.cloudflare.com/r2/api/tokens)
*/
public static class S3Config {
private final String accountId;
private final String accessKey;
private final String secretKey;
private final String endpoint;
public S3Config(String accountId, String accessKey, String secretKey) {
this.accountId = accountId;
this.accessKey = accessKey;
this.secretKey = secretKey;
this.endpoint = String.format("https://%s.r2.cloudflarestorage.com", accountId);
}
public String getAccessKey() { return accessKey; }
public String getSecretKey() { return secretKey; }
public String getEndpoint() { return endpoint; }
}
/**
* Builds and configures the S3 client with R2-specific settings
*/
private static S3Client buildS3Client(S3Config config) {
AwsBasicCredentials credentials = AwsBasicCredentials.create(
config.getAccessKey(),
config.getSecretKey()
);
S3Configuration serviceConfiguration = S3Configuration.builder()
.pathStyleAccessEnabled(true)
.chunkedEncodingEnabled(false)
.build();
return S3Client.builder()
.endpointOverride(URI.create(config.getEndpoint()))
.credentialsProvider(StaticCredentialsProvider.create(credentials))
.region(Region.of("auto")) // Required by SDK but not used by R2
.serviceConfiguration(serviceConfiguration)
.build();
}
/**
* Lists all buckets in the R2 storage
*/
public List listBuckets() {
try {
return s3Client.listBuckets().buckets();
} catch (S3Exception e) {
throw new RuntimeException("Failed to list buckets: " + e.getMessage(), e);
}
}
/**
* Lists all objects in the specified bucket
*/
public List listObjects(String bucketName) {
try {
ListObjectsV2Request request = ListObjectsV2Request.builder()
.bucket(bucketName)
.build();
return s3Client.listObjectsV2(request).contents();
} catch (S3Exception e) {
throw new RuntimeException("Failed to list objects in bucket " + bucketName + ": " + e.getMessage(), e);
}
}
/**
* Uploads an object to the specified bucket
*/
public void putObject(String bucketName, String key, String content) {
try {
PutObjectRequest request = PutObjectRequest.builder()
.bucket(bucketName)
.key(key)
.build();
s3Client.putObject(request, RequestBody.fromString(content));
} catch (S3Exception e) {
throw new RuntimeException("Failed to put object " + key + " in bucket " + bucketName + ": " + e.getMessage(), e);
}
}
public static void main(String[] args) {
S3Config config = new S3Config(
"",
"",
""
);
CloudflareR2Client r2Client = new CloudflareR2Client(config);
// List buckets
System.out.println("Available buckets:");
r2Client.listBuckets().forEach(bucket ->
System.out.println("* " + bucket.name())
);
// Upload an object to a bucket
String bucketName = "demos";
r2Client.putObject(bucketName, "example.txt", "Hello, R2!");
System.out.println("Uploaded example.txt to bucket '" + bucketName + "'");
// List objects in a specific bucket
System.out.println("\nObjects in bucket '" + bucketName + "':");
r2Client.listObjects(bucketName).forEach(object ->
System.out.printf("* %s (size: %d bytes, modified: %s)%n",
object.key(),
object.size(),
object.lastModified())
);
}
}
```
## Generate presigned URLs
You can also generate presigned links that can be used to temporarily share public write access to a bucket.
```java
// import required packages for presigning
// Rest of the packages are same as above
import software.amazon.awssdk.services.s3.presigner.S3Presigner;
import software.amazon.awssdk.services.s3.presigner.model.PutObjectPresignRequest;
import software.amazon.awssdk.services.s3.presigner.model.PresignedPutObjectRequest;
import java.time.Duration;
public class CloudflareR2Client {
private final S3Client s3Client;
private final S3Presigner presigner;
/**
* Creates a new CloudflareR2Client with the provided configuration
*/
public CloudflareR2Client(S3Config config) {
this.s3Client = buildS3Client(config);
this.presigner = buildS3Presigner(config);
}
/**
* Builds and configures the S3 presigner with R2-specific settings
*/
private static S3Presigner buildS3Presigner(S3Config config) {
AwsBasicCredentials credentials = AwsBasicCredentials.create(
config.getAccessKey(),
config.getSecretKey()
);
return S3Presigner.builder()
.endpointOverride(URI.create(config.getEndpoint()))
.credentialsProvider(StaticCredentialsProvider.create(credentials))
.region(Region.of("auto")) // Required by SDK but not used by R2
.serviceConfiguration(S3Configuration.builder()
.pathStyleAccessEnabled(true)
.build())
.build();
}
public String generatePresignedUploadUrl(String bucketName, String objectKey, Duration expiration) {
PutObjectPresignRequest presignRequest = PutObjectPresignRequest.builder()
.signatureDuration(expiration)
.putObjectRequest(builder -> builder
.bucket(bucketName)
.key(objectKey)
.build())
.build();
PresignedPutObjectRequest presignedRequest = presigner.presignPutObject(presignRequest);
return presignedRequest.url().toString();
}
// Rest of the methods remains the same
public static void main(String[] args) {
// config the client as before
// Generate a pre-signed upload URL valid for 15 minutes
String uploadUrl = r2Client.generatePresignedUploadUrl(
"demos",
"README.md",
Duration.ofMinutes(15)
);
System.out.println("Pre-signed Upload URL (valid for 15 minutes):");
System.out.println(uploadUrl);
}
}
```
---
title: aws-sdk-js · Cloudflare R2 docs
description: You must generate an Access Key before getting started. All
examples will utilize access_key_id and access_key_secret variables which
represent the Access Key ID and Secret Access Key values you generated.
lastUpdated: 2026-01-27T21:11:25.000Z
chatbotDeprioritize: false
source_url:
html: https://developers.cloudflare.com/r2/examples/aws/aws-sdk-js/
md: https://developers.cloudflare.com/r2/examples/aws/aws-sdk-js/index.md
---
You must [generate an Access Key](https://developers.cloudflare.com/r2/api/tokens/) before getting started. All examples will utilize `access_key_id` and `access_key_secret` variables which represent the **Access Key ID** and **Secret Access Key** values you generated.
If you are interested in the newer version of the AWS JavaScript SDK visit this [dedicated aws-sdk-js-v3 example page](https://developers.cloudflare.com/r2/examples/aws/aws-sdk-js-v3/).
JavaScript or TypeScript users may continue to use the [`aws-sdk`](https://www.npmjs.com/package/aws-sdk) npm package as per normal. You must pass in the R2 configuration credentials when instantiating your `S3` service client:
```ts
import S3 from "aws-sdk/clients/s3.js";
const s3 = new S3({
// Provide your Cloudflare account ID
endpoint: `https://${ACCOUNT_ID}.r2.cloudflarestorage.com`,
// Retrieve your S3 API credentials for your R2 bucket via API tokens (see: https://developers.cloudflare.com/r2/api/tokens)
accessKeyId: `${ACCESS_KEY_ID}`,
secretAccessKey: `${SECRET_ACCESS_KEY}`,
signatureVersion: "v4",
});
console.log(await s3.listBuckets().promise());
//=> {
//=> Buckets: [
//=> { Name: 'user-uploads', CreationDate: 2022-04-13T21:23:47.102Z },
//=> { Name: 'my-bucket', CreationDate: 2022-05-07T02:46:49.218Z }
//=> ],
//=> Owner: {
//=> DisplayName: '...',
//=> ID: '...'
//=> }
//=> }
console.log(await s3.listObjects({ Bucket: "my-bucket" }).promise());
//=> {
//=> IsTruncated: false,
//=> Name: 'my-bucket',
//=> CommonPrefixes: [],
//=> MaxKeys: 1000,
//=> Contents: [
//=> {
//=> Key: 'cat.png',
//=> LastModified: 2022-05-07T02:50:45.616Z,
//=> ETag: '"c4da329b38467509049e615c11b0c48a"',
//=> ChecksumAlgorithm: [],
//=> Size: 751832,
//=> Owner: [Object]
//=> },
//=> {
//=> Key: 'todos.txt',
//=> LastModified: 2022-05-07T21:37:17.150Z,
//=> ETag: '"29d911f495d1ba7cb3a4d7d15e63236a"',
//=> ChecksumAlgorithm: [],
//=> Size: 279,
//=> Owner: [Object]
//=> }
//=> ]
//=> }
```
## Generate presigned URLs
You can also generate presigned links that can be used to share public read or write access to a bucket temporarily.
```ts
// Use the expires property to determine how long the presigned link is valid.
console.log(
await s3.getSignedUrlPromise("getObject", {
Bucket: "my-bucket",
Key: "dog.png",
Expires: 3600,
}),
);
// You can also create links for operations such as putObject to allow temporary write access to a specific key.
// Specify ContentType to restrict uploads to a specific file type.
console.log(
await s3.getSignedUrlPromise("putObject", {
Bucket: "my-bucket",
Key: "dog.png",
Expires: 3600,
ContentType: "image/png",
}),
);
```
```sh
https://my-bucket..r2.cloudflarestorage.com/dog.png?X-Amz-Algorithm=AWS4-HMAC-SHA256&X-Amz-Credential=&X-Amz-Date=&X-Amz-Expires=3600&X-Amz-SignedHeaders=host&X-Amz-Signature=
https://my-bucket..r2.cloudflarestorage.com/dog.png?X-Amz-Algorithm=AWS4-HMAC-SHA256&X-Amz-Credential=&X-Amz-Date=&X-Amz-Expires=3600&X-Amz-SignedHeaders=content-type%3Bhost&X-Amz-Signature=
```
You can use the link generated by the `putObject` example to upload to the specified bucket and key, until the presigned link expires. When using a presigned URL with `ContentType`, the client must include a matching `Content-Type` header in the request.
```sh
curl -X PUT "https://my-bucket..r2.cloudflarestorage.com/dog.png?X-Amz-Algorithm=..." \
-H "Content-Type: image/png" \
--data-binary @dog.png
```
## Restrict uploads with CORS and Content-Type
When generating presigned URLs for uploads, you can limit abuse and misuse by:
1. **Restricting Content-Type**: Specify the allowed content type in the presigned URL parameters. The upload will fail if the client sends a different `Content-Type` header.
2. **Configuring CORS**: Set up [CORS rules](https://developers.cloudflare.com/r2/buckets/cors/#add-cors-policies-from-the-dashboard) on your bucket to control which origins can upload files. Configure CORS via the [Cloudflare dashboard](https://dash.cloudflare.com/?to=/:account/r2/overview) by adding a JSON policy to your bucket settings:
```json
[
{
"AllowedOrigins": ["https://example.com"],
"AllowedMethods": ["PUT"],
"AllowedHeaders": ["Content-Type"],
"ExposeHeaders": ["ETag"],
"MaxAgeSeconds": 3600
}
]
```
Then generate a presigned URL with a Content-Type restriction:
```ts
const putUrl = await s3.getSignedUrlPromise("putObject", {
Bucket: "my-bucket",
Key: "user-upload.png",
Expires: 3600,
ContentType: "image/png",
});
```
When a client uses this presigned URL, they must:
* Make the request from an allowed origin (enforced by CORS)
* Include the `Content-Type: image/png` header (enforced by the signature)
---
title: aws-sdk-js-v3 · Cloudflare R2 docs
description: You must generate an Access Key before getting started. All
examples will utilize access_key_id and access_key_secret variables which
represent the Access Key ID and Secret Access Key values you generated.
lastUpdated: 2026-01-27T21:11:25.000Z
chatbotDeprioritize: false
source_url:
html: https://developers.cloudflare.com/r2/examples/aws/aws-sdk-js-v3/
md: https://developers.cloudflare.com/r2/examples/aws/aws-sdk-js-v3/index.md
---
You must [generate an Access Key](https://developers.cloudflare.com/r2/api/tokens/) before getting started. All examples will utilize `access_key_id` and `access_key_secret` variables which represent the **Access Key ID** and **Secret Access Key** values you generated.
JavaScript or TypeScript users may continue to use the [`@aws-sdk/client-s3`](https://www.npmjs.com/package/@aws-sdk/client-s3) npm package as per normal. You must pass in the R2 configuration credentials when instantiating your `S3` service client.
Note
Currently, you cannot use AWS S3-compatible API while developing locally via `wrangler dev`.
```ts
import {
S3Client,
ListBucketsCommand,
ListObjectsV2Command,
GetObjectCommand,
PutObjectCommand,
} from "@aws-sdk/client-s3";
const S3 = new S3Client({
region: "auto", // Required by SDK but not used by R2
// Provide your Cloudflare account ID
endpoint: `https://${ACCOUNT_ID}.r2.cloudflarestorage.com`,
// Retrieve your S3 API credentials for your R2 bucket via API tokens (see: https://developers.cloudflare.com/r2/api/tokens)
credentials: {
accessKeyId: ACCESS_KEY_ID,
secretAccessKey: SECRET_ACCESS_KEY,
},
});
console.log(await S3.send(new ListBucketsCommand({})));
// {
// '$metadata': {
// httpStatusCode: 200,
// requestId: undefined,
// extendedRequestId: undefined,
// cfId: undefined,
// attempts: 1,
// totalRetryDelay: 0
// },
// Buckets: [
// { Name: 'user-uploads', CreationDate: 2022-04-13T21:23:47.102Z },
// { Name: 'my-bucket', CreationDate: 2022-05-07T02:46:49.218Z }
// ],
// Owner: {
// DisplayName: '...',
// ID: '...'
// }
// }
console.log(
await S3.send(new ListObjectsV2Command({ Bucket: "my-bucket" })),
);
// {
// '$metadata': {
// httpStatusCode: 200,
// requestId: undefined,
// extendedRequestId: undefined,
// cfId: undefined,
// attempts: 1,
// totalRetryDelay: 0
// },
// CommonPrefixes: undefined,
// Contents: [
// {
// Key: 'cat.png',
// LastModified: 2022-05-07T02:50:45.616Z,
// ETag: '"c4da329b38467509049e615c11b0c48a"',
// ChecksumAlgorithm: undefined,
// Size: 751832,
// StorageClass: 'STANDARD',
// Owner: undefined
// },
// {
// Key: 'todos.txt',
// LastModified: 2022-05-07T21:37:17.150Z,
// ETag: '"29d911f495d1ba7cb3a4d7d15e63236a"',
// ChecksumAlgorithm: undefined,
// Size: 279,
// StorageClass: 'STANDARD',
// Owner: undefined
// }
// ],
// ContinuationToken: undefined,
// Delimiter: undefined,
// EncodingType: undefined,
// IsTruncated: false,
// KeyCount: 8,
// MaxKeys: 1000,
// Name: 'my-bucket',
// NextContinuationToken: undefined,
// Prefix: undefined,
// StartAfter: undefined
// }
```
## Generate presigned URLs
You can also generate presigned links that can be used to share public read or write access to a bucket temporarily.
```ts
import { getSignedUrl } from "@aws-sdk/s3-request-presigner";
// Use the expiresIn property to determine how long the presigned link is valid.
console.log(
await getSignedUrl(
S3,
new GetObjectCommand({ Bucket: "my-bucket", Key: "dog.png" }),
{ expiresIn: 3600 },
),
);
// You can also create links for operations such as PutObject to allow temporary write access to a specific key.
// Specify ContentType to restrict uploads to a specific file type.
console.log(
await getSignedUrl(
S3,
new PutObjectCommand({
Bucket: "my-bucket",
Key: "dog.png",
ContentType: "image/png",
}),
{ expiresIn: 3600 },
),
);
```
```sh
https://my-bucket..r2.cloudflarestorage.com/dog.png?X-Amz-Algorithm=AWS4-HMAC-SHA256&X-Amz-Content-Sha256=UNSIGNED-PAYLOAD&X-Amz-Credential=&X-Amz-Date=&X-Amz-Expires=3600&X-Amz-SignedHeaders=host&X-Amz-Signature=&x-id=GetObject
https://my-bucket..r2.cloudflarestorage.com/dog.png?X-Amz-Algorithm=AWS4-HMAC-SHA256&X-Amz-Content-Sha256=UNSIGNED-PAYLOAD&X-Amz-Credential=&X-Amz-Date=&X-Amz-Expires=3600&X-Amz-SignedHeaders=content-type%3Bhost&X-Amz-Signature=&x-id=PutObject
```
You can use the link generated by the `PutObject` example to upload to the specified bucket and key, until the presigned link expires. When using a presigned URL with `ContentType`, the client must include a matching `Content-Type` header in the request.
```sh
curl -X PUT "https://my-bucket..r2.cloudflarestorage.com/dog.png?X-Amz-Algorithm=..." \
-H "Content-Type: image/png" \
--data-binary @dog.png
```
## Restrict uploads with CORS and Content-Type
When generating presigned URLs for uploads, you can limit abuse and misuse by:
1. **Restricting Content-Type**: Specify the allowed content type in the `PutObjectCommand`. The upload will fail if the client sends a different `Content-Type` header.
2. **Configuring CORS**: Set up [CORS rules](https://developers.cloudflare.com/r2/buckets/cors/#add-cors-policies-from-the-dashboard) on your bucket to control which origins can upload files. Configure CORS via the [Cloudflare dashboard](https://dash.cloudflare.com/?to=/:account/r2/overview) by adding a JSON policy to your bucket settings:
```json
[
{
"AllowedOrigins": ["https://example.com"],
"AllowedMethods": ["PUT"],
"AllowedHeaders": ["Content-Type"],
"ExposeHeaders": ["ETag"],
"MaxAgeSeconds": 3600
}
]
```
Then generate a presigned URL with a Content-Type restriction:
```ts
const putUrl = await getSignedUrl(
S3,
new PutObjectCommand({
Bucket: "my-bucket",
Key: "dog.png",
ContentType: "image/png",
}),
{ expiresIn: 3600 },
);
```
When a client uses this presigned URL, they must:
* Make the request from an allowed origin (enforced by CORS)
* Include the `Content-Type: image/png` header (enforced by the signature)
---
title: aws-sdk-net · Cloudflare R2 docs
description: You must generate an Access Key before getting started. All
examples will utilize access_key_id and access_key_secret variables which
represent the Access Key ID and Secret Access Key values you generated.
lastUpdated: 2026-01-27T21:11:25.000Z
chatbotDeprioritize: false
source_url:
html: https://developers.cloudflare.com/r2/examples/aws/aws-sdk-net/
md: https://developers.cloudflare.com/r2/examples/aws/aws-sdk-net/index.md
---
You must [generate an Access Key](https://developers.cloudflare.com/r2/api/tokens/) before getting started. All examples will utilize `access_key_id` and `access_key_secret` variables which represent the **Access Key ID** and **Secret Access Key** values you generated.
This example uses version 3 of the [aws-sdk-net](https://www.nuget.org/packages/AWSSDK.S3) package. You must pass in the R2 configuration credentials when instantiating your `S3` service client:
## Client setup
In this example, you will pass credentials explicitly to the `IAmazonS3` initialization. If you wish, use a shared AWS credentials file or the SDK store in-line with other AWS SDKs. Refer to [Configure AWS credentials](https://docs.aws.amazon.com/sdk-for-net/v3/developer-guide/net-dg-config-creds.html) for more details.
```csharp
private static IAmazonS3 s3Client;
public static void Main(string[] args)
{
// Retrieve your S3 API credentials for your R2 bucket via API tokens (see: https://developers.cloudflare.com/r2/api/tokens)
var accessKey = "";
var secretKey = "";
var credentials = new BasicAWSCredentials(accessKey, secretKey);
s3Client = new AmazonS3Client(credentials, new AmazonS3Config
{
// Provide your Cloudflare account ID
ServiceURL = "https://.r2.cloudflarestorage.com",
});
}
```
## List buckets and objects
The [ListBucketsAsync](https://docs.aws.amazon.com/sdkfornet/v3/apidocs/items/S3/MIS3ListBucketsAsyncListBucketsRequestCancellationToken.html) and [ListObjectsAsync](https://docs.aws.amazon.com/sdkfornet/v3/apidocs/items/S3/MIS3ListObjectsV2AsyncListObjectsV2RequestCancellationToken.html) methods can be used to list buckets under your account and the contents of those buckets respectively.
```csharp
static async Task ListBuckets()
{
var response = await s3Client.ListBucketsAsync();
foreach (var s3Bucket in response.Buckets)
{
Console.WriteLine("{0}", s3Bucket.BucketName);
}
}
```
```sh
sdk-example
my-bucket
```
```csharp
static async Task ListObjectsV2()
{
var request = new ListObjectsV2Request
{
BucketName = "my-bucket"
};
var response = await s3Client.ListObjectsV2Async(request);
foreach (var s3Object in response.S3Objects)
{
Console.WriteLine("{0}", s3Object.Key);
}
}
```
```sh
dog.png
cat.png
```
## Upload and retrieve objects
The [PutObjectAsync](https://docs.aws.amazon.com/sdkfornet/v3/apidocs/items/S3/MIS3PutObjectAsyncPutObjectRequestCancellationToken.html) and [GetObjectAsync](https://docs.aws.amazon.com/sdkfornet/v3/apidocs/items/S3/MIS3GetObjectAsyncStringStringCancellationToken.html) methods can be used to upload objects and download objects from an R2 bucket respectively.
Warning
`DisablePayloadSigning = true` and `DisableDefaultChecksumValidation = true` must be passed as Cloudflare R2 does not currently support the Streaming SigV4 implementation used by AWSSDK.S3.
```csharp
static async Task PutObject()
{
var request = new PutObjectRequest
{
FilePath = @"/path/file.txt",
BucketName = "my-bucket",
DisablePayloadSigning = true,
DisableDefaultChecksumValidation = true
};
var response = await s3Client.PutObjectAsync(request);
Console.WriteLine("ETag: {0}", response.ETag);
}
```
```sh
ETag: "186a71ee365d9686c3b98b6976e1f196"
```
```csharp
static async Task GetObject()
{
var bucket = "my-bucket";
var key = "file.txt";
var response = await s3Client.GetObjectAsync(bucket, key);
Console.WriteLine("ETag: {0}", response.ETag);
}
```
```sh
ETag: "186a71ee365d9686c3b98b6976e1f196"
```
## Generate presigned URLs
The [GetPreSignedURL](https://docs.aws.amazon.com/sdkfornet/v3/apidocs/items/S3/MIS3GetPreSignedURLGetPreSignedUrlRequest.html) method allows you to sign ahead of time, giving temporary access to a specific operation. In this case, presigning a `PutObject` request for `sdk-example/file.txt`.
```csharp
static string? GeneratePresignedUrl()
{
AWSConfigsS3.UseSignatureVersion4 = true;
var presign = new GetPreSignedUrlRequest
{
BucketName = "my-bucket",
Key = "file.txt",
Verb = HttpVerb.GET,
Expires = DateTime.Now.AddDays(7),
};
var presignedUrl = s3Client.GetPreSignedURL(presign);
Console.WriteLine(presignedUrl);
return presignedUrl;
}
```
```sh
https://.r2.cloudflarestorage.com/my-bucket/file.txt?X-Amz-Algorithm=AWS4-HMAC-SHA256&X-Amz-Credential=&X-Amz-Date=&X-Amz-Expires=3600&X-Amz-SignedHeaders=host&X-Amz-Signature=
```
---
title: aws-sdk-php · Cloudflare R2 docs
description: Example of how to configure `aws-sdk-php` to use R2.
lastUpdated: 2026-01-27T21:11:25.000Z
chatbotDeprioritize: false
source_url:
html: https://developers.cloudflare.com/r2/examples/aws/aws-sdk-php/
md: https://developers.cloudflare.com/r2/examples/aws/aws-sdk-php/index.md
---
You must [generate an Access Key](https://developers.cloudflare.com/r2/api/tokens/) before getting started. All examples will utilize `access_key_id` and `access_key_secret` variables which represent the **Access Key ID** and **Secret Access Key** values you generated.
This example uses version 3 of the [aws-sdk-php](https://packagist.org/packages/aws/aws-sdk-php) package. You must pass in the R2 configuration credentials when instantiating your `S3` service client:
```php
";
// Retrieve your S3 API credentials for your R2 bucket via API tokens (see: https://developers.cloudflare.com/r2/api/tokens)
$access_key_id = "";
$access_key_secret = "";
$credentials = new Aws\Credentials\Credentials($access_key_id, $access_key_secret);
$options = [
'region' => 'auto', // Required by SDK but not used by R2
'endpoint' => "https://$account_id.r2.cloudflarestorage.com",
'version' => 'latest',
'credentials' => $credentials
];
$s3_client = new Aws\S3\S3Client($options);
$contents = $s3_client->listObjectsV2([
'Bucket' => $bucket_name
]);
var_dump($contents['Contents']);
// array(1) {
// [0]=>
// array(5) {
// ["Key"]=>
// string(14) "ferriswasm.png"
// ["LastModified"]=>
// object(Aws\Api\DateTimeResult)#187 (3) {
// ["date"]=>
// string(26) "2022-05-18 17:20:21.670000"
// ["timezone_type"]=>
// int(2)
// ["timezone"]=>
// string(1) "Z"
// }
// ["ETag"]=>
// string(34) ""eb2b891dc67b81755d2b726d9110af16""
// ["Size"]=>
// string(5) "87671"
// ["StorageClass"]=>
// string(8) "STANDARD"
// }
// }
$buckets = $s3_client->listBuckets();
var_dump($buckets['Buckets']);
// array(1) {
// [0]=>
// array(2) {
// ["Name"]=>
// string(11) "my-bucket"
// ["CreationDate"]=>
// object(Aws\Api\DateTimeResult)#212 (3) {
// ["date"]=>
// string(26) "2022-05-18 17:19:59.645000"
// ["timezone_type"]=>
// int(2)
// ["timezone"]=>
// string(1) "Z"
// }
// }
// }
?>
```
## Generate presigned URLs
You can also generate presigned links that can be used to share public read or write access to a bucket temporarily.
```php
$cmd = $s3_client->getCommand('GetObject', [
'Bucket' => $bucket_name,
'Key' => 'ferriswasm.png'
]);
// The second parameter allows you to determine how long the presigned link is valid.
$request = $s3_client->createPresignedRequest($cmd, '+1 hour');
print_r((string)$request->getUri())
// https://my-bucket..r2.cloudflarestorage.com/ferriswasm.png?X-Amz-Content-Sha256=UNSIGNED-PAYLOAD&X-Amz-Algorithm=AWS4-HMAC-SHA256&X-Amz-Credential=&X-Amz-Date=&X-Amz-SignedHeaders=host&X-Amz-Expires=3600&X-Amz-Signature=
// You can also create links for operations such as putObject to allow temporary write access to a specific key.
$cmd = $s3_client->getCommand('PutObject', [
'Bucket' => $bucket_name,
'Key' => 'ferriswasm.png'
]);
$request = $s3_client->createPresignedRequest($cmd, '+1 hour');
print_r((string)$request->getUri())
```
You can use the link generated by the `putObject` example to upload to the specified bucket and key, until the presigned link expires.
```sh
curl -X PUT https://my-bucket..r2.cloudflarestorage.com/ferriswasm.png?X-Amz-Content-Sha256=UNSIGNED-PAYLOAD&X-Amz-Algorithm=AWS4-HMAC-SHA256&X-Amz-Credential=&X-Amz-Date=&X-Amz-SignedHeaders=host&X-Amz-Expires=3600&X-Amz-Signature= --data-binary @ferriswasm.png
```
---
title: aws-sdk-ruby · Cloudflare R2 docs
description: You must generate an Access Key before getting started. All
examples will utilize access_key_id and access_key_secret variables which
represent the Access Key ID and Secret Access Key values you generated.
lastUpdated: 2026-01-27T21:11:25.000Z
chatbotDeprioritize: false
source_url:
html: https://developers.cloudflare.com/r2/examples/aws/aws-sdk-ruby/
md: https://developers.cloudflare.com/r2/examples/aws/aws-sdk-ruby/index.md
---
You must [generate an Access Key](https://developers.cloudflare.com/r2/api/tokens/) before getting started. All examples will utilize `access_key_id` and `access_key_secret` variables which represent the **Access Key ID** and **Secret Access Key** values you generated.
Many Ruby projects also store these credentials in environment variables instead.
Add the following dependency to your `Gemfile`:
```ruby
gem "aws-sdk-s3"
```
Then you can use Ruby to operate on R2 buckets:
```ruby
require "aws-sdk-s3"
@r2 = Aws::S3::Client.new(
# Retrieve your S3 API credentials for your R2 bucket via API tokens (see: https://developers.cloudflare.com/r2/api/tokens)
access_key_id: "#{ACCESS_KEY_ID}",
secret_access_key: "#{SECRET_ACCESS_KEY}",
# Provide your Cloudflare account ID
endpoint: "https://#{ACCOUNT_ID}.r2.cloudflarestorage.com",
region: "auto", # Required by SDK but not used by R2
)
# List all buckets on your account
puts @r2.list_buckets
#=> {
#=> :buckets => [{
#=> :name => "your-bucket",
#=> :creation_date => "…",
#=> }],
#=> :owner => {
#=> :display_name => "…",
#=> :id => "…"
#=> }
#=> }
# List the first 20 items in a bucket
puts @r2.list_objects(bucket:"your-bucket", max_keys:20)
#=> {
#=> :is_truncated => false,
#=> :marker => nil,
#=> :next_marker => nil,
#=> :name => "your-bucket",
#=> :prefix => nil,
#=> :delimiter =>nil,
#=> :max_keys => 20,
#=> :common_prefixes => [],
#=> :encoding_type => nil
#=> :contents => [
#=> …,
#=> …,
#=> …,
#=> ]
#=> }
```
---
title: aws-sdk-rust · Cloudflare R2 docs
description: You must generate an Access Key before getting started. All
examples will utilize access_key_id and access_key_secret variables which
represent the Access Key ID and Secret Access Key values you generated.
lastUpdated: 2026-01-27T21:11:25.000Z
chatbotDeprioritize: false
source_url:
html: https://developers.cloudflare.com/r2/examples/aws/aws-sdk-rust/
md: https://developers.cloudflare.com/r2/examples/aws/aws-sdk-rust/index.md
---
You must [generate an Access Key](https://developers.cloudflare.com/r2/api/tokens/) before getting started. All examples will utilize `access_key_id` and `access_key_secret` variables which represent the **Access Key ID** and **Secret Access Key** values you generated.
This example uses the [aws-sdk-s3](https://crates.io/crates/aws-sdk-s3) crate from the [AWS SDK for Rust](https://github.com/awslabs/aws-sdk-rust). You must pass in the R2 configuration credentials when instantiating your `S3` client:
## Basic Usage
```rust
use aws_sdk_s3 as s3;
use aws_smithy_types::date_time::Format::DateTime;
#[tokio::main]
async fn main() -> Result<(), s3::Error> {
let bucket_name = "sdk-example";
// Provide your Cloudflare account ID
let account_id = "";
// Retrieve your S3 API credentials for your R2 bucket via API tokens
// (see: https://developers.cloudflare.com/r2/api/tokens)
let access_key_id = "";
let access_key_secret = "";
// Configure the client
let config = aws_config::from_env()
.endpoint_url(format!("https://{}.r2.cloudflarestorage.com", account_id))
.credentials_provider(aws_sdk_s3::config::Credentials::new(
access_key_id,
access_key_secret,
None, // session token is not used with R2
None,
"R2",
))
.region("auto") // Required by SDK but not used by R2
.load()
.await;
let client = s3::Client::new(&config);
// List buckets
let list_buckets_output = client.list_buckets().send().await?;
println!("Buckets:");
for bucket in list_buckets_output.buckets() {
println!(" - {}: {}",
bucket.name().unwrap_or_default(),
bucket.creation_date().map_or_else(
|| "Unknown creation date".to_string(),
|date| date.fmt(DateTime).unwrap()
)
);
}
// List objects in a specific bucket
let list_objects_output = client
.list_objects_v2()
.bucket(bucket_name)
.send()
.await?;
println!("\nObjects in {}:", bucket_name);
for object in list_objects_output.contents() {
println!(" - {}: {} bytes, last modified: {}",
object.key().unwrap_or_default(),
object.size().unwrap_or_default(),
object.last_modified().map_or_else(
|| "Unknown".to_string(),
|date| date.fmt(DateTime).unwrap()
)
);
}
Ok(())
}
```
## Upload Objects
To upload an object to R2:
```rust
use aws_sdk_s3::primitives::ByteStream;
use std::path::Path;
async fn upload_object(
client: &s3::Client,
bucket: &str,
key: &str,
file_path: &str,
) -> Result<(), s3::Error> {
let body = ByteStream::from_path(Path::new(file_path)).await.unwrap();
client
.put_object()
.bucket(bucket)
.key(key)
.body(body)
.send()
.await?;
println!("Uploaded {} to {}/{}", file_path, bucket, key);
Ok(())
}
```
## Download Objects
To download an object from R2:
```rust
use std::fs;
use std::io::Write;
async fn download_object(
client: &s3::Client,
bucket: &str,
key: &str,
output_path: &str,
) -> Result<(), Box> {
let resp = client
.get_object()
.bucket(bucket)
.key(key)
.send()
.await?;
let data = resp.body.collect().await?;
let bytes = data.into_bytes();
let mut file = fs::File::create(output_path)?;
file.write_all(&bytes)?;
println!("Downloaded {}/{} to {}", bucket, key, output_path);
Ok(())
}
```
## Generate Presigned URLs
You can also generate presigned links that can be used to temporarily share public read or write access to a bucket.
```rust
use aws_sdk_s3::presigning::PresigningConfig;
use std::time::Duration;
async fn generate_get_presigned_url(
client: &s3::Client,
bucket: &str,
key: &str,
expires_in: Duration,
) -> Result {
let presigning_config = PresigningConfig::expires_in(expires_in)?;
// Generate a presigned URL for GET (download)
let presigned_get_request = client
.get_object()
.bucket(bucket)
.key(key)
.presigned(presigning_config)
.await?;
Ok(presigned_get_request.uri().to_string())
}
async fn generate_upload_presigned_url(
client: &s3::Client,
bucket: &str,
key: &str,
expires_in: Duration,
) -> Result {
let presigning_config = PresigningConfig::expires_in(expires_in)?;
// Generate a presigned URL for PUT (upload)
let presigned_put_request = client
.put_object()
.bucket(bucket)
.key(key)
.presigned(presigning_config)
.await?;
Ok(presigned_put_request.uri().to_string())
}
```
You can use these presigned URLs with any HTTP client. For example, to upload a file using the PUT URL:
```bash
curl -X PUT "https://" -H "Content-Type: application/octet-stream" --data-binary "@local-file.txt"
```
To download a file using the GET URL:
```bash
curl -X GET "https://" -o downloaded-file.txt
```
---
title: aws4fetch · Cloudflare R2 docs
description: You must generate an Access Key before getting started. All
examples will utilize access_key_id and access_key_secret variables which
represent the Access Key ID and Secret Access Key values you generated.
lastUpdated: 2026-01-27T21:11:25.000Z
chatbotDeprioritize: false
source_url:
html: https://developers.cloudflare.com/r2/examples/aws/aws4fetch/
md: https://developers.cloudflare.com/r2/examples/aws/aws4fetch/index.md
---
You must [generate an Access Key](https://developers.cloudflare.com/r2/api/tokens/) before getting started. All examples will utilize `access_key_id` and `access_key_secret` variables which represent the **Access Key ID** and **Secret Access Key** values you generated.
JavaScript or TypeScript users may continue to use the [`aws4fetch`](https://www.npmjs.com/package/aws4fetch) npm package as per normal. This package uses the `fetch` and `SubtleCrypto` APIs which you will be familiar with when working in browsers or with Cloudflare Workers.
You must pass in the R2 configuration credentials when instantiating your `S3` service client:
```ts
import { AwsClient } from "aws4fetch";
// Provide your Cloudflare account ID
const R2_URL = `https://${ACCOUNT_ID}.r2.cloudflarestorage.com`;
const client = new AwsClient({
// Retrieve your S3 API credentials for your R2 bucket via API tokens (see: https://developers.cloudflare.com/r2/api/tokens)
accessKeyId: ACCESS_KEY_ID,
secretAccessKey: SECRET_ACCESS_KEY,
});
const ListBucketsResult = await client.fetch(R2_URL);
console.log(await ListBucketsResult.text());
//
//
//
// 2022-04-13T21:23:47.102Z
// user-uploads
//
//
// 2022-05-07T02:46:49.218Z
// my-bucket
//
//
//
// ...
// ...
//
//
const ListObjectsV2Result = await client.fetch(
`${R2_URL}/my-bucket?list-type=2`,
);
console.log(await ListObjectsV2Result.text());
//
// my-bucket
//
// cat.png
// 751832
// 2022-05-07T02:50:45.616Z
// "c4da329b38467509049e615c11b0c48a"
// STANDARD
//
//
// todos.txt
// 278
// 2022-05-07T21:37:17.150Z
// "29d911f495d1ba7cb3a4d7d15e63236a"
// STANDARD
//
// false
// 1000
// 2
//
```
## Generate presigned URLs
You can also generate presigned links that can be used to share public read or write access to a bucket temporarily.
```ts
import { AwsClient } from "aws4fetch";
const client = new AwsClient({
service: "s3", // Required by SDK but not used by R2
region: "auto", // Required by SDK but not used by R2
// Retrieve your S3 API credentials for your R2 bucket via API tokens (see: https://developers.cloudflare.com/r2/api/tokens)
accessKeyId: ACCESS_KEY_ID,
secretAccessKey: SECRET_ACCESS_KEY,
});
// Provide your Cloudflare account ID
const R2_URL = `https://${ACCOUNT_ID}.r2.cloudflarestorage.com`;
// Use the `X-Amz-Expires` query param to determine how long the presigned link is valid.
console.log(
(
await client.sign(
new Request(`${R2_URL}/my-bucket/dog.png?X-Amz-Expires=${3600}`),
{
aws: { signQuery: true },
},
)
).url.toString(),
);
// You can also create links for operations such as PutObject to allow temporary write access to a specific key.
// Specify Content-Type header to restrict uploads to a specific file type.
console.log(
(
await client.sign(
new Request(`${R2_URL}/my-bucket/dog.png?X-Amz-Expires=${3600}`, {
method: "PUT",
headers: {
"Content-Type": "image/png",
},
}),
{
aws: { signQuery: true },
},
)
).url.toString(),
);
```
```sh
https://.r2.cloudflarestorage.com/my-bucket/dog.png?X-Amz-Expires=3600&X-Amz-Date=&X-Amz-Algorithm=AWS4-HMAC-SHA256&X-Amz-Credential=&X-Amz-SignedHeaders=host&X-Amz-Signature=
https://.r2.cloudflarestorage.com/my-bucket/dog.png?X-Amz-Expires=3600&X-Amz-Date=&X-Amz-Algorithm=AWS4-HMAC-SHA256&X-Amz-Credential=&X-Amz-SignedHeaders=content-type%3Bhost&X-Amz-Signature=
```
You can use the link generated by the `PutObject` example to upload to the specified bucket and key, until the presigned link expires. When using a presigned URL with `Content-Type`, the client must include a matching `Content-Type` header in the request.
```sh
curl -X PUT "https://.r2.cloudflarestorage.com/my-bucket/dog.png?X-Amz-Expires=3600&X-Amz-Date=&X-Amz-Algorithm=AWS4-HMAC-SHA256&X-Amz-Credential=&X-Amz-SignedHeaders=content-type%3Bhost&X-Amz-Signature=" \
-H "Content-Type: image/png" \
--data-binary @dog.png
```
## Restrict uploads with CORS and Content-Type
When generating presigned URLs for uploads, you can limit abuse and misuse by:
1. **Restricting Content-Type**: Specify the `Content-Type` header in the request when signing. The upload will fail if the client sends a different `Content-Type` header.
2. **Configuring CORS**: Set up [CORS rules](https://developers.cloudflare.com/r2/buckets/cors/#add-cors-policies-from-the-dashboard) on your bucket to control which origins can upload files. Configure CORS via the [Cloudflare dashboard](https://dash.cloudflare.com/?to=/:account/r2/overview) by adding a JSON policy to your bucket settings:
```json
[
{
"AllowedOrigins": ["https://example.com"],
"AllowedMethods": ["PUT"],
"AllowedHeaders": ["Content-Type"],
"ExposeHeaders": ["ETag"],
"MaxAgeSeconds": 3600
}
]
```
Then generate a presigned URL with a Content-Type restriction:
```ts
const signedRequest = await client.sign(
new Request(`${R2_URL}/my-bucket/user-upload.png?X-Amz-Expires=${3600}`, {
method: "PUT",
headers: {
"Content-Type": "image/png",
},
}),
{
aws: { signQuery: true },
},
);
const putUrl = signedRequest.url.toString();
```
When a client uses this presigned URL, they must:
* Make the request from an allowed origin (enforced by CORS)
* Include the `Content-Type: image/png` header (enforced by the signature)
---
title: boto3 · Cloudflare R2 docs
description: You must generate an Access Key before getting started. All
examples will utilize access_key_id and access_key_secret variables which
represent the Access Key ID and Secret Access Key values you generated.
lastUpdated: 2026-01-27T21:11:25.000Z
chatbotDeprioritize: false
source_url:
html: https://developers.cloudflare.com/r2/examples/aws/boto3/
md: https://developers.cloudflare.com/r2/examples/aws/boto3/index.md
---
You must [generate an Access Key](https://developers.cloudflare.com/r2/api/tokens/) before getting started. All examples will utilize `access_key_id` and `access_key_secret` variables which represent the **Access Key ID** and **Secret Access Key** values you generated.
You must configure [`boto3`](https://boto3.amazonaws.com/v1/documentation/api/latest/index.html) to use a preconstructed `endpoint_url` value. This can be done through any `boto3` usage that accepts connection arguments; for example:
```python
import boto3
s3 = boto3.resource('s3',
# Provide your Cloudflare account ID
endpoint_url = 'https://.r2.cloudflarestorage.com',
# Retrieve your S3 API credentials for your R2 bucket via API tokens (see: https://developers.cloudflare.com/r2/api/tokens)
aws_access_key_id = '',
aws_secret_access_key = ''
)
```
You may, however, omit the `aws_access_key_id` and `aws_secret_access_key `arguments and allow `boto3` to rely on the `AWS_ACCESS_KEY_ID` and `AWS_SECRET_ACCESS_KEY` [environment variables](https://boto3.amazonaws.com/v1/documentation/api/latest/guide/configuration.html#using-environment-variables) instead.
An example script may look like the following:
```python
import boto3
s3 = boto3.client(
service_name="s3",
# Provide your Cloudflare account ID
endpoint_url='https://.r2.cloudflarestorage.com',
# Retrieve your S3 API credentials for your R2 bucket via API tokens (see: https://developers.cloudflare.com/r2/api/tokens)
aws_access_key_id='',
aws_secret_access_key='',
region_name="auto", # Required by SDK but not used by R2
)
# Get object information
object_information = s3.head_object(Bucket='my-bucket', Key='dog.png')
# Upload/Update single file
s3.upload_fileobj(io.BytesIO(file_content), 'my-bucket', 'dog.png')
# Delete object
s3.delete_object(Bucket='my-bucket', Key='dog.png')
```
## Generate presigned URLs
You can also generate presigned links that can be used to share public read or write access to a bucket temporarily.
```python
import boto3
s3 = boto3.client(
service_name="s3",
# Provide your Cloudflare account ID
endpoint_url='https://.r2.cloudflarestorage.com',
# Retrieve your S3 API credentials for your R2 bucket via API tokens (see: https://developers.cloudflare.com/r2/api/tokens)
aws_access_key_id='',
aws_secret_access_key='',
region_name="auto", # Required by SDK but not used by R2
)
# Generate presigned URL for reading (GET)
# The ExpiresIn parameter determines how long the presigned link is valid (in seconds)
get_url = s3.generate_presigned_url(
'get_object',
Params={'Bucket': 'my-bucket', 'Key': 'dog.png'},
ExpiresIn=3600 # Valid for 1 hour
)
print(get_url)
# Generate presigned URL for writing (PUT)
# Specify ContentType to restrict uploads to a specific file type
put_url = s3.generate_presigned_url(
'put_object',
Params={
'Bucket': 'my-bucket',
'Key': 'dog.png',
'ContentType': 'image/png'
},
ExpiresIn=3600
)
print(put_url)
```
```sh
https://.r2.cloudflarestorage.com/my-bucket/dog.png?X-Amz-Algorithm=AWS4-HMAC-SHA256&X-Amz-Credential=...&X-Amz-Date=&X-Amz-Expires=3600&X-Amz-SignedHeaders=host&X-Amz-Signature=
https://.r2.cloudflarestorage.com/my-bucket/dog.png?X-Amz-Algorithm=AWS4-HMAC-SHA256&X-Amz-Credential=...&X-Amz-Date=&X-Amz-Expires=3600&X-Amz-SignedHeaders=content-type%3Bhost&X-Amz-Signature=
```
You can use the link generated by the `put_object` example to upload to the specified bucket and key, until the presigned link expires. When using a presigned URL with `ContentType`, the client must include a matching `Content-Type` header in the request.
```sh
curl -X PUT "https://.r2.cloudflarestorage.com/my-bucket/dog.png?X-Amz-Algorithm=..." \
-H "Content-Type: image/png" \
--data-binary @dog.png
```
## Restrict uploads with CORS and Content-Type
When generating presigned URLs for uploads, you can limit abuse and misuse by:
1. **Restricting Content-Type**: Specify the allowed content type in the presigned URL parameters. The upload will fail if the client sends a different `Content-Type` header.
2. **Configuring CORS**: Set up [CORS rules](https://developers.cloudflare.com/r2/buckets/cors/#add-cors-policies-from-the-dashboard) on your bucket to control which origins can upload files. Configure CORS via the [Cloudflare dashboard](https://dash.cloudflare.com/?to=/:account/r2/overview) by adding a JSON policy to your bucket settings:
```json
[
{
"AllowedOrigins": ["https://example.com"],
"AllowedMethods": ["PUT"],
"AllowedHeaders": ["Content-Type"],
"ExposeHeaders": ["ETag"],
"MaxAgeSeconds": 3600
}
]
```
Then generate a presigned URL with a Content-Type restriction:
```python
# Generate a presigned URL with Content-Type restriction
# The upload will only succeed if the client sends Content-Type: image/png
put_url = s3.generate_presigned_url(
'put_object',
Params={
'Bucket': 'my-bucket',
'Key': 'dog.png',
'ContentType': 'image/png'
},
ExpiresIn=3600
)
```
When a client uses this presigned URL, they must:
* Make the request from an allowed origin (enforced by CORS)
* Include the `Content-Type: image/png` header (enforced by the signature)
---
title: Configure custom headers · Cloudflare R2 docs
description: Some of R2's extensions require setting a specific header when
using them in the S3 compatible API. For some functionality you may want to
set a request header on an entire category of requests. Other times you may
want to configure a different header for each individual request. This page
contains some examples on how to do so with boto3 and with aws-sdk-js-v3.
lastUpdated: 2026-01-27T21:11:25.000Z
chatbotDeprioritize: false
source_url:
html: https://developers.cloudflare.com/r2/examples/aws/custom-header/
md: https://developers.cloudflare.com/r2/examples/aws/custom-header/index.md
---
Some of R2's [extensions](https://developers.cloudflare.com/r2/api/s3/extensions/) require setting a specific header when using them in the S3 compatible API. For some functionality you may want to set a request header on an entire category of requests. Other times you may want to configure a different header for each individual request. This page contains some examples on how to do so with `boto3` and with `aws-sdk-js-v3`.
## Setting a custom header on all requests
When using certain functionality, like the `cf-create-bucket-if-missing` header, you may want to set a constant header for all `PutObject` requests you're making.
### Set a header for all requests with `boto3`
`Boto3` has an event system which allows you to modify requests. Here we register a function into the event system which adds our header to every `PutObject` request being made.
```python
import boto3
client = boto3.resource('s3',
# Provide your Cloudflare account ID
endpoint_url = 'https://.r2.cloudflarestorage.com',
# Retrieve your S3 API credentials for your R2 bucket via API tokens (see: https://developers.cloudflare.com/r2/api/tokens)
aws_access_key_id = '',
aws_secret_access_key = ''
)
event_system = client.meta.events
# Define function responsible for adding the header
def add_custom_header(params, **kwargs):
params["headers"]['cf-create-bucket-if-missing'] = 'true'
event_system.register('before-call.s3.PutObject', add_custom_header)
response = client.put_object(Bucket="my_bucket", Key="my_file", Body="file_contents")
print(response)
```
### Set a header for all requests with `aws-sdk-js-v3`
`aws-sdk-js-v3` allows the customization of request behavior through the use of its [middleware stack](https://aws.amazon.com/blogs/developer/middleware-stack-modular-aws-sdk-js/). This example adds a middleware to the client which adds a header to every `PutObject` request being made.
```ts
import {
PutObjectCommand,
S3Client,
} from "@aws-sdk/client-s3";
const client = new S3Client({
region: "auto", // Required by SDK but not used by R2
endpoint: `https://${ACCOUNT_ID}.r2.cloudflarestorage.com`,
// Retrieve your S3 API credentials for your R2 bucket via API tokens (see: https://developers.cloudflare.com/r2/api/tokens)
credentials: {
accessKeyId: ACCESS_KEY_ID,
secretAccessKey: SECRET_ACCESS_KEY,
},
});
client.middlewareStack.add(
(next, context) => async (args) => {
const r = args.request as RequestInit
r.headers["cf-create-bucket-if-missing"] = "true";
return await next(args)
},
{ step: 'build', name: 'customHeaders' },
)
const command = new PutObjectCommand({
Bucket: "my_bucket",
Key: "my_key",
Body: "my_data"
});
const response = await client.send(command);
console.log(response);
```
## Set a different header on each request
Certain extensions that R2 has provided in the S3 compatible api may require setting a different header on each request. For example, you may want to only want to overwrite an object if its etag matches a certain expected value. This value will likely be different for each object that is being overwritten, which requires the `If-Match` header to be different with each request you make. This section shows examples of how to accomplish that.
### Set a header per request in `boto3`
To enable us to pass custom headers as an extra argument into the call to `client.put_object()` we need to register 2 functions into `boto3`'s event system. This is necessary because `boto3` performs a parameter validation step which rejects extra method arguments. Since this parameter validation occurs before we can set headers on the request, we first need to move the custom argument into the request context before the parameter validation happens. In a subsequent step we can now actually set the headers based on the information we put in the request context.
```python
import boto3
client = boto3.resource('s3',
# Provide your Cloudflare account ID
endpoint_url = 'https://.r2.cloudflarestorage.com',
# Retrieve your S3 API credentials for your R2 bucket via API tokens (see: https://developers.cloudflare.com/r2/api/tokens)
aws_access_key_id = '',
aws_secret_access_key = ''
)
event_system = client.meta.events
# Moves the custom headers from the parameters to the request context
def process_custom_arguments(params, context, **kwargs):
if (custom_headers := params.pop("custom_headers", None)):
context["custom_headers"] = custom_headers
# Here we extract the headers from the request context and actually set them
def add_custom_headers(params, context, **kwargs):
if (custom_headers := context.get("custom_headers")):
params["headers"].update(custom_headers)
event_system.register('before-parameter-build.s3.PutObject', process_custom_arguments)
event_system.register('before-call.s3.PutObject', add_custom_headers)
custom_headers = {'If-Match' : '"29d911f495d1ba7cb3a4d7d15e63236a"'}
# Note that boto3 will throw an exception if the precondition failed. Catch this exception if necessary
response = client.put_object(Bucket="my_bucket", Key="my_key", Body="file_contents", custom_headers=custom_headers)
print(response)
```
### Set a header per request in `aws-sdk-js-v3`
Here we again configure the header we would like to set by creating a middleware, but this time we add the middleware to the request itself instead of to the whole client.
```ts
import {
PutObjectCommand,
S3Client,
} from "@aws-sdk/client-s3";
const client = new S3Client({
region: "auto", // Required by SDK but not used by R2
// Provide your Cloudflare account ID
endpoint: `https://${ACCOUNT_ID}.r2.cloudflarestorage.com`,
// Retrieve your S3 API credentials for your R2 bucket via API tokens (see: https://developers.cloudflare.com/r2/api/tokens)
credentials: {
accessKeyId: ACCESS_KEY_ID,
secretAccessKey: SECRET_ACCESS_KEY,
},
});
const command = new PutObjectCommand({
Bucket: "my_bucket",
Key: "my_key",
Body: "my_data"
});
const headers = { 'If-Match': '"29d911f495d1ba7cb3a4d7d15e63236a"' }
command.middlewareStack.add(
(next) =>
(args) => {
const r = args.request as RequestInit
Object.entries(headers).forEach(
([k, v]: [key: string, value: string]): void => {
r.headers[k] = v
},
)
return next(args)
},
{ step: 'build', name: 'customHeaders' },
)
const response = await client.send(command);
console.log(response);
```
---
title: s3mini · Cloudflare R2 docs
description: You must generate an Access Key before getting started. All
examples will utilize access_key_id and access_key_secret variables which
represent the Access Key ID and Secret Access Key values you generated.
lastUpdated: 2026-02-06T11:52:49.000Z
chatbotDeprioritize: false
source_url:
html: https://developers.cloudflare.com/r2/examples/aws/s3mini/
md: https://developers.cloudflare.com/r2/examples/aws/s3mini/index.md
---
You must [generate an Access Key](https://developers.cloudflare.com/r2/api/tokens/) before getting started. All examples will utilize `access_key_id` and `access_key_secret` variables which represent the **Access Key ID** and **Secret Access Key** values you generated.
[`s3mini`](https://www.npmjs.com/package/s3mini) is a zero-dependency, lightweight (\~20 KB minified) TypeScript S3 client that uses AWS SigV4 signing. It runs natively on Node.js, Bun, and Cloudflare Workers without polyfills.
Unlike the AWS SDKs, s3mini expects a **bucket-scoped endpoint** — the bucket name is part of the endpoint URL, so you do not pass a separate `bucket` parameter to each operation.
Note
s3mini does not support presigned URL generation. If you need presigned URLs, refer to the [aws-sdk-js-v3](https://developers.cloudflare.com/r2/examples/aws/aws-sdk-js-v3/#generate-presigned-urls) or [aws4fetch](https://developers.cloudflare.com/r2/examples/aws/aws4fetch/#generate-presigned-urls) examples instead.
## Install
```sh
npm install s3mini
```
## Node.js / Bun
```ts
import { S3mini } from "s3mini";
const s3 = new S3mini({
accessKeyId: process.env.R2_ACCESS_KEY_ID!,
secretAccessKey: process.env.R2_SECRET_ACCESS_KEY!,
// Bucket-scoped endpoint — include your bucket name in the path
endpoint: `https://${process.env.ACCOUNT_ID}.r2.cloudflarestorage.com/my-bucket`,
region: "auto",
});
// Upload an object
await s3.putObject("hello.txt", "Hello from s3mini!");
// Download an object as a string
const text = await s3.getObject("hello.txt");
console.log(text);
// List objects with a prefix
const objects = await s3.listObjects("/", "hello");
console.log(objects);
// Delete an object
await s3.deleteObject("hello.txt");
```
## Cloudflare Workers
Prefer R2 bindings inside Workers
When your Worker and R2 bucket live in the same Cloudflare account, [R2 bindings](https://developers.cloudflare.com/r2/api/workers/workers-api-reference/) give you zero-latency access without managing API credentials. Use the S3 API when you need cross-account access or interoperability with S3-compatible tooling.
s3mini works natively in Workers without the `nodejs_compat` compatibility flag.
```ts
import { S3mini } from "s3mini";
interface Env {
R2_ACCESS_KEY_ID: string;
R2_SECRET_ACCESS_KEY: string;
ACCOUNT_ID: string;
}
export default {
async fetch(request: Request, env: Env): Promise {
const s3 = new S3mini({
accessKeyId: env.R2_ACCESS_KEY_ID,
secretAccessKey: env.R2_SECRET_ACCESS_KEY,
endpoint: `https://${env.ACCOUNT_ID}.r2.cloudflarestorage.com/my-bucket`,
region: "auto",
});
const url = new URL(request.url);
const key = url.pathname.slice(1); // strip leading "/"
if (!key) {
return new Response("Missing object key", { status: 400 });
}
switch (request.method) {
case "PUT": {
const data = await request.arrayBuffer();
const contentType =
request.headers.get("content-type") ?? "application/octet-stream";
await s3.putObject(key, new Uint8Array(data), contentType);
return new Response("Created", { status: 201 });
}
case "GET": {
const response = await s3.getObjectResponse(key);
if (!response) {
return new Response("Not Found", { status: 404 });
}
return new Response(response.body, {
headers: {
"content-type":
response.headers.get("content-type") ??
"application/octet-stream",
etag: response.headers.get("etag") ?? "",
},
});
}
case "DELETE": {
await s3.deleteObject(key);
return new Response(null, { status: 204 });
}
default:
return new Response("Method Not Allowed", { status: 405 });
}
},
};
```
---
title: Snowflake · Cloudflare R2 docs
description: This page details which R2 location or jurisdiction is recommended
based on your Snowflake region.
lastUpdated: 2025-04-22T13:37:45.000Z
chatbotDeprioritize: true
source_url:
html: https://developers.cloudflare.com/r2/reference/partners/snowflake-regions/
md: https://developers.cloudflare.com/r2/reference/partners/snowflake-regions/index.md
---
This page details which R2 location or jurisdiction is recommended based on your Snowflake region.
You have the following inputs to control the physical location where objects in your R2 buckets are stored (for more information refer to [data location](https://developers.cloudflare.com/r2/reference/data-location/)):
* [**Location hints**](https://developers.cloudflare.com/r2/reference/data-location/#location-hints): Specify a geophrical area (for example, Asia-Pacific or Western Europe). R2 makes a best effort to place your bucket in or near that location to optimize performance. You can confirm bucket placement after creation by navigating to the **Settings** tab of your bucket and referring to the **Bucket details** section.
* [**Jurisdictions**](https://developers.cloudflare.com/r2/reference/data-location/#jurisdictional-restrictions): Enforce that data is both stored and processed within a specific jurisdiction (for example, the EU or FedRAMP environment). Use jurisdictions when you need to ensure data is stored and processed within a jurisdiction to meet data residency requirements, including local regulations such as the [GDPR](https://gdpr-info.eu/) or [FedRAMP](https://blog.cloudflare.com/cloudflare-achieves-fedramp-authorization/).
## North and South America (Commercial)
| Snowflake region name | Cloud | Region ID | Recommended R2 location |
| - | - | - | - |
| Canada (Central) | AWS | `ca-central-1` | Location hint: `enam` |
| South America (Sao Paulo) | AWS | `sa-east-1` | Location hint: `enam` |
| US West (Oregon) | AWS | `us-west-2` | Location hint: `wnam` |
| US East (Ohio) | AWS | `us-east-2` | Location hint: `enam` |
| US East (N. Virginia) | AWS | `us-east-1` | Location hint: `enam` |
| US Central1 (Iowa) | GCP | `us-central1` | Location hint: `enam` |
| US East4 (N. Virginia) | GCP | `us-east4` | Location hint: `enam` |
| Canada Central (Toronto) | Azure | `canadacentral` | Location hint: `enam` |
| Central US (Iowa) | Azure | `centralus` | Location hint: `enam` |
| East US 2 (Virginia) | Azure | `eastus2` | Location hint: `enam` |
| Mexico Central (Mexico City) | Azure | `mexicocentral` | Location hint: `wnam` |
| South Central US (Texas) | Azure | `southcentralus` | Location hint: `enam` |
| West US 2 (Washington) | Azure | `westus2` | Location hint: `wnam` |
## U.S. Government
| Snowflake region name | Cloud | Region ID | Recommended R2 location |
| - | - | - | - |
| US Gov East 1 | AWS | `us-gov-east-1` | Jurisdiction: `fedramp` |
| US Gov West 1 | AWS | `us-gov-west-1` | Jurisdiction: `fedramp` |
| US Gov Virginia | Azure | `usgovvirginia` | Jurisdiction: `fedramp` |
Note
Cloudflare Enterprise customers may contact their account team or [Cloudflare Support](https://developers.cloudflare.com/support/contacting-cloudflare-support/) to get access to the FedRAMP jurisdiction.
## Europe and Middle East
| Snowflake region name | Cloud | Region ID | Recommended R2 location |
| - | - | - | - |
| EU (Frankfurt) | AWS | `eu-central-1` | Jurisdiction: `eu` or hint: `weur`/`eeur` |
| EU (Zurich) | AWS | `eu-central-2` | Jurisdiction: `eu` or hint: `weur`/`eeur` |
| EU (Stockholm) | AWS | `eu-north-1` | Jurisdiction: `eu` or hint: `weur`/`eeur` |
| EU (Ireland) | AWS | `eu-west-1` | Jurisdiction: `eu` or hint: `weur`/`eeur` |
| Europe (London) | AWS | `eu-west-2` | Jurisdiction: `eu` or hint: `weur`/`eeur` |
| EU (Paris) | AWS | `eu-west-3` | Jurisdiction: `eu` or hint: `weur`/`eeur` |
| Middle East Central2 (Dammam) | GCP | `me-central2` | Location hint: `weur`/`eeur` |
| Europe West2 (London) | GCP | `europe-west-2` | Jurisdiction: `eu` or hint: `weur`/`eeur` |
| Europe West3 (Frankfurt) | GCP | `europe-west-3` | Jurisdiction: `eu` or hint: `weur`/`eeur` |
| Europe West4 (Netherlands) | GCP | `europe-west-4` | Jurisdiction: `eu` or hint: `weur`/`eeur` |
| North Europe (Ireland) | Azure | `northeurope` | Jurisdiction: `eu` or hint: `weur`/`eeur` |
| Switzerland North (Zurich) | Azure | `switzerlandnorth` | Jurisdiction: `eu` or hint: `weur`/`eeur` |
| West Europe (Netherlands) | Azure | `westeurope` | Jurisdiction: `eu` or hint: `weur`/`eeur` |
| UAE North (Dubai) | Azure | `uaenorth` | Location hint: `weur`/`eeur` |
| UK South (London) | Azure | `uksouth` | Jurisdiction: `eu` or hint: `weur`/`eeur` |
## Asia Pacific and China
| Snowflake region name | Cloud | Region ID | Recommended R2 location |
| - | - | - | - |
| Asia Pacific (Tokyo) | AWS | `ap-northeast-1` | Location hint: `apac` |
| Asia Pacific (Seoul) | AWS | `ap-northeast-2` | Location hint: `apac` |
| Asia Pacific (Osaka) | AWS | `ap-northeast-3` | Location hint: `apac` |
| Asia Pacific (Mumbai) | AWS | `ap-south-1` | Location hint: `apac` |
| Asia Pacific (Singapore) | AWS | `ap-southeast-1` | Location hint: `apac` |
| Asia Pacific (Sydney) | AWS | `ap-southeast-2` | Location hint: `oc` |
| Asia Pacific (Jakarta) | AWS | `ap-southeast-3` | Location hint: `apac` |
| China (Ningxia) | AWS | `cn-northwest-1` | Location hint: `apac` |
| Australia East (New South Wales) | Azure | `australiaeast` | Location hint: `oc` |
| Central India (Pune) | Azure | `centralindia` | Location hint: `apac` |
| Japan East (Tokyo) | Azure | `japaneast` | Location hint: `apac` |
| Southeast Asia (Singapore) | Azure | `southeastasia` | Location hint: `apac` |