Scratch is one of the easiest and most fun ways to get started with learning to code. Kids can easily experiment in Scratch’s drag-and-drop platform or take a Scratch coding class to build their skills. Try this simple Scratch tutorial for kids for an introduction to coding in Scratch.
Complete this Scratch tutorial for kids to build a Rocket Landing game.

Play and remix the Rocket Landing game now. Safely land your rocketship on the platform to win.
Scratch Tutorial: Rocket Landing Game
- Step 1: Create a new Scratch project
- X, Y positioning in Scratch
- Step 2: Add a space backdrop
- Step 3: Add a Rocketship sprite
- Step 4: Move the Rocketship sprite
- Step 5: Add the platform sprite and move it
- Step 6: Add “Game Over” sprite
- Step 7: Add “You Win!” sprite
- Step 8: Add game logic to rocketship
- Step 9: Add game logic to “You Win!” and “Game Over”
- More Scratch Tutorials for Kids
- Is Scratch programming easy?
- How do you learn Scratch programming for kids?
What you need:
- Scratch account: Create a free Scratch account
No coding experience is necessary for this Scratch tutorial. Beginner-friendly for kids ages 8 and up. Give it a try!
Scratch Tutorial: Rocket Landing Video Tutorial
Step 1: Create a new Scratch project
Let’s start by creating a new project.
- Visit https://scratch.mit.edu/, login to your account, and click on the “Create” button.

Now, we can code your Rocket Landing game!
Hint: You can also remix this project and others to see the code.
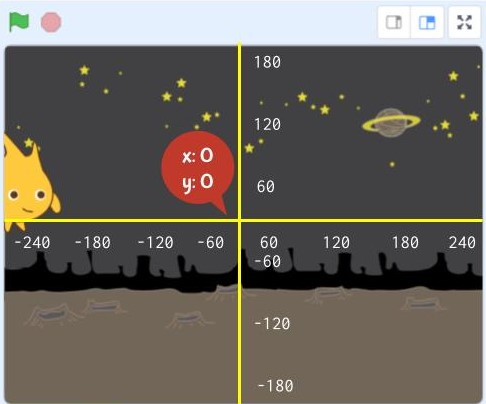
X, Y positioning in Scratch
Before we move on, let’s talk about x and y coordinates. In Scratch, your images are called sprites.
Scratch uses x, y coordinates to position sprites on the screen. You might have seen these in math class.
- x coordinate – a number of pixels along the horizontal axis of a display starting from the pixel (pixel 0) in the center of the screen.
- y coordinate – a number of pixels along the vertical axis of a display starting from the pixel (pixel 0) in the center of the screen.
We’ll use these (x, y) coordinates to position our sprites and change these coordinates to move them.
Step 2: Add a space backdrop
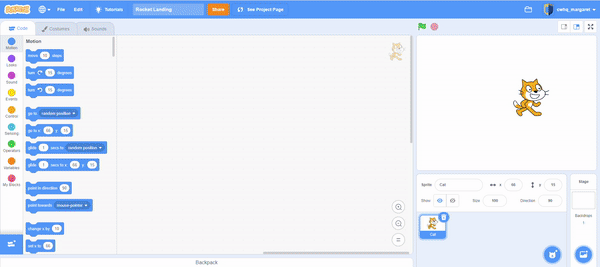
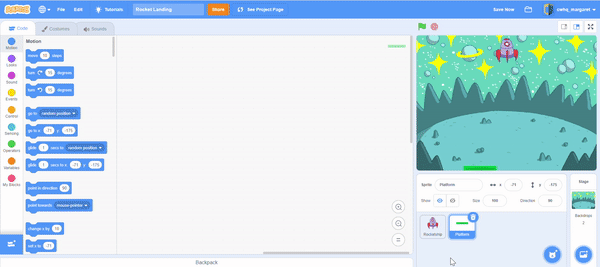
A new project will open up, and you will see the Scratch interface.
- Start by deleting the Scratch cat sprite that appears in every new project. Click on the cat sprite and the trash can icon.
- Click the “Choose a Backdrop” icon and add the “Space” backdrop.
Hint: Get creative! Choose any backdrop you want from the library or upload your own.
Step 3: Add a Rocketship sprite
Let’s create our player sprite by choosing the rocketship.
- Select “Choose a Sprite”, find the Rocketship sprite, and click to add it
- In the “Costumes” tab select costume 5
- Decrease the size of your Rocketship to 50
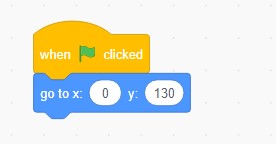
In order to run our code in Scratch, use the “When Green Flag Clicked” block to get started.
- Click on the “Code” tab
- Add the “When Green Flag Clicked” block from the “Events” category
- Position your rocketship at the top of the screen using a “Go to” block
- Now, click on the green flag to position your sprite
Hint: You can also upload your own Spaceship or use the “Paint” option to draw one.
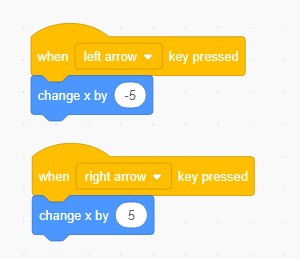
Step 4: Move the Rocketship sprite
To move our rocketship right and left using arrows, we will use “Events” blocks.
- Add the “When space key pressed” block and change the dropdown to “left arrow”
- Underneath that, add a “Change x by” block and use -5 to move left
- Next, add the “When space key pressed” lock and change the dropdown to “right arrow”
- Underneath that, add a “Change x by” block and use 5 to move right
We also want our rocketship to move down towards the platform.
- Add another “When Green Flag Clicked” block
- Use a “repeat” block to repeat the downward motion of the rocketship 200 times
- Move the rocketship down the y-axis (top to bottom) with a “Change by” block
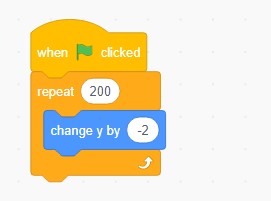
Hint: Change the 5 and -5 values to move your rocketship more or less with each click

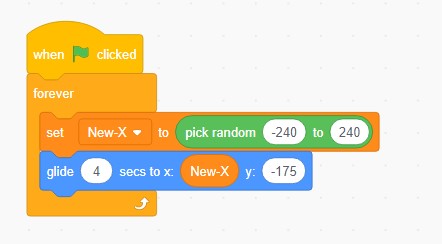
Step 5: Add the platform sprite and move it
Let’s create a moving platform to land our spaceship.
- Select “Choose a Sprite”, find the Paddle sprite, and click to add it
- Right-click on the sprite and rename it to Platform
- Position the Platform so y = -175, at the bottom of the screen
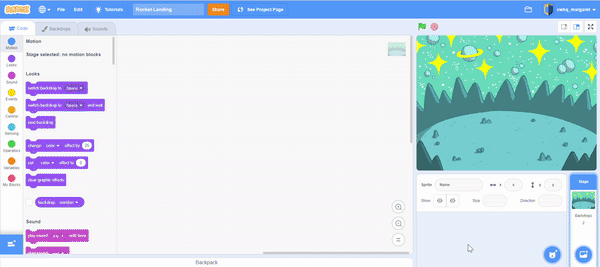
We want our platform to move randomly, so we need a variable to hold a random x value. To add code, go to the “Code” tab.
- Go to Variable blocks and right click on the orange variable circle and rename it “New-X”
- Add the “When Green Flag Clicked” block
- Use a forever loop to keep the platform moving
- Inside the forever loop, set the “New-X” variable to a random number between -240 and 240
- Use a “Glide” block and use the “New-X” value for x and -175 for y
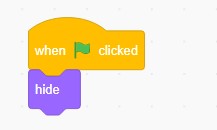
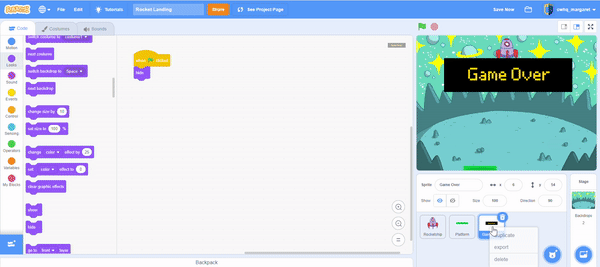
Step 6: Add “Game Over” sprite
We need some text to tell us when the game is over.
- Click on the cat icon, select “Paint”
- Select the rectangle option to draw a black rectangle
- Then, select the text option and type “Game Over” in yellow on top of the rectangle
- Right-click on the sprite to rename it “Game Over”
We only want this sprite to show if our rocketship reaches the bottom. Go back to the code tab to add code to this block.
- Add the “When Green Flag Clicked” block
- Use “Hide” block to hide the block until we need to show it
Hint: Use the text option to write any message you want when the game is over.

Step 7: Add “You Win!” sprite
We also need some text to tell us when we’ve successfully landed.
- Right-click on the “Game Over” sprite and duplicate
- Click on the “Costumes” tab to edit the text
- Double-click the text and type “You Win!”
- Right click to rename this sprite “You Win”
We only want this sprite to show if our rocketship touches the platform. Since we duplicated this sprite, it should already have the code to hide the block when the green flag is clicked.
Hint: Change the color of the box and the text to personalize your message.

Step 8: Add game logic to rocketship
Depending on where the rocketship lands, we will display a different message. We need to broadcast the information to the other sprites get the right message.
- Click on the Rocketship sprite
- Underneath the “Go to” block add a forever loop
- Inside the forever loop, add two “If-then” controls
- If the rocketship touches the edge, use the broadcast block and create a new message called “Lose”
- If the rocketship touches the platform block, use the broadcast block and create a new message called “Win”


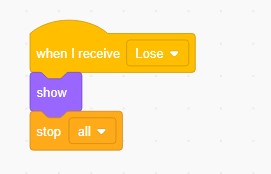
Step 9: Add game logic to “You Win!” and “Game Over”
Depending on where the rocketship lands, we will display a different message. We need to broadcast the information to the other sprites get the right message.
- Click on the “Game Over” sprite
- Use a “When I receive” block and select the “Lose” message
- When this message is received, show the message and stop all scripts
Do the same thing for the “You Win!” sprite
- Click on the “You Win!” sprite
- Use a “When I receive” block and select the “Win” message
- When this message is received, show the message and stop all scripts


Your Rocket Landing game is complete! Play Rocketship Landing game.
Click the green flag and give it a try. If you want to let other people see your project and remix it, click the “Share” button at the top.

You can “see inside” our completed Rocketship Landing game to get a peek at the full Scratch code.
Download Free Printable Scratch Coding Tutorials PDF
Get the Rocketship Landing game and Flying Space Cat Scratch tutorials in a printable format.
More Scratch Tutorials for Kids
Get inspired and practice coding with a fun Scratch tutorial for kids.
- Valentine’s Day Card Scratch Tutorial
- Holidays Advent Calendar Scratch Tutorial
- Halloween Candy Collector Game Scratch Tutorial
- Flying Space Cat Scratch Tutorial
- How to Make Flappy Bird on Scratch
- How To Make a Game on Scratch
Is Scratch programming easy?
Scratch coding is a block programming language that is really easy to learn. What makes Scratch so easy is its drag-and-drop platform. It allows kids to start learning without advanced typing skills. Even though it’s easy to use, it can teach kids important programming concepts like variables, loops, if-else statements, conditions, and more. Not only that, there is no setup that needs to be done. Kids can login and start coding Scratch games and apps right away!
How do you learn Scratch programming for kids?
There are many online resources for kids to learn how to code in Scratch. The Scratch site has a directory of Scratch tutorials or you can check out our list of fun Scratch tutorials to help you get started. There are also plenty of YouTube videos from teachers and other kids learning to code in Scratch.
If your child wants to dive deeper into Scratch, consider taking a Scratch class for kids. Students in our elementary school coding program, for ages 8-11, start learning to code with Scratch and advance to other languages like HTML/CSS, JavaScript, and Python. They’ll learn fundamental coding concepts in the Scratch platform by building fun projects and applications that they can personalize and share. From there, the possibilities are endless!

