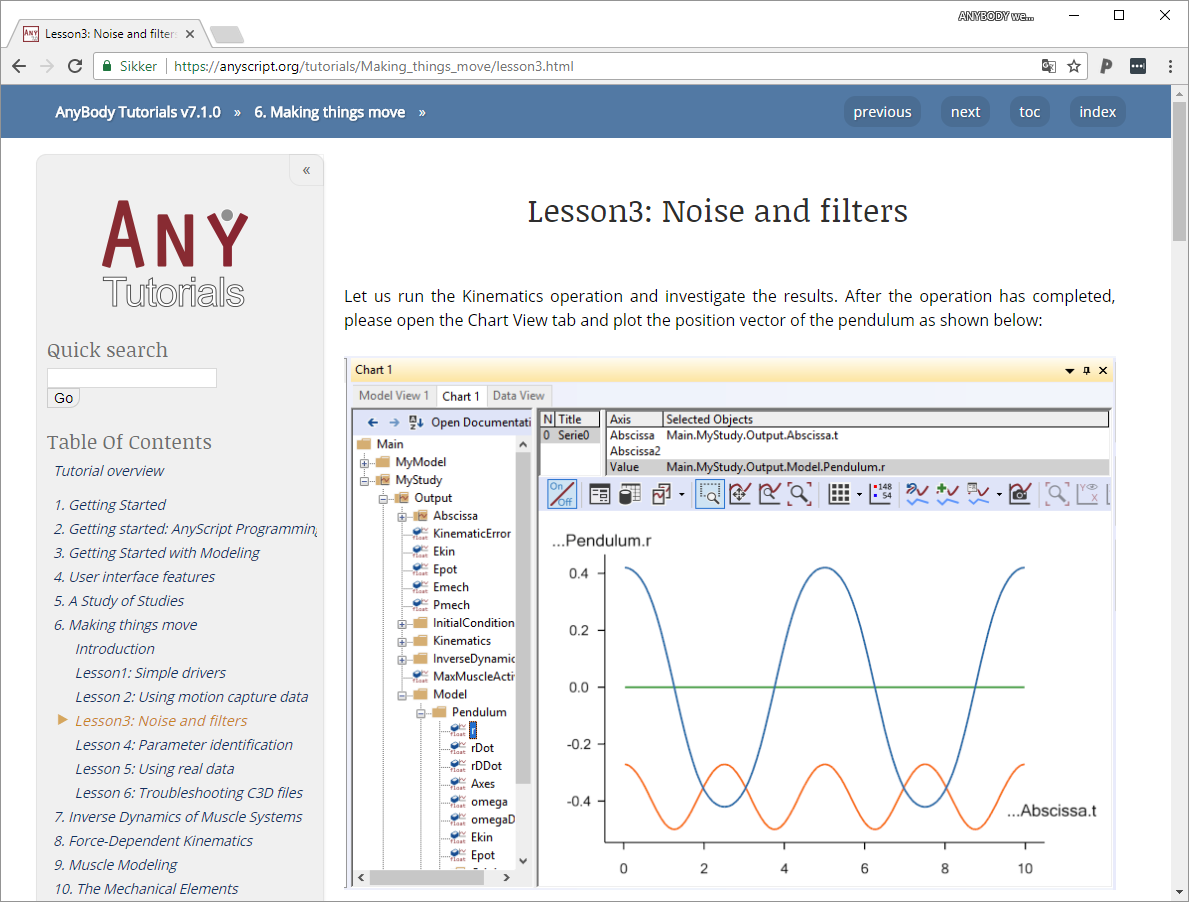
One of the first things I did when starting to use the AnyBody Modeling System, was to understand how to configure the human model. This means enabling and disabling different body parts and setting up the available options for muscles, ligaments etc. The model is configured in AnyScript by defining switches which we call Body Model (BM) statements.
#define BM_ARM_RIGHT ONWouldn’t it be nice to configure the model by having some buttons and instantaneous visual feedback as well? That is what I thought! Therefore, I have developed a small plugin which provides a graphical user interface (GUI) for configuring the Body Model (called BM-Plugin). By using it, you will be able to configure your human model in a more friendly manner but without trying to give up the flexibility of AnyScript.
The BM-Plugin targets both beginner and advanced AMS users. If you have little to no experience using AnyScript, the BM-Plugin will help you a lot in getting started with it and to understand how switches and BM statements work. If you are an advanced AMS user, you will find configuring your human model much easier and much faster by using the plugin. And don’t worry about losing your freedom with AnyScript! BM Plugin is not meant to replace it, it is meant to write it for you, so it saves you time.
In the remainder of this post I will show you what the plugin is able to do and some technicalities.
How to get and use BM-Plugin
BM-Plugin comes integrated with AMMR v2.2 and it is available to use in AMS starting with version v7.2. All you have to do is to make sure that you have these versions or later available on your computer. You can find more information about how to get the latest AMMR here. Once you have everything ready you can load any model containing the the AnyBody human model, i.e. that is any model that has the following:
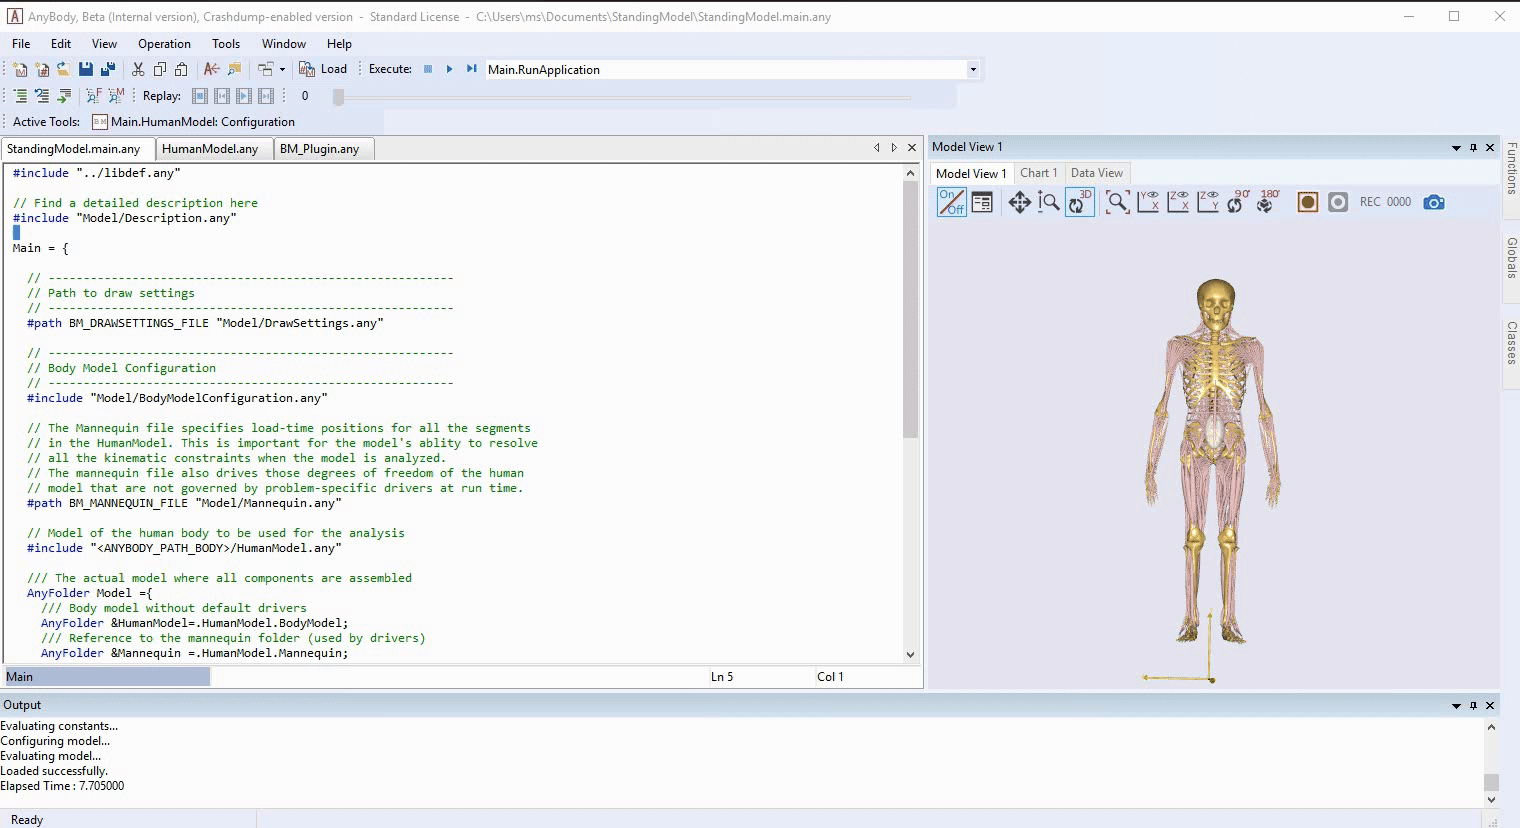
#include "<ANYBODY_PATH_BODY>/HumanModel.any"If everything is fine, you should be able to start the BM-Plugin by clicking the button marked in the figure below:
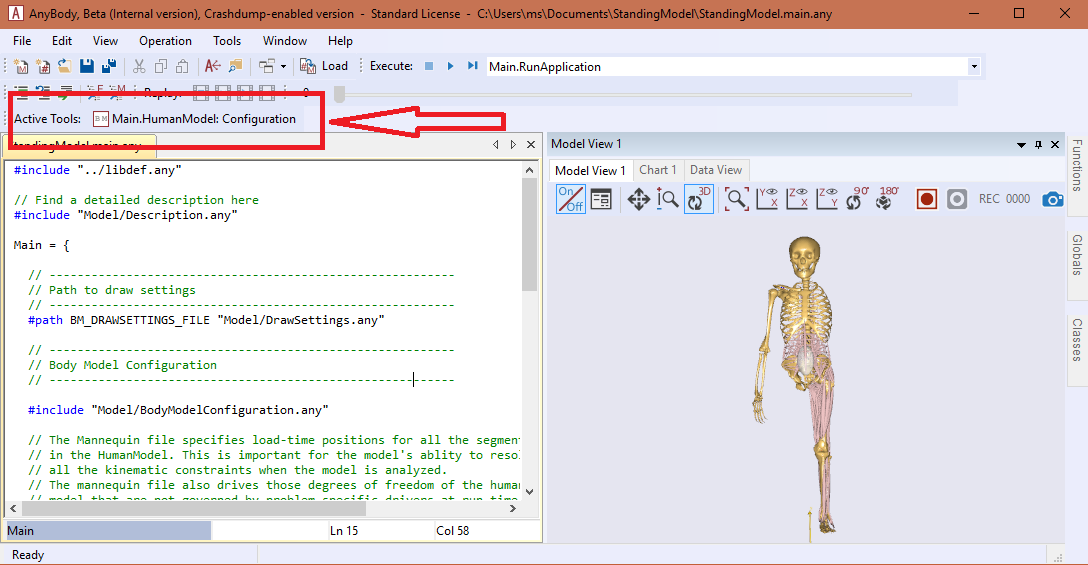
Using BM-Plugin
The BM-Plugin is structured in a number of tabs, each giving you options to adjust the configuration of different body parts while providing visual feedback if available.
These tabs are: Body, Legs, Arms, Trunk and Mannequin Drivers. Once
the desired configuration is set, you can load it in AMS by clicking Apply or
OK. The difference is that by clicking Apply the Plugin will stay open for
you to configure the model further. When OK is clicked, the configuration is
saved in a history file which is available in the Apply History drop menu,
next to the Apply button. It is therefore possible to load a previous
configurations of the model.
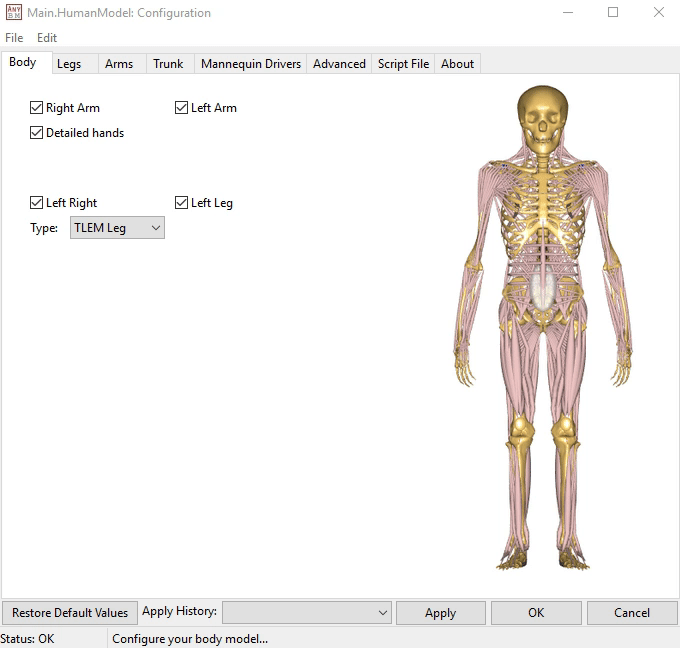
Of course, not all BM statements have a visual representation in the AMS Model
View or are directly related to physical body parts. Therefore, the BM
statements which were not classified in the tabs mentioned before can be found
and modified in the Advanced tab.
By having the presented overview of the Plugin, you should be ready to use it now. However, if you are interested in finding some details about how it works behind the scenes, continue reading.
How BM-Plugin works (tl;dr)
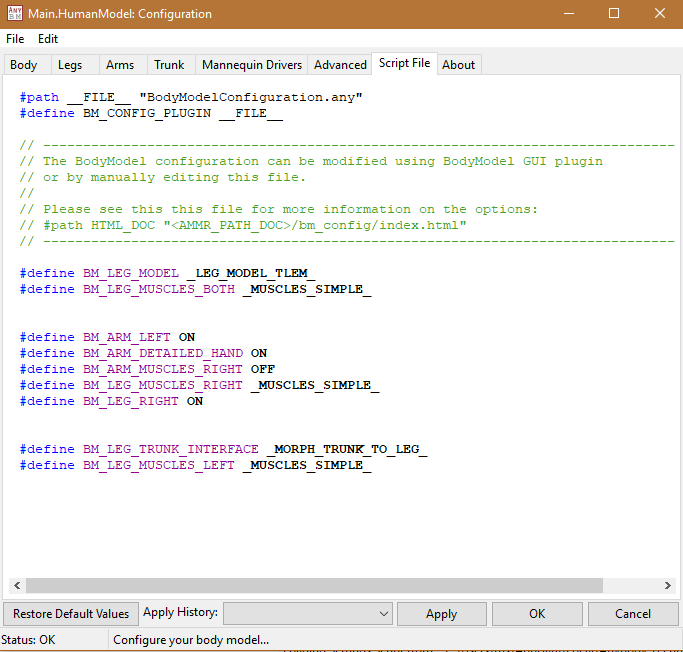
As stated in the introduction, the BM-Plugin is dependent on the HumanModel.
Therefore, every time you start the plugin, it will check your .main.any file
to determine if it is included. If it is, the Plugin will create a new file
named BodyModelConfiguration.any inside the Model folder next to your
.main.any file.
Note! All the example models in the AMMR already come with an BodyModelConfiguration.any file pre-included.
The plugin will then ask you if you allow it to include this file inside the main file (I recommend that you do):
#include "Model/BodyModelConfiguration.any"The plugin will store and modify all the needed BM statements for your model inside the BodyModelConfiguration.any file. I encourage you to use this file to store the BM statements regardless if you use the plugin frequently or not. You will also find that most of the examples using the HumanModel have this structure implemented and they are ready to be configured using the BM-Plugin.
The Configuration file can be seen inside the plugin under the Script File tab:
Now I think you know enough about the plugin to try it yourself, so what are you waiting for?
Any development suggestions and feedback are more than welcomed!
]]>This week we launched a new forum site for the AnyScript community ✨ The new site replaces the old forum which has served for the last 10 years as a place for new and experienced users to receive help and give advice on the AnyBody Modeling System.
The old forum has served us well, hosting roughly 10,000 posts and 1,800 topics since 2009. However, the old forum was starting to come across as a bit outdated. So it was about time we upgraded our community page.
The choice for a new system fell on Discourse. Discourse is modern forum system which works well on both desktop and mobile devices. It has a lot of nice features:
Conversations and not pages:
Posts are structured by conversations and not spread across multiple pages, avoiding the hassle of constantly clicking to the next page. Instead, you just have to scroll down and the new content loads automatically.
Effective search:
Search now works infinitely better than before. Just type in your search terms
to easily find related posts.

There are also options to search individual topics and apply filters to refine the search to specific dates, categories, tags, users etc. So now it is much easier to find the relevant information without having to make a new topic.
Nice editor with preview:
The editor is really user-friendly. It supports a live preview pane, markdown formatting, math using LaTeX, drag-drop images, and much more. Even if you are not familiar with markdown syntax it is easy to use with the buttons on the toolbar.

Migration to the new forum system
We migrated all posts from the old forum and the user accounts of those who had previously posted on the old forum. However, we were unable to migrate passwords, so you will have to reset your password the first time you log in. Just click the ‘I forgot my password’ link the first time you access the new site.

If you have never used the forum system you will have to create a new user account. The same is true if you now have a new email address or if you just want to start from scratch.
]]>The AnyBody Modeling System (AMS) provides a build-in optimization
class AnyOptStudy, and with it you have the opportunity to solve advanced mathematical optimization problems.
See also: You can get a taste of how it works in the newly updated tutorial on parameter and optimization studies
Extending the optimization
Of course there can be situations were you want to do a little more than what the AMS optimization offers. Say you have two seperate models were you wanted to optimize some parameter across the performance in both models? or perhaps you wanted to use a specific algorithm suitable for your exact problem? To solve these kinds of problems, you could perform the optimization process from a third party software.
In this post we will demonstrate how these problems can be solved using Python. This topic is part of a new Anybody Tutorial which describes the content of this post in detail.
As part of the post we will show how to integrate the Scipy optimization package
Scipy.optimize.minimize by running the Anybody 2D bike model from Python, using the AnyPyTools package.

Optimization example
The process of performing optimization of AMS models through Python can be sketched in four steps:
- Defining a function to call the models using AnyPyTools and extract the designvariables
- Defining a objective function to be either minimized or maximized
- Defining the constraints and bounds of the problem
- Running the optimization
And the whole Python code to complete these four steps could look like this:
    import math
    import scipy
    from anypytools import AnyPyProcess
    from anypytools.macro_commands import Load, OperationRun, Dump SetValue


    def run_model(saddle_height, saddle_pos, silent=False):
        """Run the AnyBody model and return the metabolism results"""
        macro = [
            Load("BikeModel2D.main.any"),
            SetValue("Main.BikeParameters.SaddleHeight", saddle_height),
            SetValue("Main.BikeParameters.SaddlePos", saddle_pos),
            OperationRun("Main.Study.InverseDynamics"),
            Dump("Main.Study.Output.Pmet"),
            Dump("Main.Study.Output.Abscissa.t"),
        ]
        app = AnyPyProcess(silent=silent)
        results = app.start_macro(macro)
        return results[0]


    def objfun(designvars):
        """Calculate the objective function value"""
        saddle_height = designvars[0]
        saddle_pos = designvars[1]
        result = run_model(saddle_height, saddle_pos, silent=True)

        if "ERROR" in result:
            raise ValueError("Failed to run model")

        pmet = scipy.integrate.trapz(result["Pmet"], result["Abscissa.t"])

        return float(pmet)


    def seat_distance_constraint(designvars):
        """Compute contraint value which must be larger than zero"""
        return math.sqrt(designvars[0] ** 2 + designvars[1] ** 2) - 0.66


    constaints = {"type": "ineq", "fun": seat_distance_constraint}
    bounds = [(0.61, 0.69), (-0.22, -0.05)]
    initial_guess = (0.68, -0.15)

    solution = scipy.optimize.minimize(
        objfun, initial_guess, constraints=constaints, bounds=bounds, method="SLSQP"
    )

    print(solution)
Breaking down the sections
To elaborate a little on the sections, the first part defines the run_model
function. This function takes in two arguments and assigns them to the
saddleheight and saddleposition in the AMS model. The function returns the
Pmet value for each timestep in the model.
Details and advanced options of this function and it’s components can be found in the AnyPyTools documentation.
The second part defines the objective function in question. This function takes in a
list of design variable arguments and utilizes the run_model function,
afterwards it integrates the Pmet over the whole time series and returns the
result.
Next up, the constraints and bounds are defined. For this example only a
seat distance constraint is present. The bounds for each of the design
variables is defined in the bounds variable. Lastly, the optimization process is
performed, and here it envokes the SLSQP
algorithm.
For more details and examples of the capabilities of the
Scipy.optimizepackage, follow this
link.
And there we have it. A full optimization of a AMS model, and a easy template to build other and more advanced optimization processes upon.
Try it now: Make sure to try out the full AMS tutorial here.
This post is hosted on GitHub, feel free to provide feedback here.
]]>When working with subject specific scaling of models, it can be a valuable tool to know what the strength of your model is for a given posture. With strength we mean the maximum permissible load that the model can carry in a given posture. This post will show you a way of calculating the maximum strength of a simple 2D arm model in various postures. The concepts presented can of course be extended to models involving the full body model or parts of it.

For us to do so, we first need to setup an example model. The model is a 2D arm model comprised of an upper and lower arm segment, attached with 8 simple muscles (fig. 1). The model is constraint to only allow movement in the global x and y direction. This allows us to impose movements which resembles flexion and extension of the shoulder and elbow joint. Further, we want to show a general way of calculating the strength independent of the movement, we therefore set up four load scenarios to mimic a flexion, extension, push, and pull movement.
Since we want to investigate maximum strength, we need to be sure that the
muscles are recruited appropriately. This is done by switching to the
MinMax_Strict muscle recruiter in the study section of our model. For more
information on muscle recruitment in the Anybody Modelling software, se this
tutorial.
The first step in finding the default maximum strength for a posture, is to know
the relationship between load and MaxMuscleActivity ( \(m_{act}\) ). We
can do this by implementing a parameter study to investigate the \(mmact\) across
a spectrum of loads. This is done using the AnyParamStudy class as seen below:
  AnyParamStudy StrengthEval =
  {
    Analysis = {AnyOperation& Opr = ..ArmStudy.InverseDynamics;};
    nStep = {100};

    AnyDesVar load =
    {
      Val = Main.ArmModel.Loads.Dumbbell.load;
      Min = 0;
      Max = 250;
    };

    AnyDesMeasure maxact =
    {
      Val = max(Main.ArmStudy.MaxAct());
    };
  };
This study runs our model through the loads defined in the \(load\) variable. So, in this example it does 100 steps where it starts at 0 N and stops at 250 N. This enables us to plot the \(m_{act}\) as a function of the load. By running the parameter study for all four load scenarios we end up with a graph as seen in fig. 2.

We can see that for very low loads there might be other factors than the applied load affecting the relationship. If we dwell by this fact and wonder why this could be, we could infer that the influence of gravity and segment mass could interfere with the relationship between \(load\) and \(m_{act}\). This means that when applying low external loads, the important factor in \(m_{act}\) is the mass of the moved segments, and the gravity imposed on those segments.
The graphs on fig. 2 also tells us that for high loads there is a linear relationship between load and \(m_{act}\), and the linear part is crossing $m_{act} = 1$ for all scenarios. We can use this information to calculate the maximum strength of the model. If we look at the equation for a linear function it looks like this:
\[\begin{equation} \label{eq:1} m_{act} = a * load + \ b \end{equation}\]Where \(a\) is the slope of the function, and \(b\) is the intercept with the y-axis. The slope of the linear part can be calculated using only two points and applying the equation:
\[\begin{equation} \label{eq:2} a = \frac{(m_{act_{2}} - m_{act_{1}})}{(load_{2} - load_{1})} \end{equation}\]Now that we know the coordinates of two points and the slope, we can start figuring out what the load is for an activity of 1 ( \(m_{act} = 1\) ). For this we again look at equation \(\eqref{eq:2}\), only this time we know the slope, the point $(load_{1},m_{act_{1}})\(, and the\)m_{act}$ coordinate, which should be equal to 1. We are therefore interested in finding the corresponding $load_{max}\(. We rearrange equation\)\eqref{eq:2}$, into:
\[\begin{equation} \label{eq:3} load_{max} = \frac{1}{a} - \frac{m_{act_{1}}}{a} + load_{1} \end{equation}\]This allows us to evaluate what the maximum load \(load_{max}\) is, that the model can support for a given posture. To check our results, we can calculate the maximum strength for our four scenarios using equation \(\eqref{eq:3}\) and try to implement the output load in our models. Table 1. shows the calculated strengths of the models, and the \(m_{act}\) when applying the \(load_{max}\) values.
| Movement | \(Load_{max}\) (N) | New \(m_{act}\) |
|---|---|---|
| Extension | 70.97891372 | 1.0 |
| Flexion | 78.33099967 | 1.0 |
| Push | 93.43104145 | 1.0 |
| Pull | 113.1664796 | 1.0 |
Table 1: Calculated \(load_{max}\) and new \(m_{act}\) for each movement.
Now we can calculate the maximum load for any given posture!
Find the code on GitHub
The AnyScript example which shows the concept of finding the maximum strength is available on GitHub.
]]>Digital Object Identifiers (DOIs) are the foundation of references and metrics in the world of academia. With the release of AMMR 2.1.1 we have also added a DOI to the AnyBody Managed Model Repository (AMMR):
![]() .
.
The DOI for the AMMR are issues by Zenodo, which is an European Open Science platform hosted at CERN. If you click the link above you will be directed to the side shown below.

Archived versions
The DOI above always links to the newest version of the AMMR. That is called a concept DOI, and is useful if you want to cite all version of the AMMR. However, the AMMR is updated regularly, and we would often like to cite a specific version of the AMMR. Luckily, Zenodo supports DOI versioning, and every version of the AMMR has their own DOI.
| Version | DOI | ReleaseData |
|---|---|---|
| All versions | 10.5281/zenodo.125076 | |
| AMMR-2.1.1 | 10.5281/zenodo.1287730 | June 12, 2018 |
| AMMR-2.1.0 | 10.5281/zenodo.125127 | March 25, 2018 |
| AMMR-2.0.0 | 10.5281/zenodo.1251274 | November 30, 2017 |
| AMMR-1.6.6 | 10.5281/zenodo.1250765 | March 13, 2017 |
See also: The complete list of releases on Zenodo.
Once a DOI is created Zenodo also archives all the associated files to ensure data is never changed or lost. This effectively means that you can now also download all archived versions of the AMMR directly from Zenodo.
Citing the AMMR
DOI’s will also help you cite the AMMR and specify exactly which version the AMMR you use. This is really important for scientific publications so others can reproduce your results. The DOI ensures that others can be confident that they get the exact version of the AMMR that you used. Once a DOI is minted the underlying files can’t be changed. So DOIs are also essential for traceability.
Zenodo will even generate the correct citation style for all journals.

Here is an example of how to cite the AMMR v.2.1.1 for Journal of Biomechanics:
How to cite:
Morten Enemark Lund, Søren Tørholm, & Moonki Jung. (2018, June 12). The AnyBody Managed Model Repository (AMMR) (Version 2.1.1). Zenodo. http://doi.org/10.5281/zenodo.1287730
More research output
You can find more research output from AnyBody Technology on the AnyBodyTech Zenodo community page.
]]>Join us for the launch of version 7.1 of our musculoskeletal simulation software - The AnyBody Modeling System, and a new version of the AnyBody Model repository (AMMR 2.0).
In this webcast, Morten Enemark Lund, R&D Engineer at AnyBody Technology, will the new software features and the exciting new model repository which is shipped with version 7.1.
THe features include:
-
New lower extremity model (TLEM2.1)
-
New framework for MoCap models (AnyMoCap)
-
New Manidble model
-
New calibration scheme
-
Numerous updates to body models and example applications.
With the release of the AnyBody Modeling System 7.1 update, we thought it was time to make a post about all the improvements in the new model repository.
The AnyBody Managed Model Repository (AMMR) version 2.0 marks the culmination of a huge task to update our existing models and adding new models and examples.
New AMMR documentation
New Tutorials
AnyMoCap
New Lower Extremity model (Version 2.1)
Future work
Of course we are not done. There are new model developments in the pipeline, and some of the improvements to the structure of the lower extremity model we would also like to do for the upper body.
A little history
The tutorials used to live as compiled HTML (CHM), a binary format for a documentation system called Microsoft HTML Help. You find this kind of help resources in many older Windows Programmers.
Today it may look old fashioned, but it was the best choice for distributing documentation in 2003 when the first version of AnyBody emerged.
Microsoft has since discontinued the HTML Help system. Today there are much better options for software documentation which makes it easier to both use the tutorials and maintain them.
Sphinx for software documentation
Sphinx is a tool for generating software documentation. The Python community originally developed it for creating the documentation for the Python programming language. Today it is widely used in many different domains. The Linux community recently (2016) chose Sphinx as the new documentation system for the Linux kernel. Sphinx is well maintained and actively developed, and very easy to use.
Sphinx converts reStructuredText files into HTML, pdf, epub or other formats. reStructuredText is simply plain text files with extra simple markup to define headers and other types of formatting.
A reStructuredText file could look like this:
Lesson 2: Advanced Concepts
===========================

Open the model from lesson 1 and change the following lines:

.. code-block:: AnyScript

    InverseDynamics.Criterion = {
      Type = §MR_Polynomial§;
    };

Now we have specified polynomial muscle recruitment, which
comes down to the following objective function:

.. math:: G = \sum_{i} \left( \frac{f_i}{N_i} \right)^p

We have not, however, specified what the power *p* is. In the
absence of a specification, AnyBody assumes *p* = 3, If we
reload and rerun the model now, we get the following result:

.. figure:: _static/lesson2/chart1.png
   :scale: 50 %

   Results with 5 order Polynomial muscle criterion.
Having the tutorials as plain text, may at first seem like a disadvantage. The AnyBody tutorials are currently stored as Word documents. But reStructuredText has many advantages as well.
- Better control of formatting and style
- Easier tracking of updates and changes
- Pictures and images live outside the document
- Makes it easier to accept contribution from users
Finally, MS Word can still be used when writing new tutorials. The *.docx file
can be converted into reStructured text using the Pandoc
document converter. Pandoc can convert tables, any formatting, embedded images
into reStructuredText. Pandoc even converts equations from MS Word into Latex
style formulas which work in reStructuredText files.
Hosting tutorials on GitHub
The new source files for tutorials are hosted on the AnyBody Github account togehter with the build HTML files.
-
Source files: https://github.com/AnyBody/anybody-tutorial
-
Web page: https://anyscript.org/tutorials/dev
Contributions are always welcome! So if you find typos, missing links or anything else help us fix it. It is easy. Just fork the repository on GitHub, make the changes, and issue a pull request.
Every pull request is automatically tested, to ensure that Sphinx builds the tutorials without errors. This done using Travis CI
- See status of the Travis CI build:
 .
.
Once a change is accepted and merged into the repository the script also automatically deploys the tutorial web page.
]]>With the release of the AnyBody Modeling System 7.1 update, we thought it was time to make a post about all the improvements in the new model repository.
The AnyBody Managed Model Repository (AMMR) version 2.0 marks the culmination of a huge task to update our existing models and adding new models and examples.
New AMMR documentation
Future work
Of course we are not done. There are new model developments in the pipeline, and some of the improvements to the structure of the lower extremity model we would also like to do for the upper body.
A little history
The tutorials used to live as compiled HTML (CHM), a binary format for a documentation system called Microsoft HTML Help. You find this kind of help resources in many older Windows Programmers.
Today it may look old fashioned, but it was the best choice for distributing documentation in 2003 when the first version of AnyBody emerged.
Microsoft has since discontinued the HTML Help system. Today there are much better options for software documentation which makes it easier to both use the tutorials and maintain them.
Sphinx for software documentation
Sphinx is a tool for generating software documentation. The Python community originally developed it for creating the documentation for the Python programming language. Today it is widely used in many different domains. The Linux community recently (2016) chose Sphinx as the new documentation system for the Linux kernel. Sphinx is well maintained and actively developed, and very easy to use.
Sphinx converts reStructuredText files into HTML, pdf, epub or other formats. reStructuredText is simply plain text files with extra simple markup to define headers and other types of formatting.
A reStructuredText file could look like this:
Lesson 2: Advanced Concepts
===========================

Open the model from lesson 1 and change the following lines:

.. code-block:: AnyScript

    InverseDynamics.Criterion = {
      Type = §MR_Polynomial§;
    };

Now we have specified polynomial muscle recruitment, which
comes down to the following objective function:

.. math:: G = \sum_{i} \left( \frac{f_i}{N_i} \right)^p

We have not, however, specified what the power *p* is. In the
absence of a specification, AnyBody assumes *p* = 3, If we
reload and rerun the model now, we get the following result:

.. figure:: _static/lesson2/chart1.png
   :scale: 50 %

   Results with 5 order Polynomial muscle criterion.
Having the tutorials as plain text, may at first seem like a disadvantage. The AnyBody tutorials are currently stored as Word documents. But reStructuredText has many advantages as well.
- Better control of formatting and style
- Easier tracking of updates and changes
- Pictures and images live outside the document
- Makes it easier to accept contribution from users
Finally, MS Word can still be used when writing new tutorials. The *.docx file
can be converted into reStructured text using the Pandoc
document converter. Pandoc can convert tables, any formatting, embedded images
into reStructuredText. Pandoc even converts equations from MS Word into Latex
style formulas which work in reStructuredText files.
Hosting tutorials on GitHub
The new source files for tutorials are hosted on the AnyBody Github account togehter with the build HTML files.
-
Source files: https://github.com/AnyBody/anybody-tutorial
-
Web page: https://anyscript.org/tutorials/dev
Contributions are always welcome! So if you find typos, missing links or anything else help us fix it. It is easy. Just fork the repository on GitHub, make the changes, and issue a pull request.
Every pull request is automatically tested, to ensure that Sphinx builds the tutorials without errors. This done using Travis CI
- See status of the Travis CI build: .
Once a change is accepted and merged into the repository the script also automatically deploys the tutorial web page.
]]>Anyone, who works with AnyBody modeling system has at one time used the AnyBody tutorials. They are a valuable resource when learning to use the AnyBody Modeling System and there are more than 15 different tutorials covering everything from ‘Getting Started’ tutorials for the new users to very advanced topics like force dependent kinematics and FEA interfaces.
Today, we are releasing a new web based version of the tutorials.
A little history
The tutorials used to live as compiled HTML (CHM), a binary format for a documentation system called Microsoft HTML Help. You find this kind of help resources in many older Windows Programmers.
Today it may look old fashioned, but it was the best choice for distributing documentation in 2003 when the first version of AnyBody emerged.
Microsoft has since discontinued the HTML Help system. Today there are much better options for software documentation which makes it easier to both use the tutorials and maintain them.
Sphinx for software documentation
Sphinx is a tool for generating software documentation. The Python community originally developed it for creating the documentation for the Python programming language. Today it is widely used in many different domains. The Linux community recently (2016) chose Sphinx as the new documentation system for the Linux kernel. Sphinx is well maintained and actively developed, and very easy to use.
Sphinx converts reStructuredText files into HTML, pdf, epub or other formats. reStructuredText is simply plain text files with extra simple markup to define headers and other types of formatting.
A reStructuredText file could look like this:
Lesson 2: Advanced Concepts
===========================

Open the model from lesson 1 and change the following lines:

.. code-block:: AnyScript

    InverseDynamics.Criterion = {
      Type = §MR_Polynomial§;
    };

Now we have specified polynomial muscle recruitment, which
comes down to the following objective function:

.. math:: G = \sum_{i} \left( \frac{f_i}{N_i} \right)^p

We have not, however, specified what the power *p* is. In the
absence of a specification, AnyBody assumes *p* = 3, If we
reload and rerun the model now, we get the following result:

.. figure:: _static/lesson2/chart1.png
   :scale: 50 %

   Results with 5 order Polynomial muscle criterion.
Having the tutorials as plain text, may at first seem like a disadvantage. The AnyBody tutorials are currently stored as Word documents. But reStructuredText has many advantages as well.
- Better control of formatting and style
- Easier tracking of updates and changes
- Pictures and images live outside the document
- Makes it easier to accept contribution from users
Finally, MS Word can still be used when writing new tutorials. The *.docx file
can be converted into reStructured text using the Pandoc
document converter. Pandoc can convert tables, any formatting, embedded images
into reStructuredText. Pandoc even converts equations from MS Word into Latex
style formulas which work in reStructuredText files.
Hosting tutorials on GitHub
The new source files for tutorials are hosted on the AnyBody Github account togehter with the build HTML files.
-
Source files: https://github.com/AnyBody/anybody-tutorial
-
Web page: https://anyscript.org/tutorials/dev
Contributions are always welcome! So if you find typos, missing links or anything else help us fix it. It is easy. Just fork the repository on GitHub, make the changes, and issue a pull request.
Every pull request is automatically tested, to ensure that Sphinx builds the tutorials without errors. This done using Travis CI
- See status of the Travis CI build: .
Once a change is accepted and merged into the repository the script also automatically deploys the tutorial web page.
]]>Visual Studio Code(VS Code) is one of the newest text editors to join the group of new powerful source code editors like Atom, Sublime Text and brackets. All of which have become extremely popular in recent years.
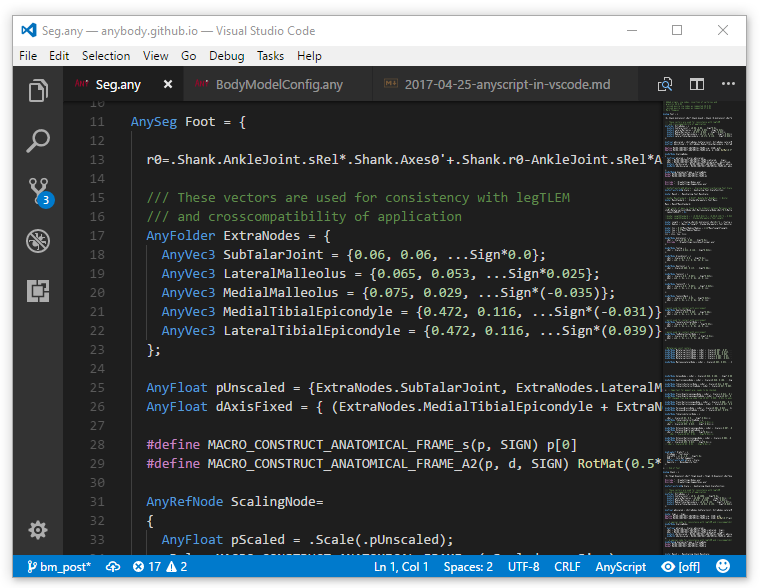
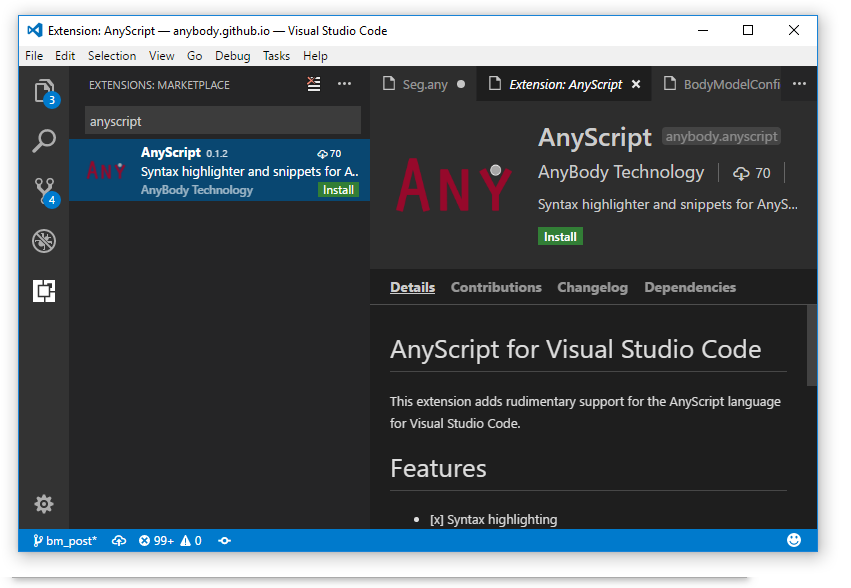
Visual Studio Code is currently my favorite text editor. It is cross-platform, lightweight, extensible and powerful. So of course I want to use it when working with AnyScript. In this post I will show a new AnyScript extension for VSCode, that does syntax highlighting, code folding, and snippets.
This is the second post in our series on using external editors for AnyScript. In the first post) I showed a handy extension for Notepad++, so if you use Notepad++ check that post.
Visual Studio Code
Visual Studio Code or VS Code is a source code editor developed by Microsoft for both Windows, Linux and MacOS. It is free, open source and includes a lot of advanced features for working with source code. It is also very customizable so users can change themes, keyboard shortcuts and much more.
VS code looks a little different from traditional Windows programs, but it is easy enough to use. The simple looks deceives. VS Code has all the same features as for example Notepad++, and if you miss a certain feature VS Code has a good extension system. So the chances are that there is a user contributed extension to help your specific need.
AnyScript Extension
In the screen shoot above shows a file with AnyScript syntax highlighting. Highlighting in AnyScript files works as soon as the AnyScript extension is installed. It is easy to install. Just click the extension icon at the bottom of left sidebar and search for AnyScript. Then click install.
Syntax highlighting and code folding
Once the extension is installed the all AnyScript files will have highlighting.
THe plugin also gives you code folding, which allows you to collapse classes and folders. A feature which is really handy when working on large files.
VS hCode supports code snippets which are templates that makes it easier to write
repeating code patterns. This part isn’t fully supported by the extension yet.
But I have added few snippets for the following classes and functions:
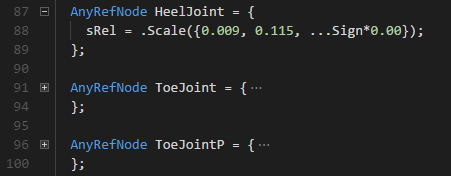
AnyDrawRefFrame, AnyRefNode, RotMat, AnyFunConst, AnyFolder,
AnyKinMeasureOrg, AnyKinRotational.
The snippet inserter is activated by pressing ctrl-shift-P and then writing
insert snippet. Note: you need to be in a AnyScript file to get the AnyScript
snippets.
Snippets can also be inserted using the tab completer. So if you start to type
the name of the class e.g. AnyDrawRe and press tab the snippet is inserted.
The snippets are just meant as a test, but hopefully we can have snippets for all the AnyScript classes in the future.
Help make the extension better
Here is an link to page where the extension live: https://github.com/AnyBody/vscode-anyscript. Any improvements and help is most appreciated.
]]>In this post, I will show a new AnyScript class template to add range-of-motion limits to Human body model.
The implementation consist of two AnyScript class templates. A high
level class template RangeOfMotionLimits which makes it easy to add
Range-of-motion limits to all the joints on the Musculoskeltal model.
Behind the scenes the high-level template uses a more generic low-leve template
KinLimitsDriver, which can add limits to any kinematic measure.
Usage:
To use the high level class template RangeOfMotionLimits you must first
include the file in which it is defined.
Add #include "../path/to/RangeOfMotionLimits_template.any" in the beginning
of your main file. Then create the RangeOfMotionLimits class inside Main after
the human model is included in the model:
#include "../path/to/RangeOfMotionLimits_template.any"

Main = {

  // It is important that the human model is include
  // before the JointLimit template. This is to ensure
  // that all BM statements are defined.
  #include "<ANYBODY_PATH_BODY>/HumanModel.any"


  RangeOfMotionLimits ROM_Limits(
      ARM_RIGHT = BM_ARM_RIGHT,
      ARM_LEFT = BM_ARM_LEFT,
      LEG_RIGHT = BM_LEG_RIGHT,
      LEG_LEFT = BM_LEG_LEFT,
      TRUNK_NECK = BM_TRUNK_NECK
   ) = {
      // Example of changing af few of the limits
      Limits.Trunk.PelvisThoraxExtension = {-90, 90};
      Limits.Right.ElbowPronation = {-90, 90};
   };
If some joint should not have range of motion limits, the class accepts arguments for disabling individual joint limits:
  RangeOfMotionLimits RoMLimits(
    PELVIS_THORAX_LATERAL_BENDING = "Off"
    ...
Find the code on GitHub
The AnyScript template is hosted on GitHub,
where you can find examples and documentation on the
class_template and the options which are available.